


It would be nice to jump right into human flags, pistol squats, hand stands walks, and muscle-ups like the Kavadlo brothers. But can you even frog stand?
The sad thing is, you probably can’t. And despite your chiseled arms and massive legs, you’d probably struggle with most of the introductory gymnastic moves.
Why?
Because you’re big and heavy, and supporting your bodyweight is tough enough as it is. Plus, your training focuses on absolute strength and mass, and less on flexibility and function.
So What Do You Do?
Well, you don’t get smaller, as clearly that’s not your goal. And you don’t stop lifting, as you love it, and you’ve worked damn hard on those gains.
So, you get better…by practicing! That’s half the battle when it comes to these challenging calisthenics movements.
The problem is, this requires a huge ego check that many of you reading this will not want to embrace. Let’s face it, no matter how much you hear about the benefits of incorporating these bodyweight resistance exercises into your training regimen, you’re afraid of looking foolish. Which is sad, when you realize:
The guys and girls that work on these exercises regularly can usually walk into a gym and press and pull two and three times their bodyweight (with little to no experience).
RELATED: Passive vs Active: Why Your Plank Sucks (Plus Two Tips for Making it Better)
For those that can step out of the comfort zone, and understand that progression is the goal (just like when you first started lifting), the favorable side effects are quickly recognized — whether that’s increasing your range of motion in the squat, improving your overhead pressing strength, or even getting rid of some nagging pains and strains in your shoulders and hips.
This is the goal: not only opening your eyes to bodyweight resistance, and progressing towards some extremely impressive feats of strength, but making you a better all-around lifter.
Where to Start?
The eight introductory exercises below are not designed to replace your current regimen; they’re designed to compliment it. And yes, you will suck at them at first.
But along with having an increased level of respect for the Gymnastic Gods, you’ll quickly recognize the benefits of including them in your training regimen.
Start basic, focus on activation more than duration, and remember — it’s all about control!
1. Body Rocks (Prone and Supine)
These are first, because they serve up a nice slice of humble pie, that says “Sorry bro, you’re not really that fit.” And unfortunately, it doesn’t get better with consecutive bites.
That is, until you start experimenting with them regularly.
Usually the Hollow Body Rocks (supine, or face-up) give people more problems, because years and decades of lifting never really taught them how to tilt their pelvis posteriorly (round their back), leaving them in an over-arched position, and making the sea-saw back and forth challenging and sometimes painful.
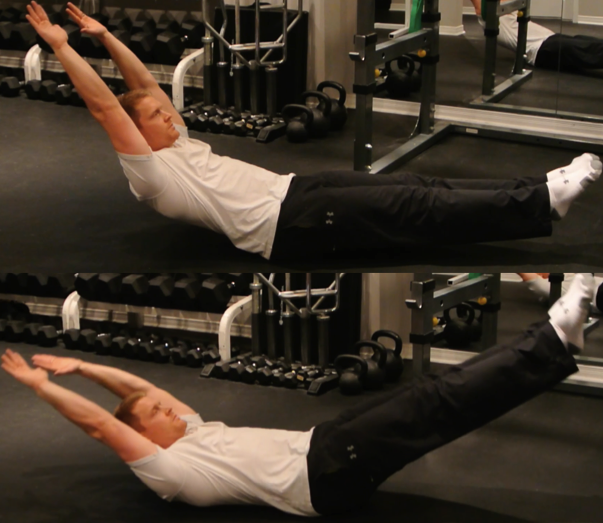
But that’s not to say the Arch Body Rocks (prone, or face-down) are not equally as challenging. Since glute activation is often poor or non-existent, and anterior-dominated daily lives (and mirror-dominated lifting regimens), leave many of us with the shoulder flexibility of a four-legger.
In both cases (arch and hollow), the only way to get better is to ‘do.’ Which starts with perfecting your ability to fully activate the muscles being worked throughout the entire duration.
For the supine body rocks, this means squeezing and tucking your butt so you can feel your lower back pressed against the floor, while reaching with your arms and legs (pointing). And for the prone body rocks, this means firing your glutes (HARD!) and seeking height and distance with your limbs.
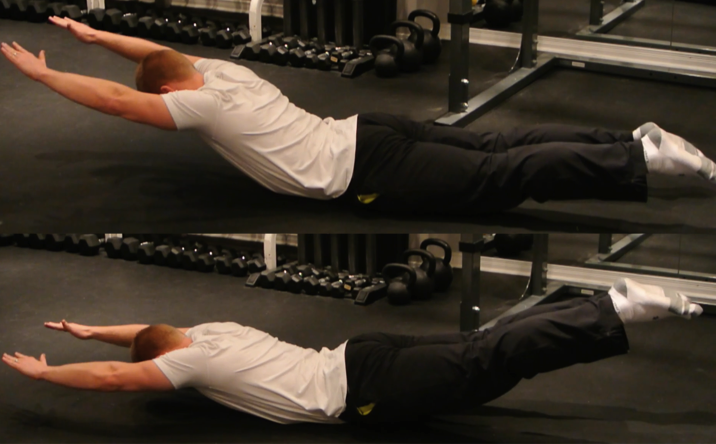
It’s not uncommon to struggle with legs extended at first, especially if you’re taking the ‘quality over quantity’ advice seriously. So, don’t be afraid to move to bent knees with the hollow body rocks, or regress to a hard isometric contraction (instead of a seesaw) with the arched option.
For those with a solid baseline, the next step up is legs spread, followed by some of the more challenging core maneuvers listed below.
2. Frog Stands
As far as introductory gymnastic exercises go, this is as basic as it gets. Which is frightening when you realize how ‘not easy’ Frog Stands actually are…when done correctly.

The frog stand requires great hand placement (fingers spread and weight evenly distributed), toes off the floor and pointed, and a consistent push from the arms to round the upper back. With the eventual goal of getting your knees off your elbows, and working towards getting them extended (i.e. the Planche).
Unfortunately, the ability to do a planche is right up there with benching two times your bodyweight. But, that’s not to say the most basic variations and incremental progressions are not worth pursuing. As very similar to the way you embarrassingly started benching with the bar on Day 1, and have used any and all means necessary (resistance bands, etc) to slowly inch forward, you need to work at it.
What’s interesting, is that those who can do a planche can usually bench 2 times their bodyweight; while those who can bench 2 times their bodyweight are nowhere close to a planche.
3. Elevated Tuck Hold
Potentially the most deceptive way to crush your core; this isometric exercise is a dumbed-down version of the infamous L-sit, which is a staple in gymnastics. It serves as a base-building exercise on it’s own, and acting as the starting position for those talented enough to transition back into a planche and up into a handstand.
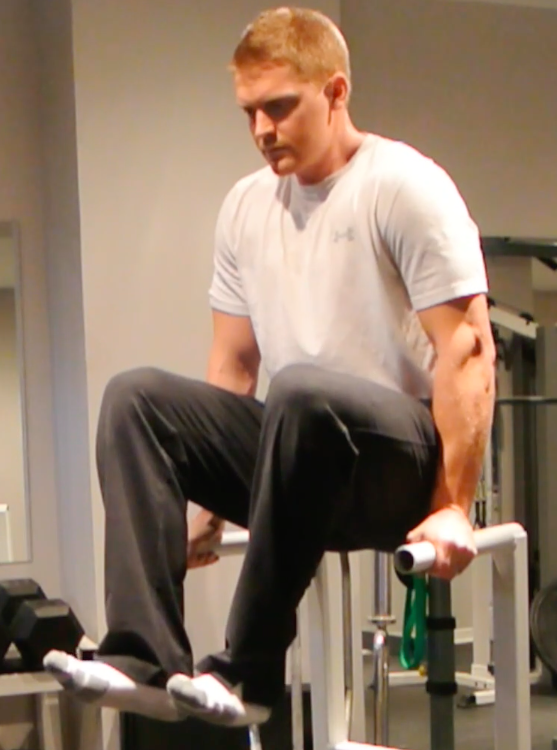
Start with your knees bent and focus on getting them up high and contracting everything to hold them in place. Once you’re comfortable here, you can extend the legs to make it more difficult, followed by bringing yourself closer to the ground until you’re doing an L-sit on the floor.
Swinging back and forth in the tuck hold and trying to pause and activate on either end is also quite effective. Improving your future potential of doing both the L-sit and the planche.
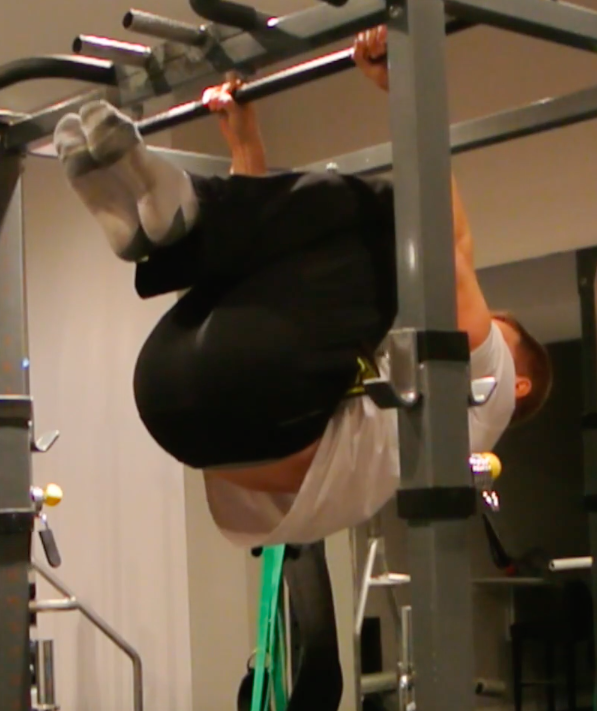
4. Hanging Leg Raises
Sadly, if you’re uncomfortable with the more advanced versions of the hanging leg raise, you’re a long ways away from the challenging gymnastic pulling maneuvers (like the front lever). But what’s more unfortunate is that a lot of lifters aren’t even comfortable with the basic bent-knee raise variations.
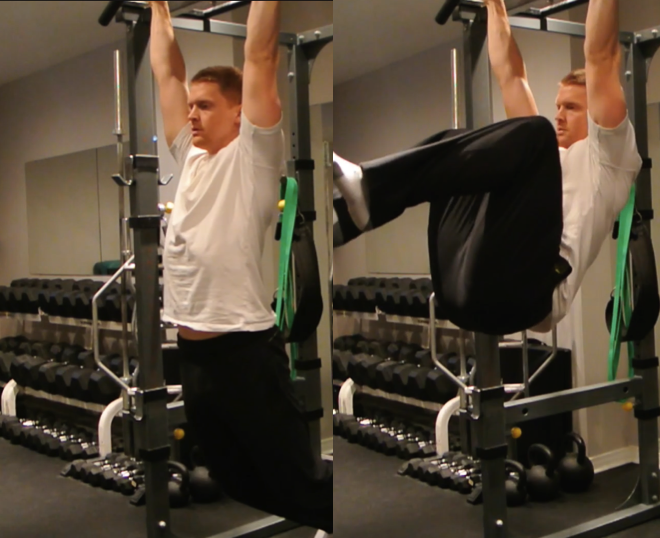
This is a point that’s not to serve as discouragement, but encouragement. If you can’t bring your knees up to your face from a dead hang with ease, it should serve as a red flag that you’ve got A LOT of work to do!
Similar to the elevated tuck hold, the longer the lever the harder the exercise, so get comfortable in a bent position and work your way up to extended legs. After that, you can isolate the top half of the movement (going from parallel up, AKA the Garhammer), or work your way up to a tucked front lever (and the one-leg progressions that follow it).
5. Single-Leg (Airborne) Lunge
As far as embarrassment goes, the Airborne or single-leg lunge is right up there. There are ‘a lot of dudes’ squatting ‘a lot of weight,’ that don’t even come close to the simplest progression of this movement.
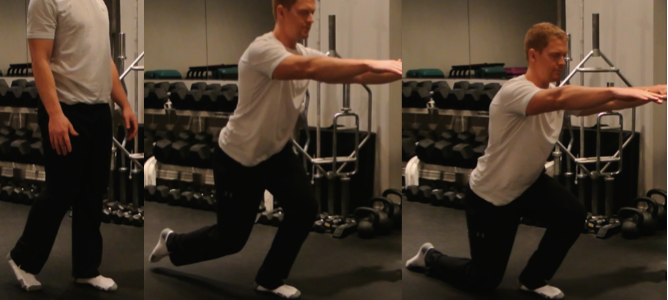
This is predominantly because ALL of their structural imbalances and hypo-mobility are on display for the world to see…and there’s nothing they can do about it.
Generally this happens with straight weightlifters because their prime movers take care of the big compound movements, and the little muscles often don’t get used at all. So, when they’re forced into a situation where they need them, or at least need them to be in unison, failure is the only option.
Aside from actually repping single-leg lunges and working your way through the various progressions to a pistol squat, you’ll want to add more unilateral work to your training, specifically focusing on single-leg exercises that train the glutes and hamstrings (1-leg glute bridge, 1-leg RDL) since the typical Gym-Rat Squatty-Body is quad dominant.
6. Wall-Stand
Similar to the single-leg lunge, the best way to get closer to a handstand is to do handstands — and not the bowed-out banana shaped one you’re doing right now.
A real hand-stand starts with glutes fired, toes pointed, and extended shoulders, that fire simultaneously to project you upright.
Aside from struggling with that (even against a wall), the majority will have trouble maintaining a neutral spine since arching the back seems to be the way our body deals with the unstable environment.
In other words, a solid wall stand takes a lot of practice, so be patient. You’ll know you’re making progress when your feet start gravitating away from the wall. This, not surprisingly, only happens when your hands are pressing, arms are extending, glutes are firing, and toes are pointing.
7. Reverse Plank/Back Bridge
An exercise you definitely won’t be great at is the reverse plank, largely because your shoulder flexibility is lacking, but also because you’re bad at activating your glutes and engaging your core.
This becomes increasingly obvious when you attempt to hold a reverse plank and execute a few alternating leg lifts.
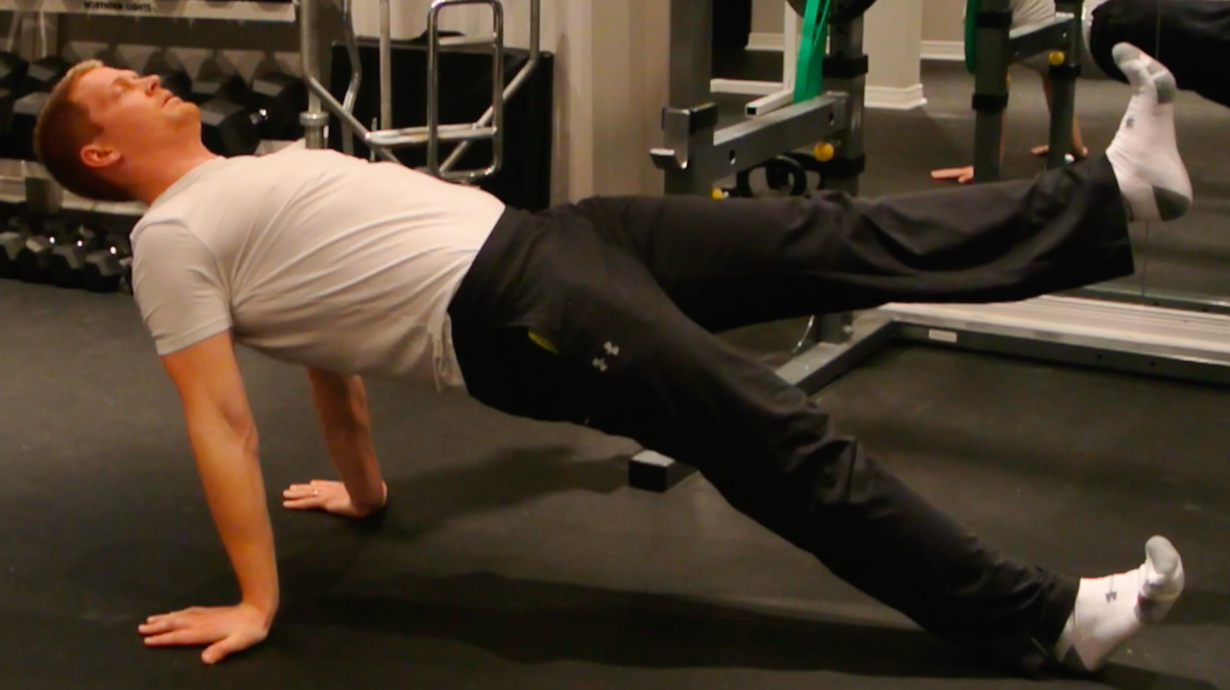
You may be able to ‘get through,’ a few but what’s your form like? Are you able to maintain contracted glutes and a rock solid plank throughout?
Sadly, many of you reading this will struggle just as much with your shoulders as you will with your plank, especially when exploring more difficult variations (from a mobility perspective, like the reverse crab or full-blown back bridge).
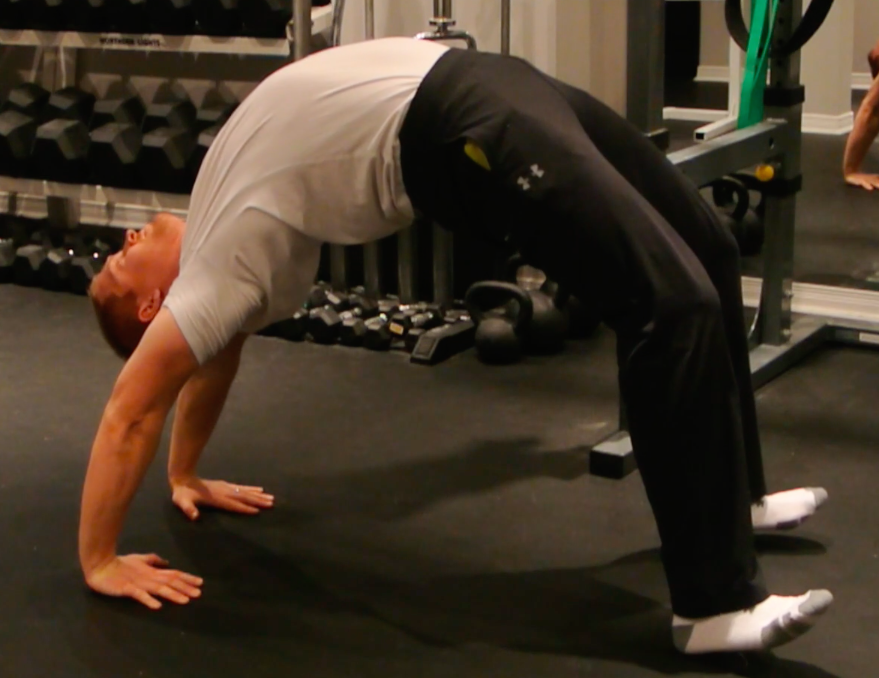
Fortunately, unlike the other seven exercises, you can likely do some form of the most difficult variation (the full back bridge) on Day 1. Although the difference is going to be the quality; similar to the handstand, it’s all about engaging the various muscles simultaneously and seeking full extension.
The flexibility benefits are most noticeable in the pelvis and shoulders. And with our 21-st century bird-necking iPhone practices, you’ll no-doubt notice a stretch between your shoulder blades (thoracic spine).
8. Active Side Planks (Human Flag)
This exercise is last, because there’s always some Bro J. Simpson in the crowd that “ain’t doin sideplanks.” Which is funny, because he’s usually the same guy that can’t do sideplanks.
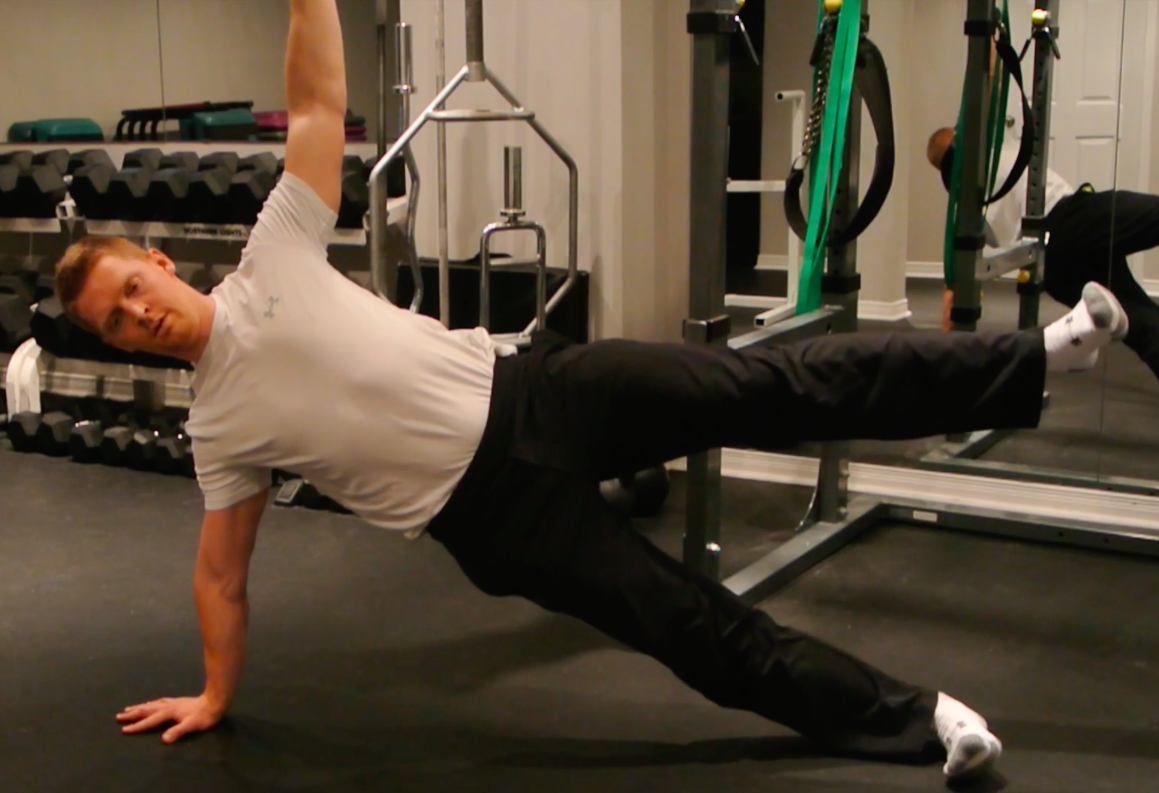
The main reason for doing ‘active’ side planks is to strengthen our lateral resistance, not only so we can hold our ground when life hits us with a Mack truck and avoid weaknesses that prevent us from excelling in the major lifts, but also so we can progress towards one of the ultimate demonstrations of strength: The Human Flag.
Obviously there’s a lot more involved here, that extends well beyond side planks. But there’s also no way you’re doing a Human Flag if you can’t execute the more difficult plank progressions with ease.
Those that fall into this category should also look at incorporating more weighted carries and standing iso-holds into their workouts. Specifically, the one-sided or off-weighted variations that split the body in half and challenge your ability to resist flexion and extension, both at your side and overhead.
Where’s the Finish?
If you’re nowhere close to doing the eight introductory gymnastic moves above, you clearly have some work to do. The end result is at least 10 steps, 100 workouts, and 1000 repetitions from where you are now.
Although, just like you couldn’t bench two plates, squat three plates, or deadlift four when you first started lifting, you’re not expected to do perfect pistols, heroic handstands, and multiple muscle-ups on Day 1.
The Gymnastics Holy Grail:
- The L-Sit
- The Handstand
- The Pistol Squat
- The Planche
- The Front/Back Lever
- The Human Flag
Realistically, most of you reading this will never be able to execute all six. But even if you get pretty close, you’re miles ahead of where you are today.
MORE: Three Burpee Technique Flaws and How to Fix Them
In all cases, mastering these exercises starts with the basic maneuver listed earlier and continuously putting yourself at a mechanical disadvantage to increase the difficulty. When the next step up is too difficult, look for ways to make it easier by shortening your levers, hanging onto something or using a support (like a bench or resistance band).
“It’s not where you start, it’s when you start.”
Similar to most, you’ll be a hater now, and a lover once you nail your first unassisted handstand. Especially when you can show it off at the beach, instead of asking dudes how much they bench.
Mike has been advising on nutrition and fitness for nearly a decade. His success is due in large part to his philosophy - "Transformation Starts with Education.” Not just showing his clients what to do, but teaching them why. Since launching his 3-part book series, he continues to share his knowledge and experience via guest articles, blog posts, social media, and personal appearances. You can learn more about him at http://coachmikeblogs.com.
1 Comment