


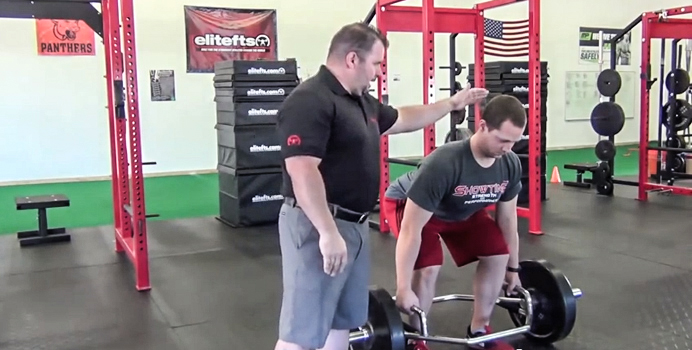
Mark Watts gives a quick tutorial on the Trap Bar Deadlift while the owner of Showtime Strength & Performance Nick Showman demonstrates.
The Trap Bar, otherwise known as the Hex Bar, is an outstanding tool for any strength & conditioning coach. The exercise has multiple benefits for athletes and has a manageable learning curve. Athletes can generally position themselves in a safe and biomechanically advantageous position on a consistent basis with very basic coaching.
The Trap Bar Deadlift is a hybrid exercise between a true hip hinge and a squat exercise. The starting position is similar to the "athletic" or power position of most sports and the arms being in a neutral position can be more natural for some athletes.
A Quick Coaching Guide for The Trap Bar Deadlift
- Foot Position
Feet should be directly under the hips (power stance) with the toes as close to straight-ahead as possible (depending on the athlete). The mid-foot should align with the center of the collar of the bar.
- Set-Up
The athlete should retract and depress the scapula (shoulder blades in the back pockets). Reach down and grip the bar with the back arched and head in a neutral position by pushing the hips back. The middle knuckle should align with the center of the collar of the bar.
- Execution
While keeping a tight position, the athlete should attempt to push the feet through the ground. The shoulders and hips should come up at the same rate of speed until the bar clears the knees (as if someone is pulling you up by your collar and belt). At that point, the hips should be extended so the shoulders, hips, knees, and feet are all "stacked."
5 Common Mistakes made in the Trap Bar Deadlift
- Feet set-up too wide. This could lead to unwanted knee valgus.
- Toes pointed out. This could lead to the knees tracking the toes which will interfere with the neutral arm positioning.
- Foot placement too far forward(stress on low-back) or too far back (weight on toes).
- Shrugging at the top of the pull.
- Pushing the hips forward in an overextended lumbar position
Trouble-Shooting Hand Placement
- Grip should enable the athlete to have their middle knuckle in line with the center of the collar of the bar.
- Tilting of the Trap Bar forward or backward would warrant the athlete to move their hands toward the downward tilt on the next rep.
Trouble-Shooting Foot Placement (front to back)
Assuming there aren't any gleaming technique flaws or posture issues, here are two ways to adjust the foot placement. In general, the middle of the foot should be even with the middle knuckle and collar. This description is a little vague and height, arm length, and leg length will further individualize necessary adjustments.
- If the knees shoot forward, this may be a compensation pattern for the feet being too bar back. This would force the athlete to push through the balls of the feet and toes.
- If the hips rise or knees straighten faster than the shoulders, this may be a compensation pattern for the feet being placed too far back. This may force the athlete to shift the center of gravity in order to produce force.
5 Week Cycle for the Trap Bar Deadlift
- Week 1: Use a 4-6 Rep Auto-Reg Set to find a Working Max
- Week 2: 85% x 5, 4, 3, 2, 1
- Week 3: 90% x 3, 2, 1, -10% x 4
- Week 4: 80% for 10 singles w/ 30 sec. RI
- Week 5: Work up to a 1-3RM
Elitefts™ Trap Bar
Elitefts™ 2" Fat Trap Bar
http://www.elitefts.com/catalogsearch/result/?q=trap+bar
It's also worth mentioning that this lift loads less on the lumbar spine. Because of this, the Trap Bar Deadlift is great for athletes with hamstring flexibility issues or those who want to decrease back stress.
Keep 'em coming!
Great points about lumbar stress and hamstring flexibility. I think anytime you can distribute the COG over the mid-foot, it's going to reduce that stress. Thanks for the comment.
Mark
And forgive me if I'm wrong, but I believe a veteran. If so, thank you for your service.