The side plank is an exercise that's often only thought of as an "abdominal exercise." Although that's not necessarily wrong, this abdominal exercise tends to come with poor movement execution, suboptimal respiration patterns, and random exercise prescription. The fact is that a side plank can be utilized as a powerful movement to program to improve performance and decrease pain when the correct intent backs it.
In this article, I will discuss the following concepts:
- Exercise Intention
- Human Body Asymmetry Overview
- Successful Side Plank Setup
- Successful Side Plank Coaching
- Three Alternatives to the Side Plank
If you're a visual learner, click the video below to watch the same topics!
YouTube

Exercise Intention
No matter the exercise, you always need to understand the intent behind your choice. Then, make it specific to your patient's patterns, structure, and limitations instead of resorting to random exercise prescriptions. Ultimately, when your intent aligns with your execution, your exercise selection becomes purposeful, powerful, and life-changing for your patient.
The aim of programming the side plank for this article is to improve the patient's structural limitations and asymmetries. These dysfunctions are why the patient is sitting in front of you in the first place—they've created pain. Overall, Postural Restoration Institute pioneered improving our professions' awareness of these patterns related to human asymmetries. As a result, we now understand, appreciate, and respect the presentations they create.
Human Body Asymmetry Overview
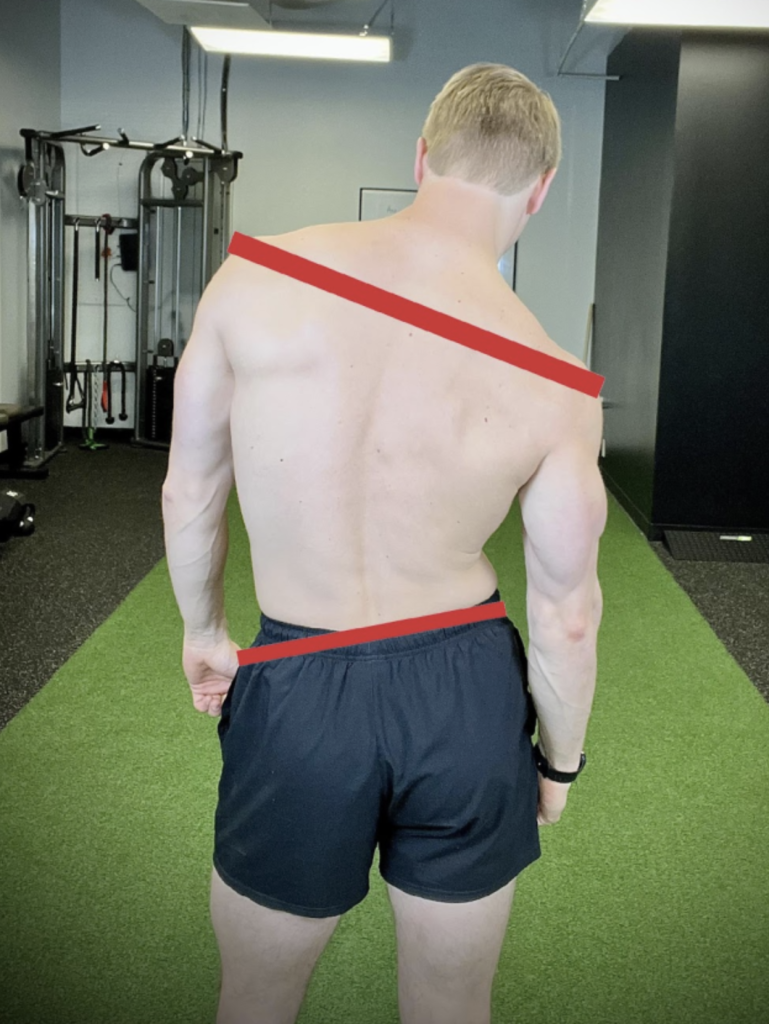
We have an innate right-sided, over-dominate pattern in the pelvis. This right-sided bias is a result of an internal right versus left asymmetry. Some of the most notable contributors include a bigger diaphragm, liver, and lungs on the right. These positional asymmetries result in a pattern that pulls us into these specific expectations related to respiration, muscle imbalance, and postures. The common theme we will see with our patients is a pelvis on the right that is biased towards internal rotation (pulled back), with the spine relatively turning towards the left.
Thorax Relative Motion
Due to the internally rotated biased position of the right pelvis, the thorax turns to the left in one of two ways.
1) It remains in the same spot, but because the right side of the pelvis moved back, the thorax would be relatively turning to the left.
2) It can drive compensatory motion to the left. This higher-intensity turn to the left happens due to the right pelvis but is often seen in more patterned individuals.
Regardless of the patient's position, the big takeaway is that they usually turn towards the left at the spine.
YouTube
Common Dysfunctional Postures
As you can imagine, these asymmetries will demonstrate to us as postural "dysfunctions." Common postural patterns include:
- A right pelvis back (IR) | a left pelvis forward
- A right shoulder depressed | a left shoulder elevated
- A spine turning towards the left
- A left rib flare
How do we manage these postures? By performing assessments with intent.
If your evaluation is performed with intent, you'll be able to find and comprehend these asymmetries before ever seeing them move. As a quick side note, we go into significant detail about finding these patterns, assessing infrasternal angles, and improving your assessment confidence in the Performance Redefined Course.
The right twist of the pelvis and the left twist of the spine typically produces a left rib flare. The problem with the left rib flare is the eccentric orientation at the left obliques. This rib flare creates weakness, respiration dysfunction, and decreased performance from the inability to compress and attain leverage on the left bucket handle (lower ribcage). So, when you're met with this presentation, you can strategically prescribe a left-side plank to address these limitations.
Successful Side Plank Setup
Left VS Right Setup: With our patients' high chance of asymmetries, we likely need to make modifications to ensure exercise success. We typically want to perform the side plank on the left and avoid the right. Why? Think of it like we need to "catch the left side up to the right." The right side is already compressed and strong, so we need to improve the position of the left obliques to build strength through compression. Ultimately, the compression on the left side improves all aspects of performance.
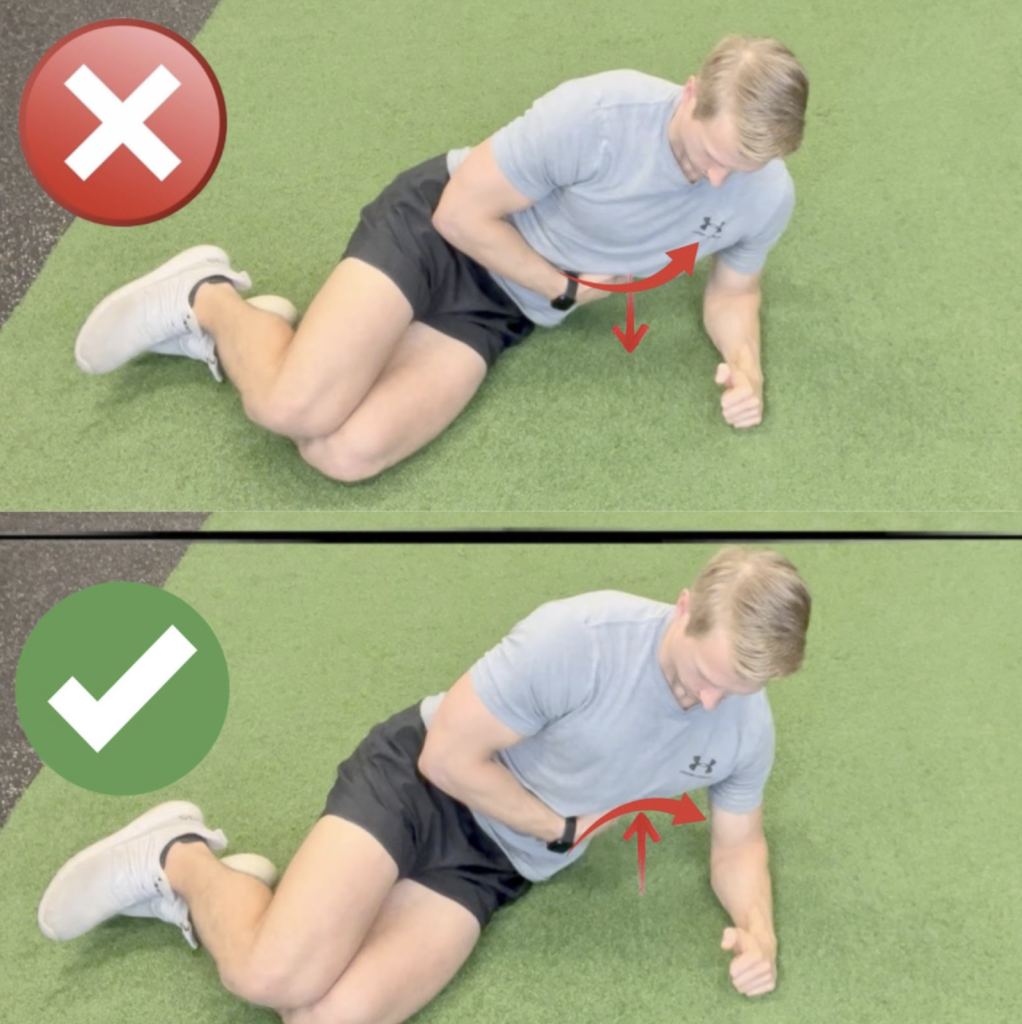
Load the Shoulder Blade: Once you're in the side plank position, you want to ensure that you are loading the shoulder blade. Too often, the patient's side planks are cut short due to anterior shoulder pain. This problem transpires to their natural tendency to have more shoulder elevation on the right from poor breathing patterns, suboptimal exercise techniques, and poor overall movement habits.
To remove the bias of the anterior shoulder, cue your patient to push through their elbow down into the ground (scapular depression), followed by a slight retraction by pulling back the shoulder blade/humerus (scapular retraction).
Requirement: Your patient must feel their shoulder blade muscles "working" before moving to the next step.
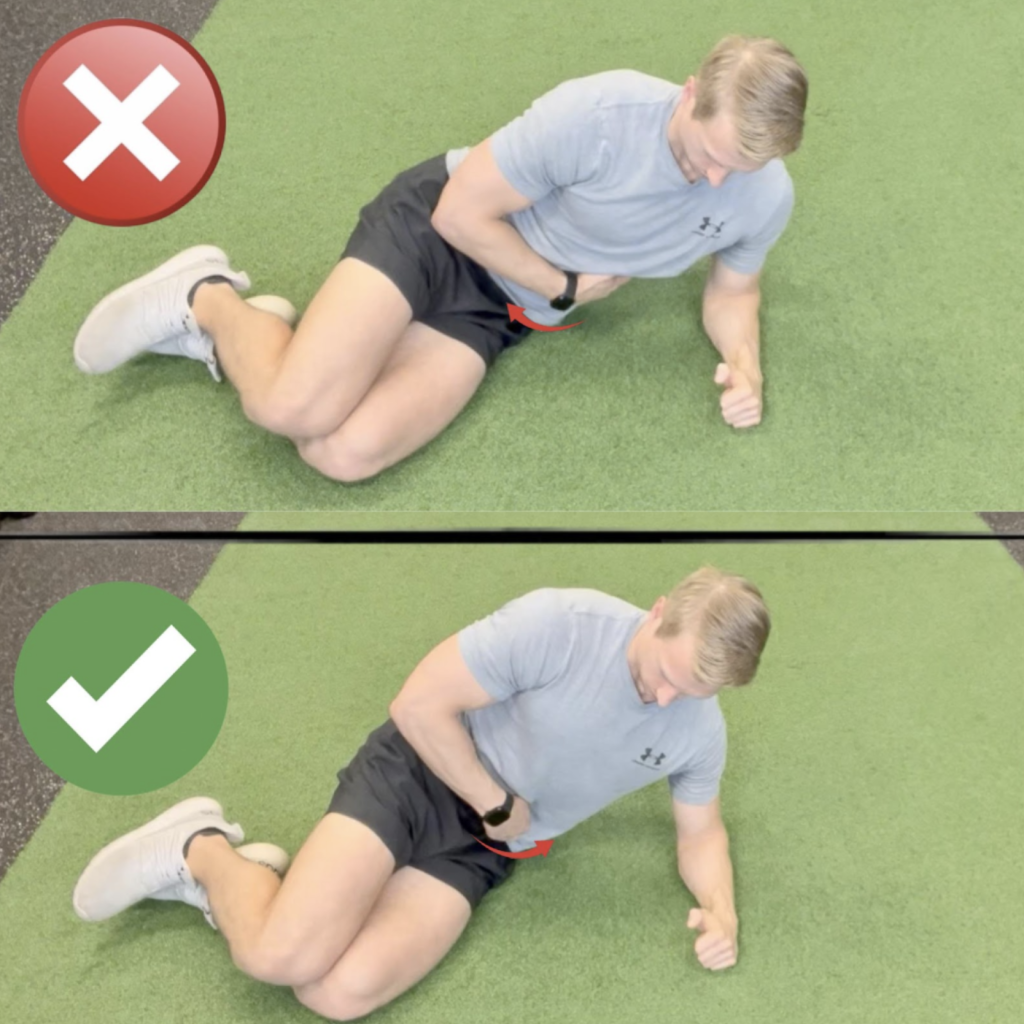
Elevate the Left Rib Cage: Remember, most patients are biased toward an expanded, open rib cage on the left. This expansion is why we need to compress and feel the obliques contract before any movement occurs during a side plank. So, now that we have the left shoulder blade muscles working, it's time to elevate the left rib cage. Have your patient wrap their right arm around the rib cage and cue them to "lift the left rib cage towards the ceiling." At this point, you must see their rib cage elevate, creating a concave representation at the left rib cage and a convex structure at the right.
Requirement: Your patient must feel their left obliques turn on without losing their left shoulder blade muscles from the previous step.
Belt Buckle: Now that we have stability through the left shoulder blade and compression at the left rib cage, we must ensure that the pelvis and the ribs are optimally positioned. We achieve this by cueing our patients to move into a slight pelvic tuck or posterior pelvic tilt, depending on how patterned they are. To cue them to move their pelvis more posteriorly, coach them to take their "belt buckle" and slowly move it towards their chin. At this point, you should also see their rib cage move down and back.
Requirement: Your patient must feel an increase in their oblique contraction from their belt-buckle movement and not lose their left elevated rib cage and left shoulder blade muscles.
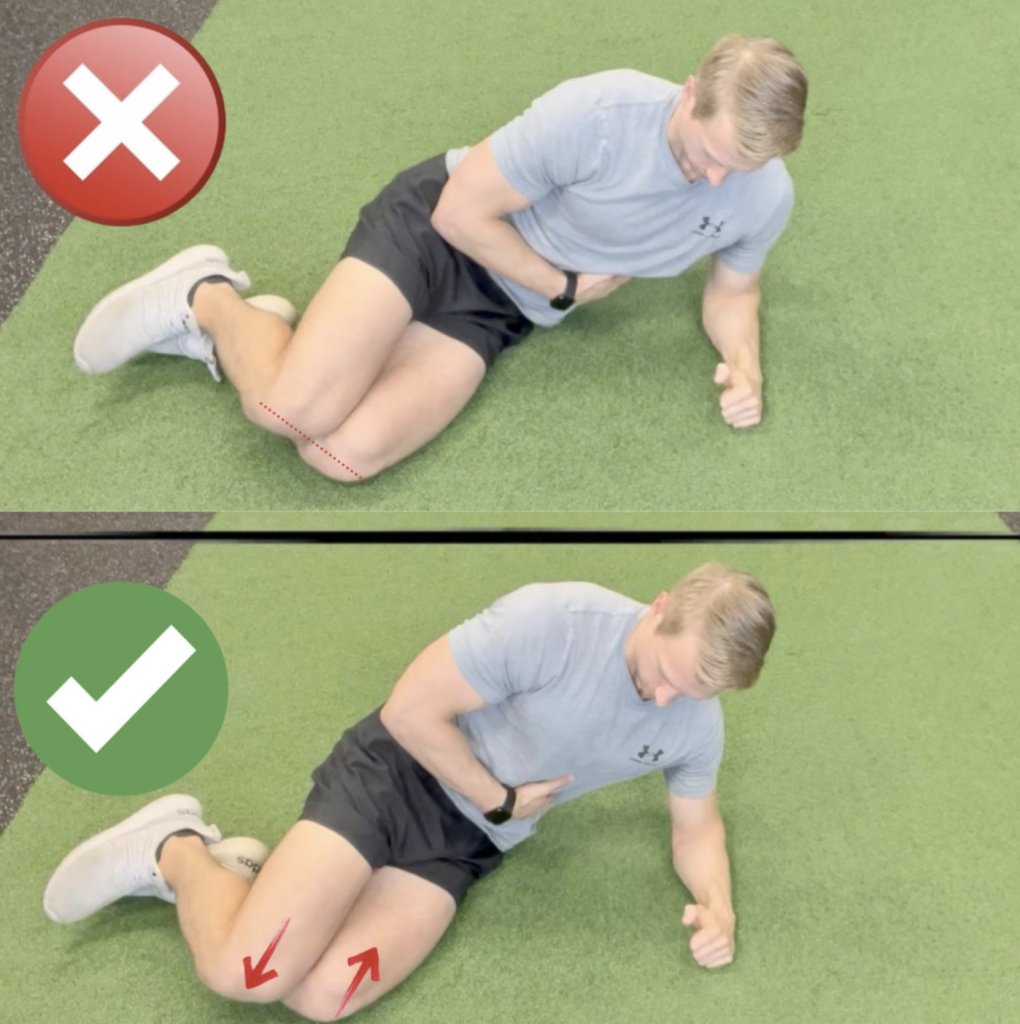
Right Knee Forward: Now that we have the thorax in a better position, we need to improve the biased position of the pelvis. As we discussed earlier, most of our patients will have the natural tendency to have their right pelvis back compared to their left. So, cue your patients to maintain the previous steps while gently moving their right knee forward compared to the left. This movement will help take them out of their right-sided bias at the pelvis and "unwind" the spine.
Requirement: Your patient must feel an increase in their obliques and not lose any previous steps.
Successful Side Plank Coaching
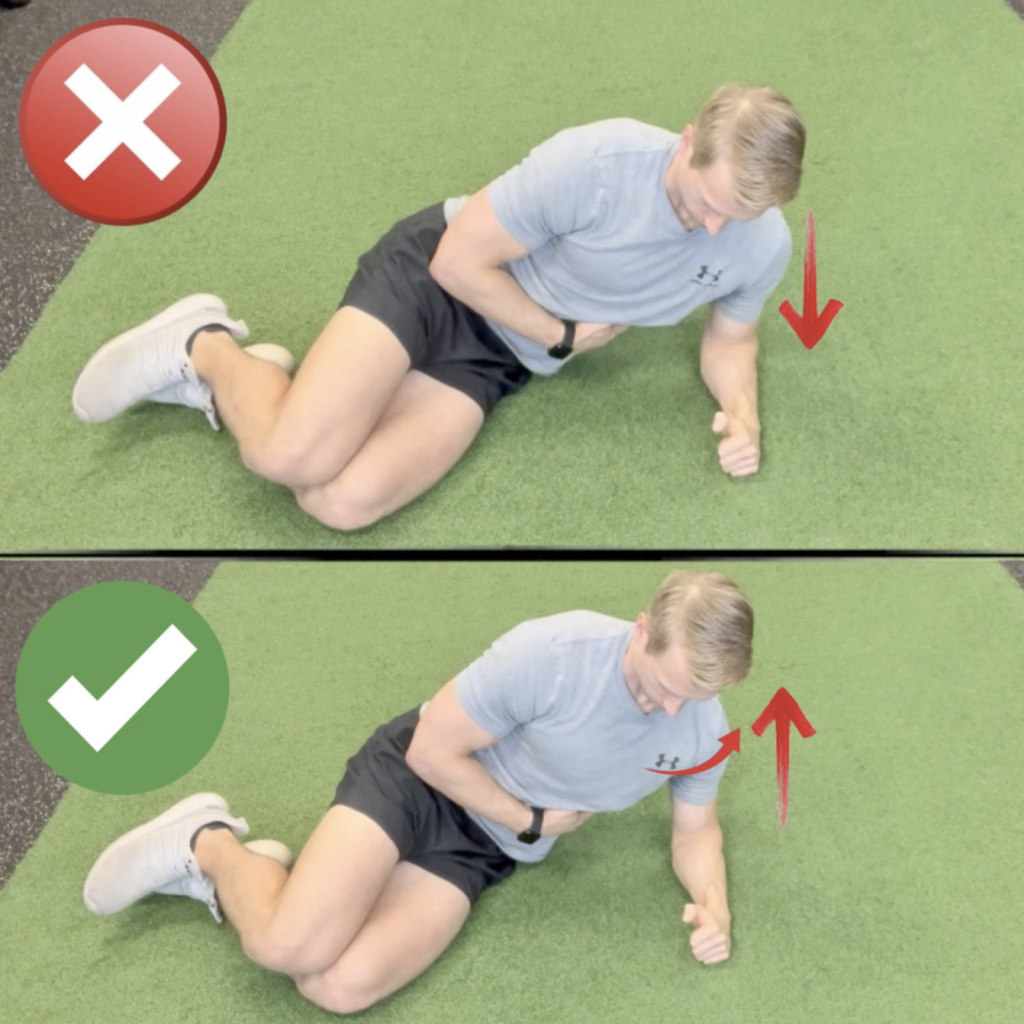
Now that we just took all that time coaching the proper setup, we can't lose it when it's time to move. Unfortunately, it's not uncommon for patients to lose the form right after they've been educated on it. That's why your coaching cues to initiate movement are extremely important. The familiar cues are typically to "raise up." However, the problem with this cue is that it's not specific enough. As a result, the hip usually becomes the primary mover. Your patient then lifts their hip, drops it down, and essentially decreases the compression we want to achieve in the left obliques. We can fix this problem by cuing the patient as follows:
"Lift your left rib cage to move your body up—keep your ribs high and your hips low." This will help ensure your patient maintains the advantageous concave position on the left. Then, as they come down, we will coach just the opposite and cue, "Lead with your hips as you descend—keep the ribs high and the hips low."
Breathing Strategies During the Side Plank
Now that we are performing the side plank with the correct intent, we can also begin to optimize breathing. Remember, exhalation is going to compress while inhalation is going to expand. So, how you coach your patient to inhale/exhale will depend on your intent. If you cue them to exhale as they lift, you will bias and maximize the compression on the left side through increased oblique contraction via exhalation. Conversely, If you cue them to inhale on the lift, you will bias expansion on the contralateral side.
Three Alternatives to the Side Plank
Sometimes your patient won't tolerate the required position of a side plank. This positional constraint may be due to an injury, weakness, or pain, but not to worry because you know the intent behind your exercise choice, right?! Remember, the primary purpose is compression in the left rib cage and expansion on the right. So with that goal in mind, we can strategically utilize the same principles with alternative exercises. Here are three simple exercises that can replace the traditional side plank.
1: Unilateral Farmer Walk: Let's start with the easiest of the three—the unilateral farmer walk. This is a great alternative exercise to bias ipsilateral compression and contralateral expansion. Below are three coaching points to consider, along with a video demonstration.
- The patient must utilize a heavy enough weight to achieve compression but not too heavy that it causes compensation.
- Exaggerate the contralateral arm swing to promote trunk rotation.
- Cue the patient to take as normal steps as possible.
Error: No videos found.
Make sure this is a valid channel ID and that the channel has videos available on youtube.com.
2: Hanging "J" Plank: A slight progression from the unilateral farmers' walk is the hanging "J" Plank. Your patient will be hanging with their feet to the side on an elevated surface for this exercise. This exercise uses the same principles as a side plank, but now we use the lower extremity to create passive compression, compared to active compression at the thorax. Below are three coaching points to consider, along with a video demonstration.
- Increase the height of the feet, the more compression.
- Ensure the patient is in a dead hang position to inhibit the lats.
- Your patient should feel contralateral expansion during the inhalation and ipsilateral compression on the exhale.
Error: No videos found.
Make sure this is a valid channel ID and that the channel has videos available on youtube.com.
3: Isometric Side Plank: The hardest of the three, the isometric side plank is an excellent alternative for someone who can tolerate a side plank's position but has limitations when attempting to lift. This technique will have the same benefits that the entire side plank has, but now we can maximize the respiration efforts. Below are three coaching points to consider, along with a video demonstration.
- Follow the same steps discussed in this article to ensure proper setup + coaching.
- Maintain left side concavity during inhalation to feel contralateral expansion.
- Increase the amount of oblique contraction during exhalation.
YouTube
Conclusion
I hope you now better understand the intent, programming, and coaching of a side plank. It can be a powerful exercise to improve your patients' limitations and overall performance when executed correctly with the right respiration strategies. If you find yourself in a situation where your patient can't tolerate the position, change it. Take the compression and expansion principles and sync them up to the best exercise for your patient. Lastly, shift your prescription to treat the source, not the symptoms. You'll always provide long-term relief for your patient when you do this.
Header image credit: simpleline © 123rf.com

Dr. Brian LeRiche is a physical therapist and strength coach. He owns Performance Redefined and is the creator of The PR Club. He is passionate about teaching students and professionals how to truly raise their standards and redefine their limits in and outside of the gym! To learn more from Brian, check out his website HERE.