


Editor's Note: Brandon Smitley is not a physician, physical therapist, or chiropractor. Please see your medical professional to treat, cure, and prevent injuries.
Back in February of 2020, I attended my first ever Postural Restoration Institute® course, specifically for Fitness and Movement. If you've not heard of PRI, don't be surprised. I didn't realize I knew what PRI was until about six years ago, but even then, I didn't understand it. I just knew I was a classic PEC, left AIC patterned athlete (many powerlifters are!). I sought out help from Dani LaMartina and Bill Hartman, and this was how I was introduced.
If you've seen people breathing with balloons, you've seen PRI.
As a small gym owner, I not only wanted to work on fixing my own low back problems but also how I could help provide my clients and athletes benefit from certain aspects of PRI. I wanted to truly understand it, so I booked a course and made it happen.
These courses are a whole weekend, 16 plus hours of lecture and hands-on work, and for the average person with no real understanding of anatomy and physiology, it could be daunting. However, the 16 hours helped me understand everything so much. I immediately saw how I could use this to help benefit my athletes and clients (and hopefully, I can help you help your clients and athletes).
So What's All The Breathing About
I'm going to try to make this as simple as possible. Dani has written some amazing articles on her experience, and I would highly recommend checking out her material. She's far more intelligent than me. But there are some key points you need to understand for this to make a bit more sense.
RECENT: World Record 12-Week Squat Cycle
In essence, PRI involves controlling the rib cage and pelvis, and how to optimally keep them stacked over each other, known as the zone of apposition (ZOA). The issue is our diaphragm isn't even on both sides (one side is bigger than the other), we don't have the same organs on both sides of the body (spleen, liver, heart, etc.), and we're just not "even" in general from the inside out. This can cause issues when compensation patterns are created and never addressed. The thing is, we've all got them, some of us just get in and out of these patterns better than others.
In simple terms, the central tendon from the right diaphragm is longer and attaches lower to the lumbar spine than the left. This causes a "pull" to the right with every breath we take. This pull to the right will pull the left hemipelvis to the right as well (since the lumbar spine is oriented that way), which in turn causes the left psoas to tighten and tip the left hemipelvis anteriorly. Since we live in a forward-facing world, our rib cage will orient to the left to keep us square.
The goal with PRI is to get back to the left, in the simplest terms. To do this, we need to work on breathing to set the ZOA, and get the muscles to hold us in the position during respiration for it to "stick." In most cases, people stuck in a left AIC pattern need more left abs (internal obliques), left adductor, and left hamstring. The problem is, we can't just do more side planks, leg curls, and adductor exercises. They need to be performed with meaningful respiration.
So How Do We Make Sense Of All This?
This is the number one question I asked myself after my weekend with PRI. I spent my weekend with incredibly smart physical therapists who have 45-60 minutes with a single patient/client. I run a semi-private training facility with 50+ youth athletes training for approximately 50-75 minutes. I don't have the time to prescribe five breathing exercises for each kid and coach them all up. It's just not feasible.
I went back to our screening process and looked at some of our older kids. What kind of dysfunctions were they having? Were they in any kind of pain or chronic issues? Did my screening show a hip shift? Elevated shoulder? A positive Thomas Test on the left?
Sure enough, most of them had something that could be linked back to the left AIC pattern.
Immediately we started implementing the 90-90 hip lift (with a balloon) before and after training for every client. I just wanted to see how well they could breathe and get their ZOA. Many did excellent (usually the better athletes, ironically), and others could not find their ZOA whatsoever.
This told me what kids needed to work on this particular exercise. With our other athletes and clients, we started to prescribe different breathing exercises based on watching them move during their training sessions. I'll discuss this more in a bit.
How You Can Implement PRI
Below I've got some of the common PRI exercises that I learned about and have been using on myself and with various athletes and clients. Certain exercises will work better for certain movement compensations you are seeing. I am not a physical therapist so if there is a huge underlying issue, I refer out. What we've done is pick ONE exercise to implement before and after training. We perform it for five good breathing cycles with three to four seconds inhaling through the nose, and six to eight seconds exhaling through the mouth. It's not ideal, but it's what we have to work with, and it's better than nothing. For some, they use a balloon to ensure they can create the ZOA, and once this is mastered, we let them perform it without a balloon. Ideally, you'll have a foam roller or small ball to help aid in some of these exercises (which helps aid in adductor facilitation and "turn off" the external rotators of the hip).
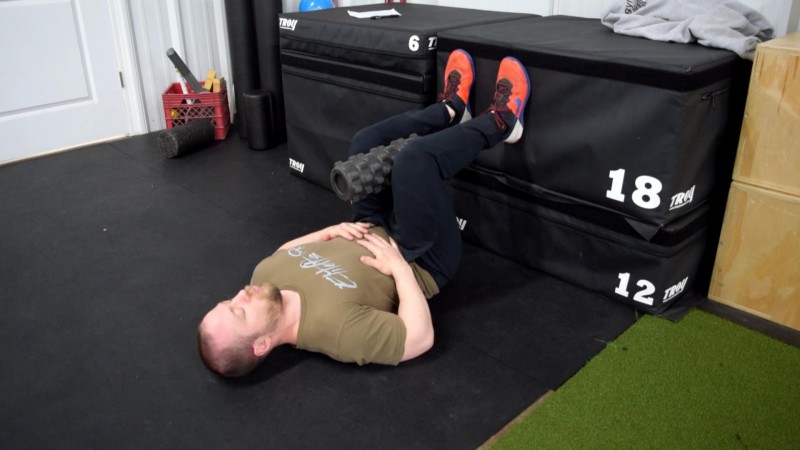
90-90 PRI Hip Lift
The 90-90 PRI Hip Lift is where we choose to start all of our clients. This helps posteriorly tilt the pelvis and get the erectors to relax. The athlete or client should press into the wall or box and pull their heels down towards the ground. This will activate the hamstrings and help get the pelvis even with the rib cage during exhalation. The back should still be on the ground, but the hips should be slightly hovering off the floor.
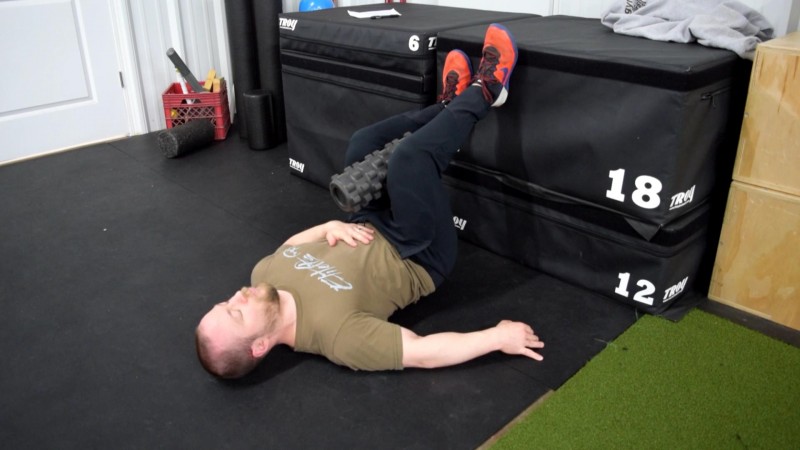
90-90 PRI Hip Lift With Right Hip Shift
The 90-90 PRI Hip Lift With Right Hip Shift would be our next progression, and for athletes that are presenting a positive one their hip flexion with the Thomas Test. If your athlete or client is complaining with left hip flexor pain, this would be a good option. This is similar to the 90-90 Hip Lift, but we will raise the right leg off the wall to facilitate only the left hamstring. When the right foot leaves the wall, the athlete should shove their right knee higher than their left knee, and focus on their left heel coming down towards the ground. Focus on breathing into the left lower back and abs (internal obliques).
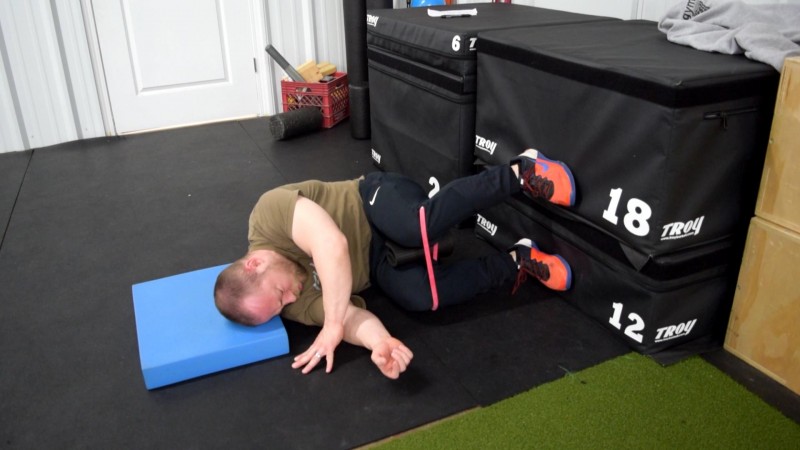
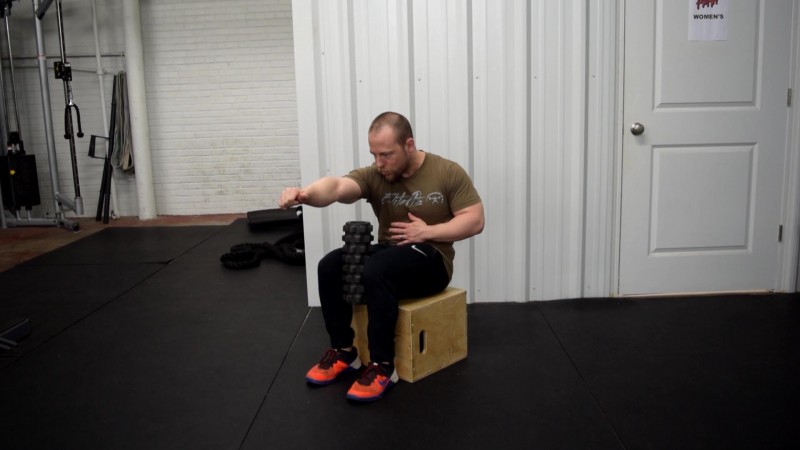
PRI Right Sidelying Left Adductor Pull Back
This progression we opt to use for athletes that have poor left internal rotation of their left femur. You could also notice this with an adduction drop test. This is similar to the 90-90 PRI Hip Lift With Right Hip Shift, but now we are laying our ride side on the floor. Set the right leg and foot flush to the floor and the left leg raised so that the left ankle is higher than the left knee. Posteriorly tilt the pelvis to stack the ribs and pelvis. Once this is achieved, perform your pull back with the left leg, so that the left knee is behind the right knee, or the right knee seems jutted out in front of the left. Press the right knee into the floor. Take your breath in, and during exhalation, pull the left leg back and use the left adductor to pull the left knee towards the midline (right).
*In this image, I have a band around my knees to help shove my left knee towards the midline even more. This will help when athletes have a hard PEC pattern. You can also place a towel or thin pad between the knees and ask the athlete to squeeze it with their left adductor to aid cueing.*
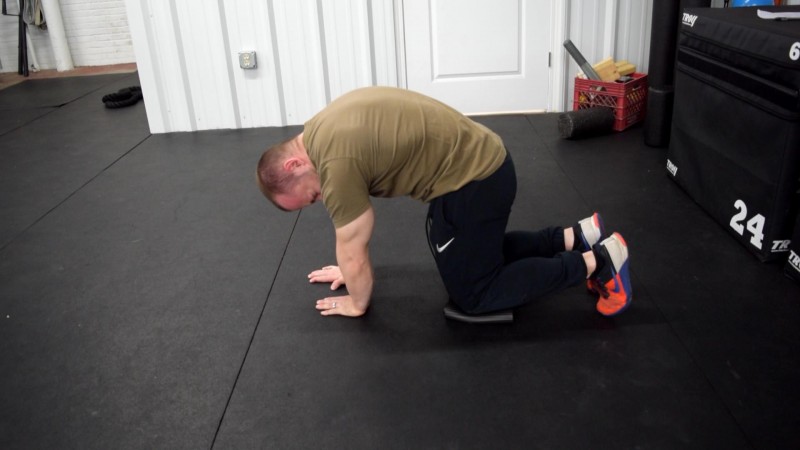
PRI All Fours Belly Breath With Right Staggered Stance
This exercise is great for athletes that need more upper back kyphosis. If you see an athlete with a flat upper back, this is excellent for teaching ribcage expansion with a slight bias towards the left internal obliques. Have the athlete get in an all-fours belly breathing position, but have them place their right hand and knee slightly in front of their left hand and knee. Elevate the left knee on a rolled towel or foam pad. Have the athlete round their upper back between their scapulas and push the floor away. While doing this, have them tuck their pelvis underneath. During inhalation, have the athlete attempt to feel their upper back and left rib cage expand. During exhalation, they want to feel their left abs (internal obliques) pulling their ribs down. Their right side should lengthen as their left side shortens. Hold the position and continue taking breaths.
PRI Seated Left Adductor Pull Back With Reach
This exercise option gets athletes to a seated position and begins to mix a couple of exercises above. This can be utilized for overhead athletes to help open up and restore right shoulder range of motion. You'll want to get a box that can let the athlete get below a 90-degree angle at the hips if possible. We're going to get into the same position as our Right Sidelying Left Adductor Pull Back, but add a reach component with our right arm. The pelvis should be posteriorly tilted, left leg pulled back, right leg shoved forward, and left adductor squeezing a small implement. Each breath in should be felt in the upper back, especially the right side. The athlete will try to reach as far as they call with each exhalation while feeling the left abs (internal obliques) and adductor.
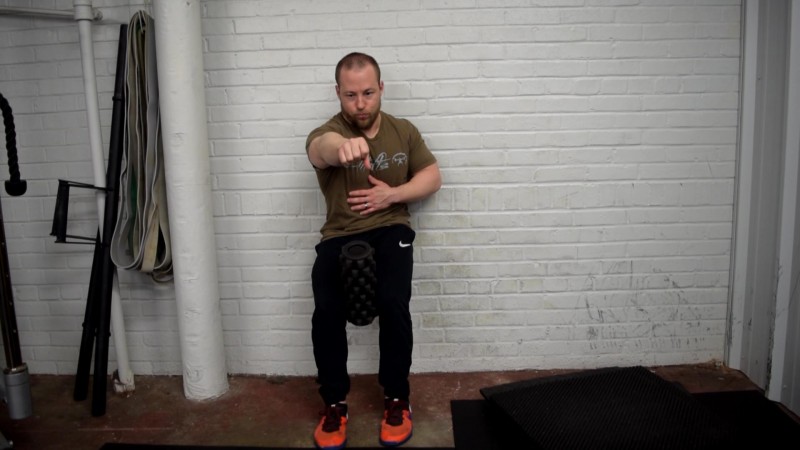
PRI Wall-Supported Squat with Right Arm Reach
This progression and option gets the athlete to their feet and standing. Just like with the seated option, we want our left leg pulled back, right leg shoved forward, and right arm to reach out in front. Our back should be against the wall but our upper back can leave the wall some here, and our pelvis will still be posteriorly tilted. Each breath should feel like the right arm is coming further forward, and the left adductor will engage with the left abs (internal obliques).
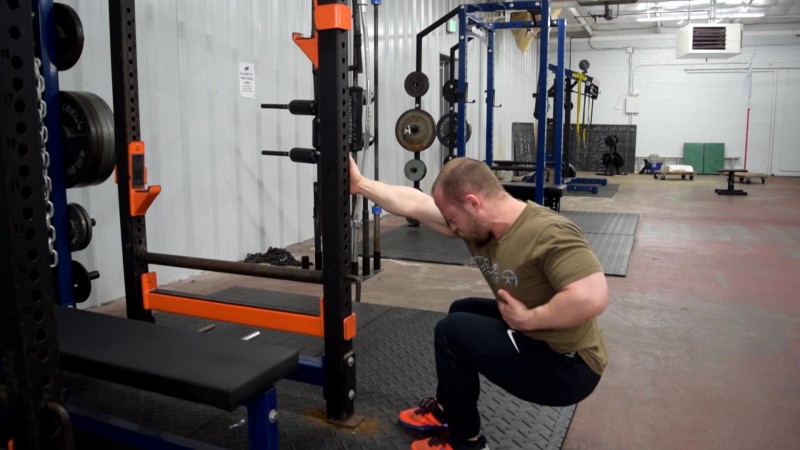
PRI Deep Squat Breathing With Right Rack Hold
This final exercise option gets the athlete up on their feet but using a rack to help pull themselves to face towards the left. The athlete still needs to have a slightly staggered stance with the right leg in front of the left with the pelvis posteriorly tilted. During inhalation, the athlete will try to feel their right ribcage expand. During exhalation, the athlete wants to feel their left adductor pull back on the left leg while the left rib cage comes down with the left internal obliques.
Making Sense Of Everything
I know that I threw a lot of information out with a variety of exercise options you can use. I, by no means, am an expert at this and am merely showing what we've been able to use and benefit from with our clients and athletes. We've managed to eliminate clients with low back pain, improve shoulder mobility drastically with overhead athletes, improve thoracic rotation, and get rid of some pretty awful hip shifts. If you are unsure of how to create a position or make use of an exercise, either refer out or get in touch with someone that understands PRI to a greater extent. I would highly suggest if you're able to attend a PRI course, do it without hesitation. You'll learn a plethora about compensations and how to optimize your client's and athlete's training.
Whoever isn't doing this is leaving gains on the table, and will never unlock their athletic potential, imo.