The wall is generally an overlooked tool to utilize in a performance or rehabilitation setting. The continuous feedback gives the athlete a sense of position, tension, and compensation. Furthermore, these methods can be applied in a variety of situations from the novice to professional athlete. With that said, here are three exercises that can be moved to the wall in order to maximize results.
1. Wall Hip Clam
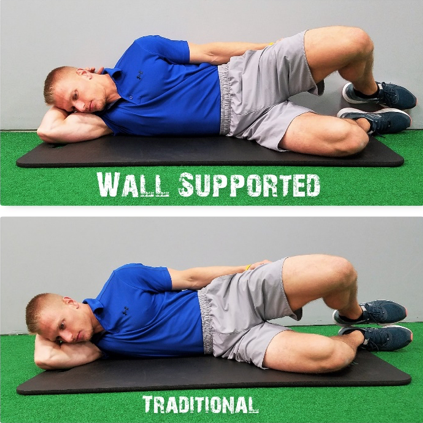
Wall-supported hip clams provide the appropriate perception for non-compensatory tri-planar movement. Conversely, the traditional hip clam tends to lead to over-rotation, lumbar extension, and forced movements. When this deceptive habit turns into a developed pattern, athletes unknowingly learn suboptimal stability strategies. Instead, take advantage of the wall to establish competent stability methods to enhance performance and rehabilitation.
Upper Body
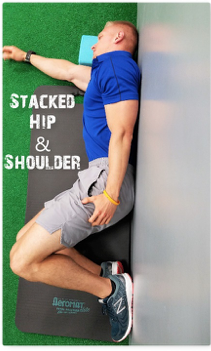
Initiate the exercise in a side-lying position with the hip and back against the wall. The athlete should lay with their shoulder over shoulder and hip over the hip. Ordinarily, this stacked position feels strange to the athlete’s natural inclination to bend, twist, and extend. However, this position provided from the wall constructs new postural information for successful movement execution.
Lower Body
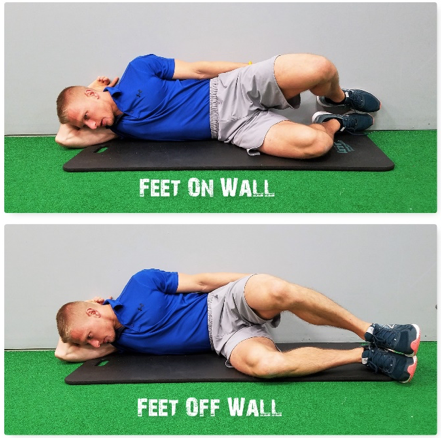
Foot placement will be revealed by the level of athleticism. Ultimately, the closer the feet are to the wall, the more challenging the exercise becomes. When the athlete’s feet are close or directly on the wall, they will have to resist the undesirable motion of lumbar extension. This placement should be used for athletes with sufficient awareness and control of their hip and pelvis. Alternatively, bringing the feet off the wall eases the exercise with positional pelvic tilt assistance. The ideal position should remain challenging yet allow enough leverage to adequately posterior pelvic tilt for sufficient low back inhibition. Although foot placement on the wall is the goal, remember not to force but instead modify the exercise as needed to match the demands for proficient movement.
What does this setup produce?
The wall provides continual positional feedback and awareness of the body during hip abduction and adduction. In other words, this conventional frontal plane exercise is now appropriately progressing with sagittal (posterior pelvic tilt) and transverse (wall support) stability. This provides the necessary local movement with the imperative global support in all three planes of motion.
2. Wall Eccentric Serratus Reach
Most people understand the correlation of proficient scapular muscle strength and overall shoulder health. However, many fail to consider the scapula's starting position and eccentric strength. Missing this integral component yields movement dysfunction, a potential pain source, and ineffective performance techniques. Rather, learn the wall eccentric serratus reach to acquire beneficial scapular position and strength for functional performance outcomes.
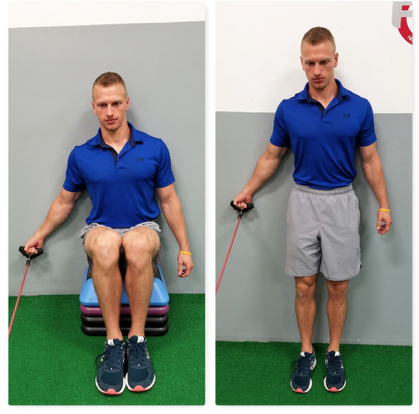
For higher-level athletes, it is suggested to perform the exercise standing. However, more dysfunctional athletes will thrive by sitting with knees slightly higher than their hip. Once this is determined, a posterior pelvic tilt is performed to engage obliques and flatten the low back. This improved scapula-thoracic position provides stability (obliques) and predisposition (correct scapular muscles) for advantageous training.
Next, the athlete contacts the wall with the back of their hand while preserving a neutral wrist. At this point, the athlete is instructed to gradually compress their shoulder blade into the wall. Gradual compression is imperative to ensure the scapular muscles activate without the unwelcome anterior shoulder, biceps, or neck. In addition, coaching the athlete to keep their shoulders "away from their ears" will aid in low trap facilitation and upper trap inhibition.
Next, the coach begins to pull the band until the client perceives scapular muscles activate. Prior to arm motion, a five-second isometric contraction is sustained. After five seconds, pulling from the coach is met with the desired deceleration and eccentric control of the scapular muscles. After the slowly controlled arm movement, the coach eases up on the band tension. The arm is re-established with the wall and the next repetition is initiated from the above-mentioned steps.
What does this setup produce?
The wall is utilized to leverage position, muscle activation, and muscle inhibition. At the onset, the ribcage is taken into consideration with a posterior pelvic tilt. This provides fundamental stability through oblique activation along with the desired lumbar inhibition. Next, the shoulder blade is persistently compressed into the wall to recruit the appropriate scapular muscles. As a result, upon the isometric contraction, the athlete has the correct starting position for successful eccentric training.
3. Wall Side Plank
Abdominal strength is a common goal given to strength and conditioning coaches, yet most athletes have an incorrect perception of what a "strong core" actually is. In addition, they train the abdominals from a faulty position utilizing flawed techniques. The misperception is contributed by the emphasis on "six-pack abs" and the absence of emphasis on the pelvis and rib cage. This typical scenario leads to an anteriorly tilted pelvis, flared rib, and erroneous breathing patterns. As a result, what should be stability training turns into athletes learning how to better compensate for their positional needs. Instead, utilize the wall side plank to better understand how to train the abdominals in the correct position with a logical approach.
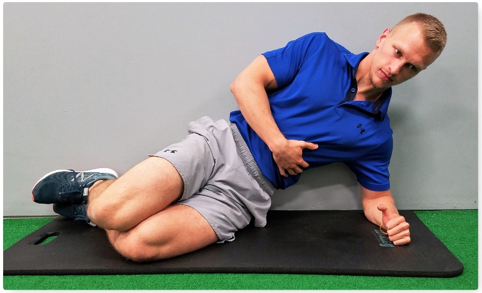
Begin on the left side, supported on the elbow in the stacked position. The coach should instruct the athlete to press their elbow through the floor. Two things should occur:
- The athlete should visually rise and separate their neck from their shoulder.
- The athlete should feel and sense the scapular muscles engage and not the anterior shoulder, neck, or biceps.
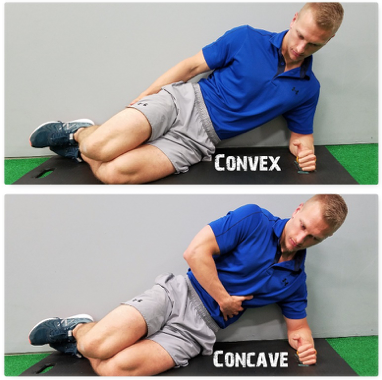
Once completed, the left rib cage should be in a convex position. The athlete is instructed to place their right hand on the left ribs to feel and move the ribs towards a concave position (upward). Notice, while this occurs, the top hip (right) should move downward, while the bottom hip (left) moves upward. As a result, the left obliques should be activated, accompanied with right oblique inhibition.
From here, the athlete performs a posterior pelvic tilt and presses both knees down into the ground to slowly raise the hip. Conscious effort is placed on maintaining back contact with the wall as they ascend. Note that the tailbone should be slightly off the wall with a proper pelvic tilt. How high the client or athlete lifts is determined at the point in which the left ribs want to drop (convex position), the pelvis anteriorly tilts, or neck activates.
In summary, various exercises can be moved to the wall to aid in training and rehabilitation. The functional goal should be directed towards the wall to improve overall movement awareness. This awareness is designed to carryover to improved training methods, a proper rehabilitation process, and increased sport-specific performance.
Four Keys to Manual Resistance
Brian is the owner of Functional Training Studio in Charlotte, North Carolina. At a young age, Brian has been training clients for over six years and is always looking at ways to improve his technique. He utilizes positional asymmetries that exist within the body to help clients and athletes improve their function and overall performance capacity. Brian has a degree in exercise science and is a certified strength and conditioning coach through the NSCA. Additionally, he plans to continue his education in 2017 in a doctorate of physical therapy program. For additional questions, Brian can be reached at FTStudio130@gmail.com.