
We will assume that Phase 2 went well and that the athlete is moving forward in great fashion. There are a ton of exceptions to this, but we assume that things are going great. The next step will be to introduce the back squat, hinging motion, and more plyometric work complexed into the training. We are not working maximal here— far from it. I would say that an RPE of as high as 7-8 is the most we should be moving as it pertains to weight, and that is with an amazing technique. If your technique is crap, then you DO NOT increase intensity. Weight will come, and they are already getting stronger as is.
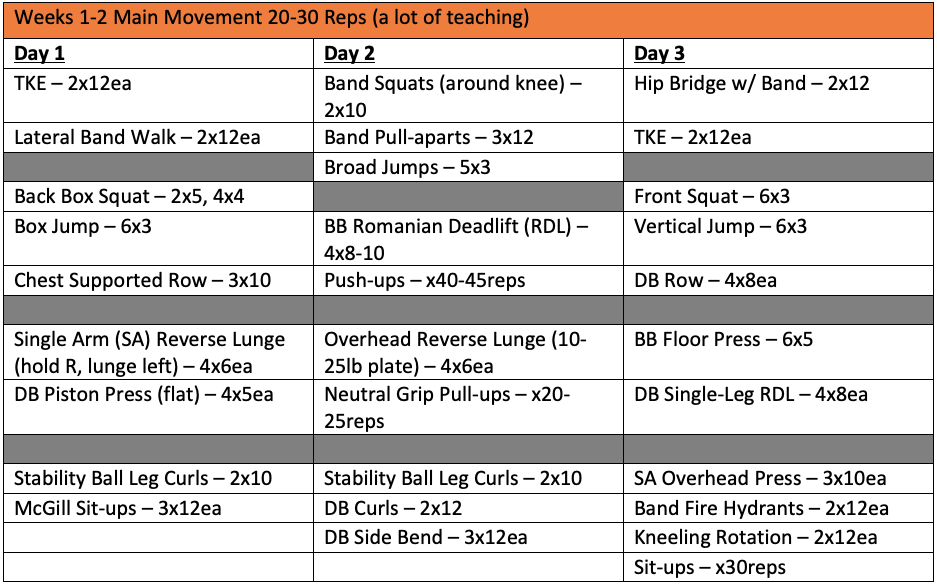
Day 1 Notes
Here, we are introducing the back box squat into the program and into the lives of the athlete. We should have already established good motor patterns with the squat motion, but now we are changing the load point and increasing stress on the overall core, trunk, whatever you wish to call it. Athletes will find themselves having more difficulty staying on the heel and will feel a bit more bent over. As long as we are maintaining a neutral spine, all is good.
Phase 1: How You Should Start Young Athletes in the Weight Room
Just with doing the front squat with a box, make sure that we are sitting back on heels, sitting soft on a box with no rocking, and keeping the knees driving out. You will also want to make sure that the bar is in a high position, with the elbows drawn in and under the back. Remember, the back squat is going to be a pivotal part of the rest of your athletes’ athletic careers. Teach them correctly, and do not load them too soon.
We are complexing a box jump with every squat set. Right after the squat is performed, have the athlete perform three box jumps. These are not rapid, sequential jumps. Reset every time, and make sure that they do not jump off the box when getting down from each rep. We are not focusing on deceleration right now. These jumps should be performed 10-15 seconds after the completion of the squat set. So, one set of squats, one set of jumps.
Perform the chest-supported row with the squats as well, after the jumps. This is performed on an incline, with both DBs rowed at the same time. Reinforce packing the shoulder blades together and pulling the shoulder blades down (i.e., do not flex the traps when you are packing).
The single-arm reverse lunge is how it sounds. You will hold one dumbbell in your right hand and proceed to lunge back with your left leg. Perform all reps on one side, then the other.
The piston press will be performed on a flat bench. You start with the dumbbells fully extended to the lock position. Then, you will go low and press back up with the right arm, go low and press back up with the left arm, then go low and press with both arms at the same time. This right-left-both process will count as one repetition. You will perform five reps each.
McGill sit-ups are actually crunches. You will lie on your back with your right leg straight and left leg bent, both feet on the floor. You will extend your arms to the ceiling and proceed to do 12 crunches. Afterward, you will switch legs, bending the right and straightening the left, and you will perform 12 more repetitions. That is one set. You can hold onto a plate for added resistance.
Day 2 Notes
We start off with glute activation work in the band squats, which we performed in the last phase. What we will add is a broad jump or a standing long jump. These reps will be performed individually and not in rapid succession. The goal is to stand and jump up and out as far as you can with each rep, resetting each time.
We are introducing another very important movement as well: the hinge. We are accomplishing this movement thought the Romanian deadlift (RDL) today. We performed the DB RDL in the last phase. This time, we are using the barbell. The concept is the same: slight bend in the knee, arch your back, bend, and allow the hip/waist to push your butt back as far as you can while keeping the barbell against your leg. Think of this as stretching your hamstrings. You will go down as far as your hamstrings will allow you to, then squeeze your butt to come back up to an upright standing position. You should be on your heels, bar close, with the head and chest up. We can worry about maintaining a neutral spine when this movement is mastered.
We are also introducing an overhead reverse lunge. You will hold a 10-pound bumper plate directly over your head, arms locked out. You will proceed to lunge back with either leg into a full lunge position, keeping the weight directly over your head at all times. You will then bring that same leg up and through to where you are standing fully upright with your knee raised into a high knee position. If you start with your right leg, you will do all of the reps on that leg until complete, then proceed with the left side. Note that with bringing the leg up and through, your foot will not touch the ground in the upright position. It will only touch if you lose your balance.
Pull-ups will also be introduced. We will start with a neutral grip, if possible. That is where the palms of your hands face each other. These will be assisted unless they are able to perform a full range of motion on their own. A total volume is given. The volume should be attained with the fewest number of sets possible.
Day 3 Notes
Day 3 brings back the front squat. We lower the volume per set to work on a great technique and to hopefully increase some intensity here. We are complexing with a vertical jump to be performed after each squat set, just like on day 1.
Today, we introduce the barbell into our pressing through a floor press. When lying on the floor, make sure that the bar is at a level that the athlete can pack his or her shoulders and still lift the bar out of the J-hooks. You want to make sure that the eyes are under the bar so that we do not run into the J-hooks while pressing.
Grip should be inside the ring. Grip advice is pinky just inside the ring, not touching it, to half a thumb from the smooth. So, anywhere in between there is fine. Always have the thumb around the bar as if you were holding onto a glass of water. NO FALSE GRIPS!
After bringing the bar out back, make sure that the lowering of the bar to the floor is with elbows at about 45 degrees. Elbows should NOT be flared out to the side. The more abducted you are, the more risk for impingement issues you experience. Plus, that works a lot more shoulder than chest and triceps. Be sure to soft-touch the elbows onto the floor, pause, then press up and back toward the head/lockout position.
In keeping your elbows tucked in at 45 degrees from the bar, when you come down, you will move away from the lockout position, so you must drive up and back toward the head to get back to it.
You will also have a single RDL today. You will still keep a slight bend in the knee, with a nice flat back, head, and chest up. You will hold only one dumbbell. If you are holding that DB with your right hand, then your right leg will be the one moving back and up. As you hinge, make sure that every inch of your shoulders moves forward, and down your back, the foot should move back and up into the air. Balance is key here, as well as positioning.
Band fire hydrants are done with a small mini band around the knee on all fours, like a bulldog (stout base). In this position, you will drive one of your knees out to your side and up, as if a male dog were peeing on a fire hydrant. Keep the hips flat, and do not rotate the body. Do four repetitions.
Phase 2: How You Should Start Young Athletes in the Weight Room
The kneeling rotation is performed on both knees, with a mini band attached to a rack. You should face the rack so the band is either to your left or to the right side of your body. Hold onto the band (which should be attached at shoulder level) with the arms out straight, and proceed to rotate the opposite direction to which the band is attached. Make sure that you are turning your head as well.
The following weeks are as follows:
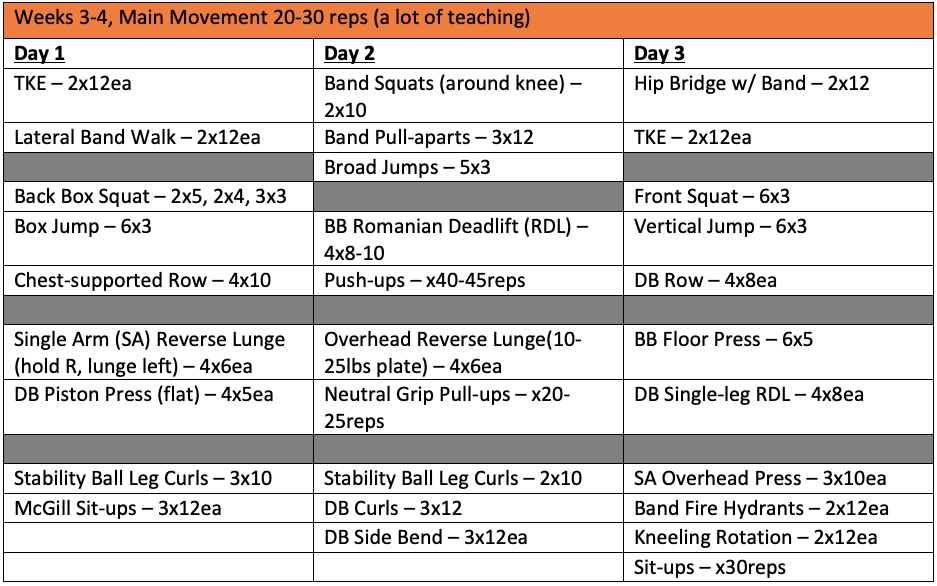
We will keep movements the same but manipulate the volume and intensity. Overall, this is still teaching a lot of light weight movements with a moderate to high amount of volume. Weights can increase as long as movement patterns are not compromised. DO NOT sacrifice technique for weight. They are young and just learning. We have a long way to go. Nothing needs to be complicated.