


You read the title correctly! The training cues I’m about to discuss below will have an immediate impact on your bench press performance. These are no-bullshit cues and tricks from a few of the best lifters past and present, such as Blaine Sumner, Vinny Dizenzo, Brandon Lilly, and Jen Thompson. I have utilized these cues with my athletes and have found them to have a profound immediate impact. These are sure to turn on a light bulb!
Benching can be a frustrating movement for many. I find this to be true because many overlook the complexities that are involved in a successful bench press. There is a lot of precision and fine detail involved in the movement, and from what I see this is the one exercise where most lifters throw caution to the wind and just end up gun-slinging it like Brett Favre. So no wonder the bench press frustrates most lifters to no end. It's no surprise that the cues you’re about to read below turn light bulbs on instantly for lifters. I’ve always said it only takes a single well-thought-out cue to change the way someone approaches a lift. I’m certain that one of the bench cues below will be that single cue that you’ve been waiting for.
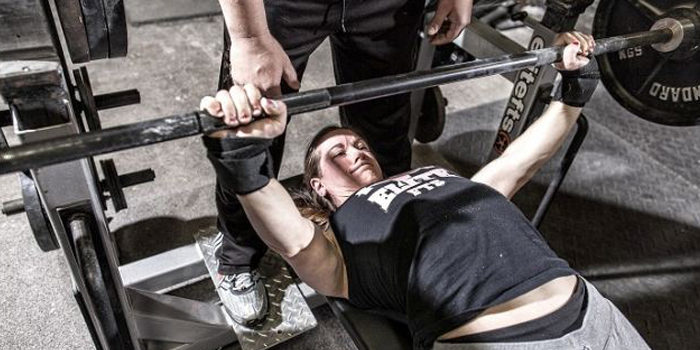
Blaine Sumner's Sawed-Off Bench
This is a cue that is attributed to IPF legend Blaine Sumner. Blaine has a 904-pound single-ply bench to his name, which is an IPF World Record. This is a drug-tested federation in which they are known for being strict with calls. There is no denying that Blaine is one of the greatest bench pressers to date and that any tips he may offer are extremely valuable. This is one of those tips. This cue is in regard to setting up on the bench and initiating leg drive. Anything that can improve a lifter's setup is going to be worth its weight in gold because this is perhaps the most important phase of the bench press. You cannot build a house without a solid foundation, and you cannot build a bench without a solid setup. Likewise, a lifter’s legs will always be stronger than their arms, so let's start using them!
RECENT: The Coach's Guide to Teaching the Bench Press
Blaine talks about a “sawed-off bench.” This means if the bottom portion of the bench (where your hips lay) is cut off, you'd be able to carry out and execute your setup and press in the exact same manner. Read that slowly one more time and let it sink in a bit. This is a very powerful way of looking at the bench press, and it has paid dividends for my lifters. Thinking in this manner means you actually have two major points of contact: your feet driving through the floor, and your upper traps or the base of neck on the pad. Your hips shouldn’t carry weight on the pad!
Let me make that clear in case you're ready to throw the red light at me. Your hips are in contact with the pad, but they are not bearing your bodyweight. This is active hips at its finest. You should have material contact with the pad but you’re using your legs to drive your body onto your traps. This is leg drive! I teach this by placing my arms behind the lifter when they set up. I tell them to use their legs to drive into my arms as hard as they can. Usually, this gets the point across!
Vinny Dizenzo's Banded Unrack
Vinny was the lifter who got me interested in equipped lifting. I was competing at the meet in which he hit 900 pounds! Vinny wasn’t a one-trick pony either; he was a tremendous raw bencher as well. He benched 600 pounds raw in three different weight classes. He is one of the greatest to do it and an outstanding representative of the sport. When Vinny is talking about the bench, I listen. It was at a seminar of his that I was introduced to the concept of adding bands to assist with the unrack process. The purpose of the band tension is to get you taking the bar out via your lats and not your shoulders. The difference when you learn to drag the bar into position with the lats rather than lift out with your shoulders is night and day. It can completely change the way you bench, because in order to use the lats effectively in the press, you need to engage them correctly during the unrack.
In order to perform this, you need to attach a band to the bar that pulls the bar into the back of the rack. If you try to initiate the unrack with the shoulders you will just slide the bar up the rack. It forces you to have to “pull” the bar out of the rack in a movement similar to a lat pullover. This is a fantastic teaching tool that is sure to have an immediate impact on your benching!
Breathe Before You Unrack
This is another cue I originally heard from Vinny Dizenzo. It is the most simple yet most overlooked cue. Breathe before you unrack the bar, and not after. Be honest here: is this something you ever paid any attention to until now? Typically you’ll see lifters unrack their max and take a big breath before they begin their press. Breathing before you unrack the bar allows you to fully breathe and expand through the midsection without worrying about the weight in your hands. I’m sure we can all agree on the fact that it’s easier to breathe into your belly without 400 pounds in your hands.
Why is this important? Proper breathing leads to being able to brace the midsection more effectively. The greater the bracing effect you create through your midsection, the more force that will transfer from the lower body into the bar. I may add to make sure when you take a hand-off that you communicate that you need the additional time to fully expand with air. Often times I see lifters taking a quick breath because their hand-off starts giving them the bar early. Don’t rush this process! For those who say they have trouble holding their breath that long, it is a trainable trait! Just because you have a hard time now, it doesn’t mean that you can’t increase your lung capacity in the future. It does make all the difference when executed correctly.
“Bend the Bar” Correctly
I recently have enlisted the assistance of a PVC pipe in my coaching. A simple tool, yet it has already proven immensely beneficial in teaching lifters how to bend the bar correctly. When we say “bend the bar” I have been finding that there is a big disconnect with lifters on how to do this correctly and how to engage the lats in this motion. What I have found is that the majority of lifters have been bending the bar incorrectly. When given a PVC pipe and told to “bend the bar”, I find lifters bend the ends downwards, as if there were heavy weight on the ends putting a bow in the bar. What you want to see is the bar bending towards your feet. The ends should, in fact, curl towards your feet. I tell lifters that they should aim to twist their pinky fingers towards their toes. Bending the bar in this manner allows you to engage the lats optimally.
We created a bar called the Tork Bar, made of PVC, which is an excellent practice tool for lat engagement and back training for the bench. The lifter now has visual feedback for the direction they are bending the bar, and when they keep a constant bend in the bar while going through a set, they are training their back similar to how it would act in the bench press. Again such a simple item but I have seen it make a profound difference in someone's benching ability.
Brandon Lilly's Touch Point Trick
This is a cue derived from world-class powerlifter and Cube Method creator Brandon Lilly. We once had the pleasure of hosting one of Brandon’s seminars and this was one of the interesting cues he demonstrated. The idea is to find your optimal touch point on the chest. Usually, this is a spot that puts you in the best position to take advantage of favorable leverages and use each muscle group effectively. I have seen lifters touch too high and rely on their shoulder and chest strength to carry them through the lift. Likewise, I have seen lifters try to touch too low and end up in a poor bottom position that is difficult to recover from because there is inefficient joint alignment. The balance is somewhere in between: a sweet spot that will allow you to load your lats and engage the pressing power of your chest, triceps, and shoulders evenly while maintaining a good position.
Brandon’s cue helps you find that sweet spot. He has a lifter lie down with an empty bar on the bench. He says to unrack the bar and begin moving it up and down your body with locked out arms. It is important to do this with your eyes closed! Just tune in to how the bar feels as you move it from your neck to your belly and back again. Take note of where the bar seems to become weightless. Find the exact spot the bar becomes weightless and drop the bar straight down. He says this is the sweet spot. Aim for this spot every time with precision!
Jen Thompson's Pinky Squeeze
Jen Thompson is an unbelievable bench presser, regarded as one of the best benchers in the sport. Like Blaine Sumner, she competes in the IPF and has numerous world records to her name. She is someone chock-full of interesting insights that can excel your performance. This cue I’m about to talk about is exactly one of those cues — something that puts a magnifying glass on a critical detail in your bench press that probably wasn't highlighted before.
She says that at her gym they teach lifters to “pinky squeeze” the bar. Simple at the surface, yet brilliant when you delve into it. One of the biggest aspects to benching huge weight is having an iron grip to the bar. You want to crush that bar for all it’s worth to get optimal muscular activation and to amplify the nervous system. Usually, we don't put as much focus on this as we should, however, and we let this aspect of our bench fall by the wayside. You always seem to extract more from your effort when you’re focused on it, and that is exactly what this cue does for us.
When you think about using your pinky finger to squeeze the bar, you’re focusing on the very last, smallest, and often weakest component to your grip. If you can maximize your focus and force from this finger, imagine what it is doing for your grip. If you want a quick cue that is sure to impact a lifter immediately, it would be a cue to crush the bar harder. It works almost every time to bring the very last bit of force production out of a lifter.
New Approach to Bar Grip
This grip I’m about to share with you is something I have always used and have just come to realize the benefits of. I was using this grip subconsciously for the reasons I’m about to describe, and when I realized why I was doing what I was doing, I quickly jumped to share it with other lifters. The feedback has been overwhelmingly positive, and I’m very excited to share this game-changing approach to grip with all of you. It is nothing that hasn’t been done before, and it certainly isn’t groundbreaking. However, if you’re hearing it for the first time it is going to change your bench press!
The first priority of any good bar grip is establishing the resting point of the bar to be deep in the palm of the hand. This should be universal amongst grips in order to yield the greatest force transfer into the bar. The grip I’m sharing with you is a cross between a false grip (thumbless grip) and a normal choked grip. It takes benefits of both and blends them into one and ultimately allows you to tune in with your lat engagement more effectively. What makes the false grip so effective is that it takes focus away from gripping the bar tight. This allows you to have to use your lats to a higher degree to stabilize the bar. Taking away one aspect leads to an increase in another. The downside? You can’t create torque with a thumbless grip. If you tried to bend the bar, your hand would just spin. Then we have the traditional choked grip where the lifter is squeezing the bar and the thumb is resting upon or right next to fingers. This allows you to have an extremely tight grip to the bar, but it is easier to fall into the trap of commanding the bar with your arms and losing the engagement from the lats. So what's the solution?
Grip the bar like you would in a traditional grip, but slide the thumb out. When the thumb is spread out from the other fingers, it is left to serve more as an anchor to allow you to bend the bar effectively, while yielding similar benefits from a false grip. It is a best-of-both-worlds scenario that works tremendously for lifters. Those having a hard time tuning in with their lats will benefit immensely from this grip. I know because I have experimented with lifters and it works!
Bandbell Earthquake Bar
The Bandbell Earthquake Bar is something I use on a weekly basis, for good reason. I have found this to be a one-of-a-kind bar in terms of teaching a lifter how to control their bench groove and engage their lats. If you have never used this bar, it is made out of very light bamboo material. When you suspend weight from it via bands, it becomes a very unstable bar and tends to jolt around all over on you. Why is that such a beneficial thing?
Besides just the huge benefits yielded in shoulder stability—which is great when injured or rehabbing as well—it is fantastic for teaching a lifter how to lower the bar into their lats. When a lifter tries to command this bar with their arms, they will receive immediate feedback by the bar bouncing around side to side and falling out of control. When a lifter learns to properly execute lowering the bar with the lats, the bar tends to stay in control and stable. It is one of those fantastic immediate feedback tools that is a must-have for any bencher. In addition, it also demands that you be precise with your bar path. You need to become a master of precision with this bar, because one bad groove will leave the bar rocking. Awesome training tool to have in your arsenal!
Like I mentioned earlier, these training cues are surefire ways to kickstart your bench press! These are the cues in which I have found to provide an immediate impact in a lifters performance from session one. I have found so much immediate value in these cues that I have even included them in this year’s version of my bench clinics, which I present at powerlifting and CrossFit gyms alike. Lifters' faces when I present this material to them light up as if to say "ah-ha!" These are true lightbulb moments that I hope to share with all of you through this article. Please pass it on to those you train with, coach, and hope to elevate. Don’t let benching be a struggle any longer!
My website www.bigbenchas.com and my YouTube channel Big Benchas is dedicated to providing all the content you need to take your bench to the next level. I cover every aspect of how to perfect the technical side of bench pressing. I encourage you all to reach out to me for additional training help. You can reach me at coachben@bigbenchas.com.
