


If there's one thing I've become big on as I've matured in the fitness industry, it's learning to train optimally, regardless of goals. Many roads lead to Rome, and the best road is often the least traveled. For this article, that road is the Cambered Squat Bar.
The Cambered Squat Bar is one unique barbell you can find at elitefts. Although it's less common than the Safety Squat Bar, it has a ton of benefits and ways you can implement it into your training, regardless of training goals.
Error: No videos found.
Make sure this is a valid channel ID and that the channel has videos available on youtube.com.
Cambered Squat Bar Benefits
Shoulder Friendly
To kick things off, one of the best aspects of the Cambered Squat Bar is it is relatively shoulder friendly. If you're dealing with a banged-up shoulder, have an injury you are nursing, or are just trying to put less wear and tear on your shoulder before bench day, this is an excellent fit.
While it's not as good as the Safety Squat Bar, it can allow for some relief for less mobile people and remove that repetitive strain and position that might lead to overuse or tendonitis issues.
Different Stimulus
While there is nothing inherently bad with a squat bar, beating a dead horse often is a surefire way to get frustrated, injured, or just burnt out. The Cambered Squat Bar places the bar lower than your normal squat bar, where the weights are likely around hip or belly button height. This position changes the physics of the exercise entirely. Usually, the weight being close to the hips would be a benefit, however, because of the oscillation and instability the camber provides, it forces you to stay tight and own your positioning throughout the movement.
Most lifters will have one if not two, main issues when they squat: pitching forward and tightness.
What does this bar help fix?
Pitching forward and tightness.
After running a training cycle using the Cambered Squat Bar, you can attack the hole faster, be more stable, and be less likely to pitch forward.
Versatility
The Cambered Squat Bar can be used on squats, good mornings, lunges, bench press, Zercher carries, overhead presses, and much more. Just about any movement you need to have slowed down, work on positioning, or challenge overall trunk stability while being brutally strong…the Cambered Squat Bar can fit the bill. I personally like using them for good mornings or loaded carries with wrestlers.
Program Implementation
Now for the fun part—figuring out how to implement it within your training.
The most important aspect of this, before you program it for yourself or your athletes, is to ensure you have a good reason to use it. It would not be wise to have 11-year-old Johnny use the cambered squat bar or 74-year-old Mary do loaded carries with it. We can find better exercises for these populations for their intended training goals (99% of the time, anyways). Typically you'll want these for more intermediate to advanced clients that already have some general strength training behind them and foundational movements understood by both clients and athletes alike.
Powerlifting
Let's get the obvious one out of the way. We know the conjugate system loves to use the ability to vary stimulus to improve training qualities. I really like the Cambered Squat Bar for box squats, good mornings, pause squats, and dynamic effort work with chains.
It can help teach lifters how to stay tight on the box, in the hole, or while keeping their upper back tight during good mornings. I know some lifters love it for bench press, and it's certainly challenging, but I've always liked the earthquake bar more. Nonetheless, it's great for teaching tightness with your bench press.
Hypertrophy
If I competed in bodybuilding, I would only squat with a Cambered Squat Bar or the Safety Squat Bar. There isn't a reason to place our shoulders in an externally rotated position more than we have to, especially since our goal would be merely leg size, not strength or technical mastery of the squat. Implement on any day you need to squat for a new challenge and to save your shoulders for chest day.
Sports Performance
As a coach who makes his living training athletes, I use this bar the most. I generally save it for upperclassmen and athletes I know love to be in the weight room and work hard, but also more advanced athletes that need some shoulder TLC (baseball, softball, swimming, tennis, volleyball). My favorite exercise for athletes are front rack split squats. We improve single-leg strength and power, improve trunk and upper back strength, and generally see improved hip stability. We also use them for loaded carries in a Zercher position for our wrestlers to work on upper back strength and mimic having to hold athletic positions. There are certainly many more, but these have been staples I see myself using quite frequently.
Final Thoughts
While the Cambered Squat Bar isn't one of the most popular pieces of equipment, it definitely should be. During your next training cycle, find a place to plug it in (justifiably), and give it a thorough run to improve your squat, deadlift, and bench press.
Your training and body will thank you.
Brandon Smitley is a 2011 graduate of Purdue University, where he earned his Bachelor’s degree in Health and Fitness, and of Indiana State University with his Master's Degree in Coaching. His best lifts to date are a 567-pound squat, 330-pound bench, 510-pound deadlift, and 1377-pound total in the 132-pound weight class! Brandon holds his CSCS, USAW, and CPT certifications. He has opened THIRST with his wife, Adrian, to help athletes and others realize their full potential from proper strength training methodologies.
Most lifters will have one if not two, main issues when they squat: pitching forward and tightness. What does this bar help fix?
If there's one thing that's highly debatable within the powerlifting community when it comes to max effort conjugate work, it's the use and implementation of backdown sets. Backdown sets are rather popular these days within the undulating periodization crowd, and they have some amazing benefits in improving neurological efficiency within movements.
Suck at using the SSB? Nothing better than decreasing the weight and working on maintaining upper tightness, right?
The main issue with the conjugate crowd is that they want to hit a max effort single, some general accessory work, and call it a day. And if you're a geared lifter, this is often about all you'll either A) have time for or B) feel up to the task of doing once you get your heaviest lift in for the day.
I believe there is some real value in backdown sets and, more importantly, getting the most out of them and figuring out how to gauge your training with the feedback it might give you.
This led me to the APRE method by Dr. Bryan Mann. A huge thanks to my guy, Coach Lucas White, currently at Boise State University, for reminding me and helping me see how he used this system during his path in collegiate strength and conditioning.
Below I'm going to discuss the APRE method in simplistic terms and then describe how I've used it within the conjugate system to have calculated backdowns to acquire improvement and maximize recovery.
APRE Basics
To start things off, if you're the type of strength person who loves to read research, please find the following dissertation that Dr. Bryan Mann put together: A Programming Comparison: The APRE vs. Linear Periodization In Short Term Periods. You can also purchase the book he wrote here at elitefts. Both would be well worth your time.
However, in the simplest terms possible, APRE stands for Autoregulatory Progressive Resistance Exercise. It's autoregulating your training based on the current day's readiness. This process happens nearly every day you train, but Dr. Bryan Mann helps simplify it. Based on your set performance, he provides you with numbers you should be hitting for particular reps. If you fall short or hit more, your subsequent set will adjust. He also has particular rep schemes based on goals, commonly known as APRE3, APRE6, and APRE10. We'll get into these more later.
RECENT: 10 Exercises Powerlifters Should Be Doing (But Aren't) to Stay Pain...
We've all had those days where training sets feel super light and others where 135 feels like 500. You typically pivot at the moment and then go about your day. But have you ever had those days where weights start to feel better and better after you get going, and next thing you know, you have a PR day? Those aren't as common, but they certainly happen from time to time. I enjoy this piece of APRE because with my clients, I now have concrete numbers of how they feel, and they can also learn how to use their RPE and be more in tune with it.
Implementing APRE With Max Effort Conjugate Training
While the conjugate system is amazing and has seen huge growth and popularity thanks to Louie, I'm always looking for my own ways to tweak and adjust things more to my liking and for my clients. That's the beauty of the system - you can make it your own. This led me to wonder how to improve a max effort movement if you only happen to see it every six-12 weeks. Part of training progression is specificity, or the SAID principle (specific adaptation to imposed demands). At first, I would decrease the weight by ~10-15% and do a couple of sets and reps. But I wouldn't make progress, or I'd feel crushed the next day. Here's where I started to use the APRE method and tinker with my bench press.
After looking at the APRE charts that Dr. Bryan Mann has available in his work, I knew that if I wanted to get stronger, I needed to use the APRE3 method, focusing more on strength. After tinkering with numbers and implementation, here is what I came up with depending on the goals for the day:
| 1RM | 3RM | 6RM | 10RM | ||||
| 1st Set Reps | 2nd Set | 1st Set Reps | 2nd Set | 1st Set Reps | 2nd Set | 1st Set Reps | 2nd Set |
| 1-2 | Decrease 5-20 pounds | 1-2 | Decrease 5-20 pounds | 3-5 | Decrease 5-20 pound | 6-9 | Decrease 5-20 pound |
| 3-4 | Same | 3-5 | Same | 6-9 | Same | 10-14 | Same |
| 5+ | Increase 5-20 pounds | 6+ | Increase 5-20 pounds | 10+ | Increase 5-20 pounds | 15+ | Increase 5-20 pounds |
This might look super confusing but bear with me.
At the top of the chart, we have 1RM, 3RM, 6RM, and 10RM. These would be your top sets for the day. Below each rep max, you then have a column for your first backdown set of reps that you completed, a recommended second set, and how you would adjust. What isn't shown is that the first backdown will always be 92.5% of your top weight used for the day. This is designed to take into account fatigue on all levels, and it took me some time to find a good number that would be good for the majority of lifters.
Something that you always need to keep in mind is that the adjusted weights will always have ranges. This is because every lifter is different, and how much you lift will dictate how much you should adjust. For example, a 148-pound female athlete who benches 135 pounds will not need to increase or decrease nearly as much weight for the adjusted sets. However, a 220-pound male with a 650-pound squat will certainly need to strip more weight off the bar if they need to decrease weight. When in doubt, I suggest taking more weight off or adding less total weight.
To see how this looks, here's an example from one of my lifters bench press sessions using the 3RM protocol:
Max Effort Upper
Bench Press vs. Bands and Chains: Use doubled micro mini bands and one chain per side
Work up to a heavy triple (@ RPE 9) with APRE
Set 1: 155x3
Set 2: 140x4
Set 3: 140x3
As we can see, since his first backdown, he only managed to get four reps. Therefore, he needed to keep the weight the same for the last adjusted set. This tells me he did a good job gauging his top triple for the day. If we also look at Prilepin's Chart, these numbers align with what we would want for optimal training.
Here's one where a lifter had a pretty rough training session, and squats didn't go where we needed them to:
Max Effort Lower
SSB Box Squat: Box slightly below parallel
Work up to a heavy single (@ RPE 9.5) with APRE
Set 1: 470x1
Set 2: 435x2
Set 3: 425x2
This particular lifter noted in their comments section that weights felt heavy and had been a rough day at work. Unsurprisingly, we didn't get a PR single, and our backdown sets didn't go so hot, either. Ideally, he would have had a bigger drop on the third set, but knowing that four plates on a SSB is 425, you can likely bet he was ready to get the shit over with. This training day tells me we need to pull back a bit or adjust the next week of training accordingly.
The 6RM and 10RM
This is a great area to look at and implement some of the APRE methods into your supplemental work. I typically like supplemental work to be more in the six-10 range when possible, which is where I'd use them. I've only used them for a 12-week cycle, and after that, I realized this is for the lifters that have great recovery and need to put on size. If you're going to use these within the conjugate system, DO NOT do the APRE work for your max effort work and then this for your supplemental work. You will feel like shit in no time. I tried it with my bench press and my recovery could not keep up.
I suggest picking where you are in your yearly calendar and then deciding what you need more (size or strength). When jumping back into barbell work after a meet, I think the APRE6 and APRE10 are great ways to get solid work in without killing yourself. If you're deep into the off-season and trying to push strength, I would go more of the APRE1 and APRE3 methods with your max effort work.
Final Thoughts
While this implementation may look super confusing at first, I promise if you can do some simple math (92.5% of your top work), you can make the APRE system work well for you within the conjugate system. I always struggled to figure out backdown work and the balance it takes to improve yet not overtrain. This system has worked incredibly well for me and dozens of lifters I've worked with. The beauty is that at the end of the day, you're getting the most optimal work you can for that given day, which is all you can ask for in training.
Thanks again to Dr. Bryan Mann for his research and for providing the information I could use to make educated decisions implementing this material and training rationale.
Brandon Smitley is a 2011 graduate of Purdue University, where he earned his Bachelor’s degree in Health and Fitness, and of Indiana State University with his Master's Degree in Coaching. His best lifts to date are a 567-pound squat, 330-pound bench, 510-pound deadlift, and 1377-pound total in the 132-pound weight class! Brandon holds his CSCS, USAW, and CPT certifications. He has opened THIRST with his wife, Adrian, to help athletes and others realize their full potential from proper strength training methodologies.

Although this may look super confusing initially, I promise that if you can do some simple math, you can make the APRE system work.
When it comes to being the best and strongest powerlifter you can be, the last thing you think about is programming and training to remain pain-free. Trust me; I've been there. My training six to eight years ago was vastly different than it is today.
Even though I have decent genetics, good leverages, and a mental fortitude made from my wrestling days, I wish I would've slowed down and implemented more exercises that could have helped keep aches and pains away with performance at the forefront.
Are extra ab work, Reverse Hypers®, and band pull-aparts all you need? No.
The ten exercises listed here will keep you pain-free and help put pounds on your total. End goal: Be a stronger lifter and remain healthier for longer.
What Most Lifters Are Missing
The first thing to remain healthy is filling up "buckets" that powerlifters are missing. We already know the strength "bucket" is overflowing, and probably the hypertrophy "bucket" as well. Chances are your mobility and recovery "buckets" either have holes or are likely neglected across the board. Rather than just telling you to go foam roll or implement some mobilizations, I know that time is important for many people, and the goal is to get the most from the least.
RECENT: The Most Underutilized Training Tool to Break PRs
The two areas most powerlifters need to address are improving movement in the frontal and transverse planes. All the lifts we do as competitors (supplemental and accessory work, too) are in the sagittal plane, which means all we do is go up and down all day. This causes the body to get relatively stiff and typically locked into an anterior orientation with low back issues while the body is cranked through extension. We lack the ability to move side to side (frontal plane) and through rotation (transverse), and ultimately get out of the extended position.
Below you'll see ten exercises that can help fill these gaps. You can do them simply as part of your warm-up, a GPP or conditioning day, or even as your accessory work. The major goal is to have things you can take away today and immediately implement without having extra time in the gym, feel and move better, and remain pain-free.
1. Lateral Lunge or Cossack Squat
One of the first exercises that I have been implementing more and more is a lateral lunge or a cossack squat. This is a pretty basic lunging activity, but where you start and what you're looking for depends on where you are. If you're not super mobile, start with the lateral lunge and perfect it before moving to the cossack squat. The goal here is to move side to side and see some improvements in the hips and glutes long term. If you're a sumo puller, you might feel these help your mobility and keep adductor issues at bay.
Where I'd Implement Them: Put these as an accessory exercise on your deadlift days for 2-3 sets of 8-10 reps per side.
2. Landmine Sways
Next up is another frontal plane exercise similar to the lateral lunge, the landmine sway. This is an exercise I use with a lot of my baseball, softball, and basketball players in-season to keep the hips feeling good and mobile with some load. For us lifters, I think this is one of the best active mobility drills you can be doing for your hips and adductors. You can easily adjust load, height, and comfort within seconds, and it'll only take you 1-2 sets at most. The goal is to improve these so your hips can get lower over time, let the adductors get good and long, and ultimately improve your squat depth.
Where I'd Implement Them: I like these as part of my warm-up on lower body days before my first movement of the day. Typically 1-2 sets of 10 reps per side do the trick.
3. DB or KB Side Bend
Now I know what you're thinking, "Shouldn't we just do suitcase carries?"
And honestly, I'm right there with you. I love the suitcase carry, and I believe it's an exercise that should be implemented in your training frequently. However, I do think the side bend has benefits for us lifters.
First, I like that it keeps us moving in the frontal plane. Again, most of our trunk and abdominal work is either about creating stiffness or moving up and down. This exercise will do the opposite of both of those, ideally helping the low back feel better. The side bend will let our obliques and QL get good range of motion that we typically lack daily.
Where I'd Implement Them: I like these for light to moderate loads for 1-2 sets of 15-20 reps per side as part of my warm-up on upper body days. Typically after a hard lower body day, your lower back is left feeling stiff, which can be a good way to loosen things up before hitting the bench.
4. Front Foot Elevated (FFE) Split Squat
Next is the beloved split squat, specifically the front foot elevated variation. I like the FFE split squat because it helps push the body's center of mass backward. This might be tough to understand but hang with me here for a minute, as this theme will carry on the rest of the article.
Everything we do as lifters aims to push our center of mass forward - barbell on our back, arched in the bench press, deadlift, and all the accessory work. This is good, as this is what makes us stronger and better lifters. However, when it comes to feeling better and staying pain-free, we must ensure we do some of the opposite exercises. Elevating the front foot brings the ground up, so when you go down in the exercise, the front foot will need to push you up and BACK. Pair this up with a front-loaded position, and it's even better.
I lean more towards the FFE split squat over the Bulgarian split squat, as the Bulgarian variation further pushes you forward and the pelvis more anteriorly oriented. Use a double kettlebell front rack position to get the most out of this exercise. Increase your lower body strength and size in the glutes, hamstrings, and quad along the way!
Bonus: Your upper back and abs will also see huge improvement, and they are less likely to pitch you forward in your squat.
Where I'd Implement Them: Use these as part of your accessory work on lower body days for 3-4 sets of 8-12 reps per side.
5. Heels Elevated Cable Zercher Squat
Sticking with our theme of the split squat, next up is an awesome Zercher squat variation. This is an exercise I use a lot with older personal training clients to improve their lower body and their squat depth.
This variation has a lot going on, so let's break it down. First off, having the heels elevated lets the body sense the heels more so that we can get the pelvis in a more neutral position and naturally increase squat depth. Secondly, the cable is also pulling the body forward, so to combat that, the lower body will need to push up and backward. And lastly, by having the Zercher position with the cable and strap, the backside will open up and be less extended.
This is an amazing way to get a lot of quad work in if you don't have access to a leg extension machine or reverse sled drags while simultaneously helping improve your squat depth (if you have issues in that department).
Where I'd Implement Them: These work best as a lower body accessory exercise on squat or deadlift days, ideally for 2-3 sets of 10-15 reps. Focus on quality reps and depth over pushing super heavy weights.
6. Cicinelli Turtle Roll
This is probably one of the most awkward-looking exercises you'll ever see, but it's also humbling. This exercise aims to balance out all the extended base work we do as lifters and get in some quality flexion. The kicker is that we'll need to create quality flexion with our elbows and knees as we try to keep the yoga block (or med ball) squeezed while we roll. The rolling will help open up the backside and use physics to our advantage to have our guts inside us move towards our diaphragm and pelvic floor throughout the rep. It can help aid mobility as those tissues expand and contract. Be warned, your abs will be feeling these, I promise.
Where I'd Implement Them: I like these as part of my warm-up for 1-2 sets of 10 reps. They also work well as your main trunk work for the day for 3-4 sets of 10-15 reps.
7. Reverse Crunch
We have the infamous reverse crunch to round out this theme of helping offset the extended position. This is an amazing ab exercise, but for powerlifters it's even better as we fill in a lot of gaps that typically get overlooked.
By performing these with some good intentions, we can train in safe movements of flexion while simultaneously opening up the backside after a heavy squat or deadlift day. The key is to go good and controlled, ideally in a segmented-based move so that it feels like each vertebra is slowly going back towards the ground and getting as round as you can at the top. These will feel really good on your lower back after a heavy lower body day.
Where I'd Implement Them: These can work well as part of a warm-up for 1-2 sets of 10 reps or as your main trunk work for 3-4 sets of 10-15 reps.
8. Cross Connect Walking Lunges
Earlier I talked about how powerlifters don't do much to rotate in our training. The cross connect walking lunge is a great way to get in some rotation about the body without doing Russian twists and similar exercises.
The key thing with this exercise is to over-exaggerate the rotation while performing the lunge. You'll want to keep your arms up and think about bringing your elbow towards your upstance leg. This will mimic the phases of gait but also get the ribs rotating naturally. These won't be hard for most lifters, but they will feel awkward. You might feel some outer glutes and inner thighs while you do them, which is completely normal.
Where I'd Implement Them: These will be best served as a warm-up for 1-2 sets of 10-15 steps per side. Just focus on being fluid and rotating in the upper body.
9. Half Kneeling Landmine Overhead Press With Opposite Reach
Speaking of getting more rotation, this is one of my favorite upper body exercises to help improve not only rotation but shoulder and hip health as well.
To start, by performing a landmine press, we're going to get some good serratus anterior work which can be great for powerlifters that are constantly pulling their shoulders down and back on a bench press. Chances are your serratus is pretty weak, and this can help keep your shoulders feeling good well past your powerlifting days.
Secondly, being in a half-kneeling position ensures we can keep the hip flexors lengthened and help prevent ourselves from going into that extended position even more. And lastly, by reaching with our non-working arm, we can keep the ribs moving and rotating, similar to our gait cycle. Feel free to load the weights up here so long as you can keep your technique crisp.
Where I'd Implement Them: I like these on upper body days as an accessory exercise, usually for 2-3 sets of 8-12 reps per side.
10. Bent Over KB Row With Thoracic Rotation
And last but not least, we've got this amazing bent over row variation that can also get the ribs and body moving about rotation. I usually love this exercise for my baseball, softball, tennis, and swimming athletes. As lifters, we love to train our upper back, so here we can get a two-for-one deal. Chances are you're not going to be able to use weights as you would with a regular bent over row, but on the other side of the coin, you're going to open up your upper back and have things feeling good after the fact. Just ensure you're keeping your body in a good neutral position and focus on getting long and rotating.
Where I'd Implement Them: I like these at the end of an upper body day for 2-3 sets of 10-12 reps per side.
Just The Beginning
I know this was a lot of information to throw at you in one article. Hopefully, there were some exercises you've likely never seen or thought about implementing when it comes to improving your lifting. If you're clueless about where to start, ask yourself what you believe you need more in your training. Need more rotation? Pick one to two exercises to start implementing. Is the low back super cranky? Find a frontal plane exercise and an exercise to help open up your backside.
I've been using many of these exercises almost daily, and my body has been thanking me for it. I wish I had implemented them ten years ago. If you have specific questions or want other examples, feel free to reach out. Best of luck staying pain-free and strong!
Header image courtesy of Meana Albersworth
Brandon Smitley is a 2011 graduate of Purdue University where earned his Bachelor’s degree in Health and Fitness, and of Indiana State University with his Master's Degree in Coaching. His best lifts to date are a 567-pound squat, 330-pound bench, 510-pound deadlift, and 1377-pound total in the 132-pound weight class! Brandon holds his CSCS, USAW, and CPT certifications. He has opened THIRST with his wife, Adrian, to help athletes and others realize their full potential from proper strength training methodologies.
What do you believe you need more of in your training? More rotation? Is the low back super cranky? Pick 1-2 exercises and get started.
It's 2022, and it seems like new equipment and more efficient ways to get things done in the weight room are constantly coming to the limelight every couple of months. Although it's great for the industry, it's even better for those who train with this equipment.
However, there is this old-fashioned tool that the majority of lifters and coaches are forgetting exists. You likely see it every day in the gym and just think of it as a safety feature for your training (which isn't entirely a bad thing).
I'm talking about the safety pins.
Safety pins can massively benefit your training and improve position and technical prowess at specific joint angles (and many times can be easier to recover from).
As you continue to lift heavy, add size where you need it, and utilize ample recovery to benefit from the hard training, let's discuss how you can use pins in your training to break PRs.
Digesting the Basics
Using pins as part of your training shouldn't be the main part of your training. These variations should be used as supplemental exercises in more cases than not and are designed to help aid areas of your lifts where you have trouble. Setting up a rack pull (or pin pull) is a giant waste of time if you're only going to pull it six inches and you have issues from the floor.
Most pin work will fall under one of two categories:
- Concentric
- Isometric
You're very unlikely to see eccentric exercise options from utilizing pins. I've even written in the past about what the difference is between squatting and benching to pins and pin pressing and squatting from pins.
Realize that using pins can be somewhat a pain in the ass. Finding where to set the pins up, using them in a group with training partners, and then moving into them after some basic squat or deadlift work can feel like a hassle, especially if your training time is more limited.
You'll also need to have a good training facility with quality racks, bars, and owners that are cool with you potentially dropping some weights at times (both from being loud and putting the equipment through the wringer). I've personally not had any issues with my elitefts racks, but still something to consider.
Concentric Work
Let's discuss using pins from a concentric standpoint. If you don't understand concentrics, there is no lowering portion of the lift (from a training perspective). The deadlift, by nature, is a concentric-based exercise. Concentrics are usually harder because of the need to generate force from a dead-stop position and the inability to use the stretch-shortening cycle. This is great for decreasing soreness (DOMS) and improving the rate of force development (RFD).
Typically, you'll see concentric work with pins programmed for singles. The main reason behind this is that you'll basically want to drop the weight back to the pins. Lowering the weight back slowly will essentially defeat the purpose. If you do more than one rep in a set, drop the weight back down, reset, and go again. You'll likely perform these for three to four singles if you're using them for a supplemental exercise in your program. If you're going to perform these as your max effort work, just work up to a top single for the day and shut it down.
When it comes to where to set your pins, my suggestion is to set the pins just slightly under your sticking point. This is going to teach you to accelerate through the sticking point. Most sticking points that you see are typically later than where you truly have issues. Think about a missed deadlift just above the knee. You likely started to slow down below the knee and didn't have enough speed to get past the top of the knee. You can teach yourself to drive through that sticking point by setting your pins at mid-shin.
Below are some videos and explanations to help you with various concentric pin work:
Anderson Squat (Squat From Pins)
Pin Press
Conventional Rack Pull
Sumo Rack Pull
Good Morning From Pins
Isometric Work
Another amazing aspect of pins is using them for isometric work. Nothing is more humbling than trying to pull a sub-max weight into a pin and feeling like you can't budge it. Most people will use pause squats, Spoto press, and deadlifts with pauses for their isometric work. These aren't bad exercises by any means, but the pausing aspect can be subjective.
Did you really hit a PR if you constantly don't hold your pauses for two seconds? Because I can tell you, the majority of paused work I see is crap and just a "slow-down" of the original movement.
When it comes to isometrics and using pins, we've got two main reasons this can be beneficial:
- Yielding
- Positioning
For many lifters, learning to strain or yield can go a long way because you'll have more time under tension in an area where you need it. Most isometrics into pins will be held for five to six seconds. Five to six seconds may seem short, but it will be much longer than you think. The great thing about these is that they will improve your strength at or about 15 degrees from your joint position, so you can see benefits above and below your sticking area if you get the pins set up in the proper position.
Another positive piece to performing isometrics into pins is that it can help you with your positioning. As you go into the pins, you'll immediately be able to feel that you're too far forward, behind, elbows are flaring, etc. Generally, when you see people miss lifts or have issues around their sticking point, from a technical standpoint, they go into the position with technical issues, which biomechanically puts you in a rough spot.
Pair these with a similar movement for approximately the same weight or effort so that you can also see some post-activation potentiation.
When it comes to programming, I've taken these programming methods from Cal Dietz and Tri-Phasic work. Again, I've had success with them, but feel free to experiment on yourself and see if you find you need more or less load.
I like using a three-week wave of 60%, 65%, 70%. Each week, you should perform three sets of one with an isometric hold for five to six seconds.
Below are some examples of how you can set the pins up for the squat, bench press, and deadlift. Of course, you could also set these up for other major movements with some creativity.
Back Squat Into Pins
Bench Press Into Pins
Conventional Deadlift Into Pins
Sumo Deadlift Into Pins
Pushing It Together
While the implementation piece of pins can be a major hassle, I think you'll find that using them can serve as an ace card for meet preps and breaking through plateaus you've had for quite some time.
I've used pins to hit my all-time best bench press, and I've gone on to help others hit all-time PRs as well with these methods.
They suck, but the results will quickly make them completely worth it.
Feel free to reach out if you need any help with setup and implementation.
Brandon Smitley is a 2011 graduate of Purdue University where earned his Bachelor’s degree in Health and Fitness, and of Indiana State University with his Master's Degree in Coaching. His best lifts to date are a 567-pound squat, 330-pound bench, 510-pound deadlift, and 1377-pound total in the 132-pound weight class! Brandon holds his CSCS, USAW, and CPT certifications. He has opened THIRST with his wife, Adrian, to help athletes and others realize their full potential from proper strength training methodologies.
You likely see it every day in the gym and just think of it as a safety feature for your training. You’re not entirely wrong but USE it!
If you go digging for conjugate-related articles, you’ll likely find everything under the sun regarding dynamic effort cycles, bands, chains, exercises popularized by Louie Simmons and Dave Tate, and new principles you can implement into your training. What seems to be lacking is max effort cycles and how to appropriately line up your main movements to see progress.
While most conjugate-based training aims to bring up weak points (and rightfully so), how you set up your max effort work is crucial to setting up the rest of the session. You shouldn’t just pick a random exercise and run with it for the day. You should certainly have staples that you know help show progress (testers), and you’ve got the staples that you know consistently give you that progress (builders).
Below are five max effort cycles that I’ve run personally and with clients, and ones you can use to immediately align your training and hopefully hit new PRs here soon.
Below I’ll briefly describe the cycle and then provide some examples.
Ascending Cycle
The Ascending Cycle is all about building up in load over the next three to four weeks. How long you want your lifts to build up in load is what works best for you. The nice thing here is that as you redo the cycle, your body will get a mini “deload” as loads decrease agree. Dave has talked about setting your max effort cycle up like this in the past.
- Week 1: Front Squat
- Week 2: SSB Squat
- Week 3: Back Squat vs Bands
- Week 4: Reverse Band Box Squat
As you can see in the example above, the loads you should be using each week will naturally increase.
Descending Cycle
The Descending Cycle is essentially the opposite of the Ascending Cycle. It works great as you approach a meet to allow more central nervous system recovery but still take some hard singles to address strength and places where you need improvement. Here’s an example with the bench press in mind:
- Week 1: 2-Board Press
- Week 2: Reverse Mini Band Bench Press
- Week 3: Bench Press
- Week 4: Close Grip Spoto Press
As mentioned, you should see loads you’re able to use for this cycle decrease over the four-week cycle.
Wave Cycle
The Wave Cycle is one of my favorites and, while more advanced, is a great way to get out of ruts. It focuses on adjusting the nervous system response you get to benefit in the upcoming weeks. Generally, you’ll see this in three-week waves to see the best results.
What you’ll do is pick a mechanical disadvantageous lift, an advantageous lift, and then your realization-based lift. This works awesome for sports training as well, as most coaches want to stick close to the main movements, and this cycle allows you to return to the main lift rather frequently. Below I’ll provide a squat and deadlift variation of the cycle.
Squat Cycle
- Week 1: Front Squat
- Week 2: Reverse Band Squat
- Week 3: Back Squat
Deadlift Cycle
- Week 1: Deficit Deadlift
- Week 2: Block Pull From Mid Shin
- Week 3: Deadlift
*Use preferred stance*
As you can see, this creates peaks and valleys, which can be great for building the nervous system up for a peak on test day (or a meet), and also great for in-season athletes that know they have certain weeks where you’ll need to pull back (big conference game) and then a bye week where you can push things a bit more.
Triphasic Cycle
The Triphasic Cycle is built off the principles of the triphasic system. My good friend Christian Anto has amazing material for using the triphasic principles in powerlifting, so I would highly suggest you read his material if you want to go deeper into this topic.
For this wave, it’s relatively simple to set up. It’s a four-week wave consisting of an eccentric option, isometric option, and concentric option followed by the main movement you’re looking to improve. Here’s a good bench press wave:
- Week 1: 5-Second Eccentric Bench Press
- Week 2: 5-Second Spoto Press (pause just off chest)
- Week 3: Pin Press (just off chest)
- Week 4: Bench Press
As you can tell, the goal is to specifically focus on just that adaption for the week. You can certainly drag this out to seven weeks by doing two-week mini-waves of each, but I’ve found this works better if you’re going to use the principles for your supplemental work.
5/3/1 Cycle
5/3/1 is one of my favorite cycles to use for beginner to intermediate lifters and athletes. It provides ample practice with the movements and helps the athletes get used to taking heavier weights if that’s what you need to teach them. Find two movements that you want in your program to work on, and you’ll use them for the next six weeks. For this example, I’m going to use the squat as an example lift we’re going to improve.
- Week 1 - Front Squat 5RM
- Week 2 - Back Squat 5RM
- Week 3 - Front Squat 3RM
- Week 4 - Back Squat 3RM
- Week 5 - Front Squat 1RM
- Week 6 - Back Squat 1RM
- Deload
Notice that I didn’t pick any crazy variations (although you can pick whatever variations you need, clearly), but I’ve found this works better with less experienced lifters and athletes. They can usually make progress on lifts by merely getting better at them, so you’ll want to use that to your advantage with a cycle like this.
Putting It All Together
Hopefully, some of these cycles can go on to help you break some PRs, train your teams better, or overall give you some guidance on how to cycle and set up your max effort work. With some thought processes and attacking your weak points, you’ll find that you can not only get more from your max effort work but hopefully see progress quicker.

Brandon Smitley is a 2011 graduate of Purdue University where earned his Bachelor’s degree in Health and Fitness, and of Indiana State University with his Master's Degree in Coaching. His best lifts to date are a 567-pound squat, 330-pound bench, 510-pound deadlift, and 1377-pound total in the 132-pound weight class! Brandon holds his CSCS, USAW, and CPT certifications. He has opened THIRST with his wife, Adrian, to help athletes and others realize their full potential from proper strength training methodologies.
How you set up your max effort work is crucial to setting up the rest of the session. Don’t just pick random exercises here.
When building a strong deadlift, two common variations are present in the strength and conditioning world—the stiff-legged deadlift (SLDL) and the Romanian deadlift (RDL). However, they are often confused for one another and/or entirely done the same way. There are some key differences between the lifts and why you might use one more than the other. Below are videos that describe each exercise, including how we coach them to our athletes and strength competitors at Terre Haute Intensity Resistance and Sports Training (THIRST).
Romanian Deadlift
Let’s start with the Romanian deadlift, as I feel it’s more commonly used in sports performance, personal training, and strength circles universally. This is the big hinge-based exercise many of us work to coach and correct. Personally, when I work with athletes and clients, they must be able to perform this exercise for certain weight and reps to learn how to deadlift. This is a great way to ensure they develop the proper glute, hamstring, and low back strength before pulling things off the floor. And for many people, just learning to hinge can be a big struggle as they dissociate the hips from the low back.
MORE: The Best Lift for Collegiate Athletes
First, an RDL will start from the top and begin with an eccentric or lowering of the barbell. I suggest starting with the barbell in a power rack, then taking one to two steps back for clearance. Once in this position, slightly bend or unlock the knees to achieve the “soft” lockout position. The lats will be engaged (think about squeezing an orange or tennis ball in your armpits), and then the hips are pushed back while the torso and spine will stay long and neutral. If done correctly, your hips will likely go behind your ankles in the bottom position, which will be slightly below the knee cap to mid-shin based upon your mobility. A great goal I like to use with my athletes is to keep the barbell on the thighs the whole time. Then return to the start position by bringing the hips forward and squeezing the glutes at the top.
Key Programming Considerations
Since the RDL is very eccentric heavy, it’s great for filling in the holes that the standard deadlift misses out on (it starts with a concentric action—picking it up off the floor). With that said, recovery will be harder due to the increased time under tension, especially if you utilize longer eccentrics for each rep.
- Program as a supplemental based exercise for strength athletes
- Program as the main movement for athletes and personal training clients
- Use for 3-5 sets of 5-10 reps
- Great for improving lockout strength and torso positioning
- Monitor stress for in-season athletes
- Ensure the athlete/client can achieve ~60-degree straight leg raise
Stiff-Leg Deadlift (SLDL)
Next is the stiff-legged deadlift, which is considerably more popular in the strength sports world. This is also an amazing addition to building up the deadlift, particularly the erectors and mid-back. The SLDL is considerably harder to teach and execute because you really need to know how to hinge, to not only prevent injury but optimize the positioning the exercise needs you to be in to get the desired training effect.
For the SLDL, you’re going to start with the barbell on the floor. In most cases than not, this exercise is performed with a conventional stance, but you can certainly use a sumo stance if you have the mobility to do so. I like to start with having people actually hinge back similar to an RDL while the barbell is lined up with the midfoot, then try to reach the bar. Once they hit a “wall”, they’ll let the arms hang longer and “pull” themselves into position so that their back is completely flat, lats are turned on to pull the slack out of the bar but the bar will still remain over midfoot and shoulders, with the neck neutral. From this position, they will push their feet into the ground while using the glutes and hamstrings to initiate the movement. The barbell won’t come in contact with the thighs like in the RDL, but the hips will come forward to meet the bar once it passes the knees.
Key Programming Considerations
The SLDL has some unique considerations since it has more range of motion and overall more musculature involved to move the weight (and typically can use more load than the RDL). Like the traditional deadlift, it starts with a concentric action, which can be hard on the nervous system to break the initial inertia to get the load moving. I cannot express this enough, but do not use touch-and-go reps with the SLDL.
- Program as a supplemental-based exercise for strength athletes
- Typically not programmed for sports performance or personal training clients (risk is not worth any reward IMO)
- Use for 3-5 sets of 5-12 reps
- Great for improving starting strength and back strength
- CNS heavy, so keep in mind peaking and overstimulating CNS too frequently
- Ensure the athlete can perform an RDL properly and has a very technically sound deadlift
- Consider athlete low back history
Sample Deadlift Training Templates
Below are two training sessions that can help aid your deadlift based upon where your deadlift might be halting:
Lifter A - Weak Lockout and Mid Position
A1) Low Block Pull (1-2”) vs Bands - Work up to a hard single (RPE 9)
B1) RDL - 3x6 with 5 sec eccentric
C1) Bulgarian Split Squat - 3x10-12 per leg
C2) Lat Pulldown - 3x8-12
D1) Single Leg Reverse Hyper® - 3x10 per leg
D2) Double KB Front Rack Carry - 3x~50 yards
Lifter B - Weak From Floor and Starting Position
A1) Deficit (~1.5”) Deadlift - Work up to a hard single (RPE 9)
B1) SLDL - 3x8 (RPE 8)
C1) Glute Ham Raise - 3 sets, max reps
C2) Bent Over KB Rows - 3x10-15
D1) Bilateral Single Leg KB Deadlift - 3x8 per side
D2) Standing Band Crunch - 3x12-15
There are dozens of deadlift variations that help improve your deadlift strength and technique, but there is no question that the Romanian deadlift and stiff-legged deadlift are the two most common to see in strength and conditioning realms. With proper execution and programming, you’ll be able to hit a new deadlift PR in no time.

Brandon Smitley is a 2011 graduate of Purdue University where earned his Bachelor’s degree in Health and Fitness, and of Indiana State University with his Master's Degree in Coaching. His best lifts to date are a 567-pound squat, 330-pound bench, 510-pound deadlift, and 1377-pound total in the 132-pound weight class! Brandon holds his CSCS, USAW, and CPT certifications. He has opened THIRST with his wife, Adrian, to help athletes and others realize their full potential from proper strength training methodologies.

If your deadlift sucks at lockout, mid-position, or from the floor, you’ll want to add the stiff-legged deadlift and Romanian deadlift into your training program. Here’s how to do them correctly, with a sample training template to get started.
Say what you will, but the triceps are the evil twin of arm development. Rarely will you have someone ask you, "What do you do for triceps?" It's more likely to be, "What do you do for arms?"
We all know by now that your triceps make up the vast majority of your size in your upper arm (or at least they should). If you want shirt splitting arms, plus a bench press to match, you better have massive triceps. In my gym, we call them Tricepticons. You know, the antagonists to the Autobots that get so much love (biceps), but we know that Megatron is the almighty.
This article is aimed at improving your triceps, so your bench press will benefit too. These are primarily accessory based exercises that would follow after your main bench press work. I purposely left off the close grip bench press and board press work so we could have exercises for a variety of situations and programs—giving you something you might not have considered.
Rolling Tricep Extension
Rolling Tricep Extensions are my personal favorite accessory movement when it comes to the triceps. When I need my bench press to move, I dust this exercise off and abuse it. It's great for developing the long head of the triceps, but also starting strength due to the dead stop on the floor for each repetition. Make sure you keep your elbows high and try to throw those dumbbells across the room.
I prefer programming this more on the heavier side of things for 3-5 sets of 8-10 reps. These fall in great after your supplemental work.
EZ Bar Skull Crusher
Skull crushers are a classic tricep exercise that most people probably recognize. They tax the medial and long head of the tricep very hard and should probably be a staple in most beginner training programs for direct tricep work. I like to think of these as my supplemental exercise for a close grip bench press. The main issue becomes elbow pain management once you get strong enough. These can wreak havoc on your elbows if you don't take care of them. For my example, I'm using the elitefts Zig Zag bar, which is thicker and angled to help reduce some of the elbow strain. I would also recommend adding chains if you're a veteran lifter that still wants to get these in to decrease the load on the elbow when in the bottom.
You'll probably see these programmed for 3-5 sets of 6-10 reps for best progress. The key is to ensure you're keeping technique emphasized over the weight used. That will save your elbows in the long run.
Other Skull Crusher Variations
With our main skull crusher exercise out of the way, we now have different ways we can load this exercise for some variety and slightly different training effects.
DB Skull Crusher: These are wonderful for an accessory exercise when you're short on time. All the bang of the barbell versions, but less wear and tear. Nonetheless, you can also crank the volume on these if desired.
I think 3-4 sets of 8-12 reps is a good sweet spot, but I've done as much as 6x20 in workouts when I'm short on time.
KB Skull Crusher: Just like the dumbbell version, these are great for accessory work when you're short on time. But the mechanics of the kettlebells mix things up as the bell moves in your hand as you lower and extend the weight. These are one of my personal favorites as I feel the best stretch in the bottom without much elbow discomfort.
Another 3-4 sets of 8-12 reps should do the trick for these.
Bodyweight Skull Crusher: If you're someone with minimal equipment or training in your garage, this is a fantastic version that you can quickly set up in your rack with just your bar. You'll place the bar in your rack at a moderately challenging height, and lower your body with your triceps as you move your body (specifically your head) towards the bar. Then extend back up to the top. Think of these as the inverse option to the barbell.
Performing reps a tad bit higher is probably ideal if you're limited on equipment, somewhere in the 8-15 rep range for 3-4 sets.
Zercher Tricep Extension: While it doesn't have skull crusher in its name, it certainly has its roots from the dumbbell skull crusher variation with a minor twist (literally). Set up as you would with your standard DB Skull Crusher, but as you come down, rotate your palms toward your face, and then as you extend, rotate them back. This will hit the medial head of your tricep like no other. With the position our hands are in, we definitely want to have reps on the lighter side here so that we can keep a good hold of the dumbbells but also feel a good stretch and contraction.
Knowing that, stick with 10-15 reps for 3-4 sets.
SSB JM Press
If you're reading elitefts, you should know of JM Blakley and his contribution to powerlifting, especially the bench press. While I love the JM Press, I think it's one of the worst exercises for long term elbow health. This is where I think the elitefts SS Yoke Bar comes in to help negate that fact. You'll need to take the handles out of the bar for these, but because of the camber of the bar, it will do the "rolling" aspect for you and help force you to keep your elbows up on the higher side of things. It's best to think of these as your rolling tricep extensions with the safety squat bar, except much heavier.
The JM Press is one of the few exercises listed that could be a main movement for your training day, but it likely fits in better as a supplemental movement after your main bench press work for sets of 6-10 reps.
Incline Tate Press
The Tate Press has some great history here with Dave, but I enjoy the incline version. I think the increased range of motion lends itself to better hypertrophy and tricep training (especially if you have short arms like myself). The key here is to have the dumbbells constantly touching and squeeze the tricep at the top while lowering the dumbbells back to the start position. You can typically get rather heavy on these, so control the tempo a bit and don't overextend at the elbow. You should feel these at the elbow joint versus the "meat" of your tricep, compared to other tricep exercises.
Since this is an accessory exercise, place it where it fits best for you after your main work. Typically 3-4 sets of 8-12 reps will get the job done.
Cross Body Tricep Extension
This is a classic bodybuilding isolation exercise, but I believe it's a great option for those with elbow issues that want massive triceps. Having our elbow supported with our opposite hand will provide some feedback and give up something to press the crook of our elbow into as we extend (think about how this is done with a Sissy Squat). This is certainly an exercise where you want to focus on the stretch and contraction. Bringing the working arm across the body as much as possible will help keep time under tension on the triceps, even at the end range of motion. An added benefit is that you can bring up a weaker side or pick up on a weaker side very quickly with this exercise.
Perform these for 3-4 sets of 8-15 reps and focus on the stretch and squeeze before slinging around heavy weight.
Dips
Look back in time at some of the greatest bodybuilders and powerlifters, and they did a plethora of dips to aid chest and tricep strength. When you're trying to pick exercises that give you a ton of bang for your buck, it's hard to argue against dips. The only thing to be aware of is shoulder discomfort or problems, especially when loaded heavy. But if that all checks out for you, dips should probably be a part of your training program in more cases than not. For our tricep development, an option with parallel handles/bars would be preferred, but you'll see progress regardless of which option you choose. When your hands are on the bars, keep the elbows tucked and drop down to roughly 90 degrees and press back up into lockout.
With these being a bodyweight exercise, I typically like to program 3-4 sets of max reps, and if the athlete/lifter can get 20 reps on all three sets, then we can begin adding some weight to drop down into the 10-15 reps range. While I think heavy dips can have some merit, I would avoid the reps dropping below eight, just for shoulder and pec health in the long run.
Supinated Cable Pressdown
How could I go without having a pressdown in the process of building the Tricepticons? While I love pressdowns as much as the college gym bro, when it comes to building thick, meaty triceps worthy of benching massive weights, we need to do more supinated work here. The supinated version hits the medial head tremendously better, especially compared to the rope variation, which hits the lateral head (or lazy head). I would suggest performing these with a handle that rotates for the sake of your wrists, and an EZ bar/angle bar attachment would be ideal. Like your standard pressdown, keeping the elbows in and extending long is the name of the game. With this being a lighter exercise, you can crank the sets and reps to your heart's desire. Pressdowns are an exercise that I think you can perform multiple times per week if needed, and still recover.
Push-Up Hell
This is my favorite tricep finisher, with ties back to Dave Tate's board press hell. I work with a lot of kids, so I prefer the push-up for many programming reasons, but I do believe when this is used as a finisher, it will blow your arms up with minimal time. You'll need a couple of board press boards, and then you will perform five repetitions of a push-up, then do them to a one-board, two-board, three-board, four-board...and then all the way back down. This would be a total of 45 reps for the set, and with a close-grip option, it makes it challenging for even some of the strongest. One to two sets is all that's needed.
Tricepticons Unite
If you're looking to have massive arms, a respectable bench press, and just fill out that elitefts T-shirt, these should get you well on your way. You can use a variety of the exercises and approaches in here to mix up training and keep things fresh, but stick with some of the basics as well. I'd recommend training your triceps twice a week in some fashion, but not destroying them in the process. Oh, and don't forget your couple sets of curls for elbow health and Optimus Prime.
If you’re looking to have massive arms, a respectable bench press, and just fill out that elitefts T-shirt, these should get you well on your way.
Dig up any great training deadlift article here on elitefts, and you’ll find the two main parts to a huge pull are the glutes, hamstrings, and the back. All the greatest deadlifters have a massive, huge back stacked with huge glutes and hangin’ hammies. For this article, I’m going to discuss five exercises that I’ve had success with building a back that is not only huge but will aid your pull come meet day.
A few things we need to determine though is what is actually important when it comes to back strength for the deadlift. When properly deadlifting, we know that the back is not a prime mover, it acts isometrically to help maintain position throughout the entire pull. This doesn’t mean we can’t train extension of the back (with things like the Reverse Hyper™, back extensions, and the like), but that in more cases than not, we need to train it isometrically for it to have carryover for the deadlift come competition day.
RELATED: Building the Raw Deadlift
This involves the erectors to maintain position (neutral spine, or very close to it with some conventional deadlifters), the lats, and the rhomboids/traps to maintain scapula position (depressed and hunkered down). Knowing this, we can begin to formulate a list of priorities, but more importantly, call upon five exercises I’ve seen help improve back strength for the deadlift.
Snatch Grip Deadlift Off Blocks or Mats
While I hate the snatch grip deadlift, it’s a great exercise to build the deadlift with a bit of variety. The wide grip taxes the lats to a higher degree and will force the lifter to maintain a neutral spine more. Getting rounded on a snatch grip deadlift feels like death, so the exercise itself forces you into optimal position.
Performing the snatch grip deadlift off blocks or mats, however, is great that it takes out some of the initial leg drive and can get you more into a position to mimic a conventional deadlift. The traditional snatch grip deadlift is actually going to increase time under tension (which isn’t a bad thing!), but we will need more quad strength and leg drive to get the weight from the ground to lockout (again not a bad thing). However, if back development and strength is what you need for your pull, I suggest pulling off blocks or mats that get the bar about knee level or slightly below.
These would be best suited to be a supplemental exercise for 2-4 sets of 3-6 reps after your main deadlift work. Add bands or chains for extra suck if you wish.
SSB Good Morning
Number two on the list is the Safety Squat Bar good morning, and for a good reason. Anyone that’s read Louie’s material or enough of Dave knows that the good morning is a great exercise to aid the deadlift. Using the Safety Squat Bar is not only more comfortable to set up, but the camber of the bar is trying to bend you over and make you eat the floor.
The main thing I see botched with this is people going too heavy and letting the bar actually fold their thoracic/mid back over. To have this help aid our deadlift, we need to keep this as rigid as possible during the execution. This will help you build thick, dense, statically stronger erectors from head to butt at a mechanically disadvantageous exercise. Ensure that you’re hinging at the hips, keeping the knees soft, and maintaining that position as well. Too often you see many good mornings become a squat morning. Don’t be that person.
This is another fantastic supplemental exercise for 3-4 sets of 6-10 reps after your main deadlift work, or even after squats. If you want to upgrade the suck on these, have some elitefts bands pulling from the front of your rack or monolift.
Pendlay Row
Next up, is the classic Pendlay Row. While most deadlift articles will push the bent-over row (again, a fantastic exercise), I prefer the Pendlay Row for a couple of reasons:
- We’re constantly bent over in a neutral position aiding in isometric back strength.
- Each repetition involves a dead stop, which will require the abdominal and upper back work to have to rebrace for each rep.
- Cheating on reps becomes more challenging. You must maintain the same torso angle the whole time.
- You don’t have to actually deadlift the bar off the ground.
Think of yourself performing a Romanian Deadlift (RDL), and getting the bar to the ground. This is your start position. Perform an explosive row while maintaining good, neutral positioning, and then return the bar back to the ground. We obviously get some rowing volume in, which is never a bad thing either for the competitive powerlifter.
I prefer programming these for 3-4 sets of 8-10 reps per set. If you have access to a cambered bench bar, these are even better due to the added range of motion of the row.
Chair Deadlift
Anyone that’s performed the chair deadlift knows how bad these suck. While they are probably programmed to mainly aid in hip development (especially for sumo pullers), they also are great at building the back for the deadlift. To set this up, you’ll need a chair or plyobox that can allow your hips to get slightly lower than your starting position. Your feet will be positioned wide (sumo stance) with toes turned out and shins perpendicular to the floor. Grab the bar, and use your erectors and hips to lift the bar from the floor with a good second hold below the knee. Then return the bar to the ground and repeat. Typically I like to program these in rep ranges divisible by three, and have the lifter stand on the third rep of each (so a set of 12, the lifter would stand on reps 3, 6, 9 and 12).
This will build the low mid back up through static strength, as if you are not able to maintain position, the bar will not leave the ground. This exercise works great if you lose position as you get ready to pass the knee during a max effort lift. It will also teach you how to drive your hips forward to meet the bar rather than extending through your low back at the top of the deadlift.
As I mentioned, I like programming these with sets of 12 or 15 due to programming an option to stand up, but you don’t essentially have to do this. If you want to upgrade it, pull against bands to make those extra two-second holds suck a little more.
Straight Arm Lat Pulldowns With Iso Hold
This exercise is kind of out there, but I do feel that it’s highly overlooked when it comes to lat development for deadlifters. Most will push lat pulldowns and pull-ups (again, great exercises) but using a straight arm option with an isometric hold (preferably 2-3 seconds), can help teach the lifter how to maintain the bar in close to the body while increasing time under tension. It’s one thing to be able to sling some weight around on lat pulldowns, but how much time do you really spend in the contracted state isometrically when you do that? Maybe 2-3 seconds tops over the course of a set of 12-15 reps...because we chase the pump. Instead, hold the contracted position for 2-3 seconds to build up the strength in that range of motion to help keep your pulls in close, but also cranking up the intensity of your accessory work when you need it.
Since this is an accessory exercise, place it where it fits best for you after your main work. Typically 3-5 sets of 10-15 reps with a 2-second isometric will blow you up.
Finish Strong
I hope you found a new, different, or improved way to make your deadlift training more efficient to aid your back development to pull a new PR. If nothing else, you’ll look a little more yoked and have some different ways to train your deadlift during a plateaued period of training.
There are a ton of great back exercises to choose from, but what exercises translate to more pulling power? More specifically, what exercises bring up weaknesses found in your erectors, lats, and rhomboids?
I’ve written a couple of different articles about my gym, Terre Haute Intensity Resistance and Sports Training (THIRST), and how to start a garage gym. Not only have I received great feedback and input, but I also feel that I’ve helped steer some people in the right direction. Now that my wife and I have been in business for two years, I figured it was time to give a progress report, especially after COVID-19.
Year One Summary
To backtrack a little bit, year one was undoubtedly a challenging year for us as a business. Starting our gym while we were tying the knot, purchasing a house, and both working full-time jobs was trying enough. During year one, my wife and I kept our full-time jobs while running the gym. Year one already had us hitting profit margins and getting in the black while seeing quick, healthy growth. From everything we could tell, year two was going to be a great year of advancement, and what we had hoped to be a start to an end of our full-time jobs. But then, life happened.
Cancer
Shortly after our one year wedding anniversary and one year anniversary of the gym, my wife was diagnosed with Hodgkin’s Lymphoma. She was 24 years old at the time, and by no means did we think she had cancer. After all, we’re young, healthy, and have no family history of cancer. But after my wife’s first powerlifting meet in April of 2019, she noticed she had some lumps on the left side of her neck, and she continually told me that she felt like her lifts were getting worse and worse while she was growing more tired by the week. She went to the doctor and was prescribed antibiotics and anti-inflammatories. These helped for a short period, but then she was just back to feeling the same. She then went to see a family doctor, where they ordered imaging, and that’s when we got the bad news—it was Hodgkin’s Lymphoma.
After meeting with multiple doctors and discovering what would need to be done, we knew that chemotherapy was going to be the best route of treatment. As a young female, we opted to avoid radiation to prevent any risk of breast cancer in the future. This part of our lives was the most challenging thing I’ve had to deal with, and I can’t imagine how she felt week after week: no appetite, constantly sick, no energy, and having to miss work at times with bills coming what seemed like every week. Not to mention the strain it put on a young, newly wedded couple that thought they had their whole lives ahead of them.
RECENT: How to Start a Gym with Less Than $20K
Fortunately, we have some amazing friends and family that raised funds, donated money, and did everything they could to support us to ease the transition of missed work, bills, and decreased gym hours. We even got to a point where our family members had to open the gym in the morning so that members could get their workouts done. In the meantime, I was swamped with my full-time job plus overtime and running the gym in the evening and weekends. I thought many times that either the gym or our lives would never recover, even though we were ensured that she would make a full recovery and beat cancer.
Once in remission (September 2019), we started to figure out how I could somehow work at the gym full-time. I’m not sure what it was, but even with my wife out with cancer most days (she continued to work at the gym and her full-time job as much as she could) and my hours at the gym only in the evenings, our athlete and client numbers continued to climb week after week, month after month. When we knew treatments would stop in December, something would have to change to slow us down a little bit. We couldn’t do this forever, and the numbers began to line up. I knew that if I left my full-time job, I would be taking a nearly 50 percent pay cut to be at the gym full-time. The thought was that with my all-out dedication to the gym, I could put my time and energy into marketing, training, open hours, and overall, give the gym a better chance to see that money come back through the doors.
I used my last couple weeks at my full-time job to get a hernia surgery performed, ran out my PTO and FMLA, and then left on a huge risk that we would see increased business in three months or less.
Full-Time Gym Owner and Our First Hire
Essentially starting after Christmas, I opted to move to the gym full-time and see what I could make happen. Fortunately for us, we had an amazing intern, Andrew, that stepped up during our trying time of cancer to help us run and coach at the gym. Without Andrew, there is no way I would have been able to take the leap of faith to leave my full-time job. We were preparing for our annual RPS powerlifting meet in January of 2020, when Adrian and I decided we needed to bring Andrew on as a part of the staff. While the short two months of being away from my full-time job, we had seen revenue increase nearly fifty percent. I knew that with my wife still coming back from cancer, getting back to her full-time job (and now desperately needing healthcare for the next five years or more), I needed a coach that I could trust and knew our systems in and out. Andrew stepped up when we needed him the most, and we decided to offer him a part-time coaching position beginning in February 2020.
That alone brought its own learning curves. I have never had to fill out employment paperwork, taxes, and do all the little behind the scenes tasks, so that took time to learn and get into a rhythm itself. I had managed multiple college students in the past with other jobs and positions, but this was different because now someone was relying on my business to do well enough to continue to pay him. Needless to say, having Andrew on staff has been one of the best things we’ve done to grow our business and provide an even better training experience for our athletes and clients.
COVID-19
After a couple of months of Andrew working for us, we got the dreaded COVID shutdown thrown on us. Regardless of your stance with this (I’m going to keep politics out of this article). It was a huge swift kick to the nuts for us. I couldn’t believe that the government could just shut us down. What were we supposed to do for our income? Sure, my wife still had her full-time job (she works with high functioning special needs population), but the first thing I started to worry about was being able to pay rent, utilities, my mortgage, and just feeding my family. How long would this last? And how long could we make it?
Fortunately for us, we’ve got a great family at THIRST. As hard as it was, we asked all our members, parents, clients, and athletes to keep their regular billing going, and we would honor all training. We had a couple of people that needed to stop payments for their financial reasons, which was completely understandable. But for the most part, everyone agreed to stay on board and support us.
In Indiana, we were able to open back up around Memorial Weekend. This would be amazing for some communities, and luckily we happened to live in the right state. We provided all of our athletes at-home workouts, made training videos, gave them bands from elitefts, and rented out some fundamental equipment. We also called each family, hand wrote them cards with a THIRST logo sticker, and now that we’re open, we’ve given each person a free limited edition shirt. That’s the least we could do so that we could keep our business and our lives in check. And I still feel like we owe them so much more.
What Did I Learn?
If year two taught me anything about business, it’s ALWAYS to give more than you take. Provide value in any and all ways that you can. This could look like: giving free apparel, giving a little bit of wiggle room for long-term clients, being flexible with your commitments, showing up at games and family events to the best of your ability, getting to know people on a personal level outside of just the gym, and to continue to educate them for free.
RELATED: How To Reopen Your Gym
We dumped hours and hours into continuing education, whether that be articles, YouTube videos, phone calls, text messages, DM’s, starting a podcast, etc. While I felt like I was taking on more (and I certainly did), it’s come back to boost us further than we were before the closure.
I also learned the value of Search Engine Optimization (SEO). I spent about 10-20 hours a week on just improving this while we were closed, so that when we were given the green light to open, we were the business at the top of Google with free resources and information.
We also discovered that we have indeed built a family in our four walls. I know it’s talked about all the time with business, but I genuinely believe that gyms like ours that are a close-knit family, will support and aid each other in times of struggle. We have been blessed to call all the people that are in our gym family, and it’s motivated us to continue to push that level of unity even higher.
Takeaways
While we certainly did not have an optimal year two of business, I do feel that the foundation we laid during year one is why we still have a gym to go to every day and “Build Better People Through Strength.” We took a couple of swift hits, but each time we came back stronger. Create the foundation, community, and truly follow your core values, and your gym or business will come out on top of hardships at the front of the pack.
From everything we could tell, year two was going to be a great year of advancement, and what we had hoped to be a start to an end of our full-time jobs. But then, life happened: COVID-19, cancer, closure, and more.
I recently did some digging in my old elitefts achieved training logs, and came across this amazing board press program that I used quite extensively. This board press program helped me achieve my first 300+ pound raw bench press in competition at 132 pounds. I went on to use it for a good six months after I hit that as well, leading to some good training PRs.
I'm looking at saving this for the next meet prep that I do (with the COVID-19 pandemic, who knows when that will be). But I figured it would give you a way to spice up your dynamic effort training for the bench press.
*Note: All percentages are of your best raw bench press. If you use a shirt, this will likely help your geared benching as well. You will keep the bands on for the board press work!
To begin with, I want to mention that I did this after my dynamic effort bench work. For my dynamic effort bench press, I used doubled mini bands and then the following percentages. Here is my whole layout, but you don't have to do the dynamic effort bench training if you don't want. It was just ideal for how I had my training set up. If you opted to use this outside of your dynamic effort training, I would use this as your supplemental work after max effort day.
RELATED: Down with the Decline?
I would also like to add that this is beneficial if your triceps are weak. Training the triceps at specific joint angles with the boards is what I believe makes this so beneficial to most lifters. While there is nothing wrong with pressdowns and variations of tricep extensions, overloading the triceps at varied joint angles seemed to be the determining factor for my bench press.
You should ensure that you are using the correct bands based upon what you can currently bench press. Too much or too little band resistance may not give you the desired training effect. Here are the bands I'd recommend based upon your bench press PR.
- 225 pounds or less: Doubled Micro Mini Bands
- 225-455 pounds: Doubled Mini Bands
- 455+ pounds: Doubled Monster Mini Bands
Week 1
Dynamic Effort Bench Press vs. Doubled Mini Bands, 40%x6x3
- 1 Board, 50%x6
- 2 Board, 60%x5
- 3 Board, 65%x4
Week 2
Dynamic Effort Bench Press vs. Doubled Mini Bands, 45%x6x3
- 1 Board, 60%x6
- 2 Board, 65%x5
- 3 Board, 70%x4
Week 3
Dynamic Effort Bench Press vs. Doubled Mini Bands, 50%x6x3
- 1 Board, 60%x4
- 2 Board, 65%x3
- 3 Board, 72.5%x3
After you complete the 3-week wave, you have a few options:
- Add 2.5 percent to all board percentages and repeat the program.
- Switch over to chains, but now add 5 percent to all bar weight (to account for the deload at the bottom and no longer having the overspeed eccentric).
- Drop all the boards by half a board. This can be repeated for a total of 9 weeks.
Here's an example:
- Half board, 1.5 board, 2.5 board for weeks 4-6
- Chest, 1 board, 2 board for weeks 7-9
After running these cycles, you can then either retest your 1RM on the bench press or use your new PR from competition. I would wait approximately 12-16 weeks before you retest (if you don't do a meet) and then rerun the entire program with the new numbers based off your new 1RM.
I hope you enjoy the program and see some new bench press PRs fall over the next couple of months.
World Record 12-Week Squat Cycle
I’m looking at saving this cycle for the next meet prep that I do (with the COVID-19 pandemic, who knows when that will be). In prep for a meet or not, I guarantee this will spice up your dynamic effort training for the bench press.
Editor's Note: Brandon Smitley is not a physician, physical therapist, or chiropractor. Please see your medical professional to treat, cure, and prevent injuries.
Back in February of 2020, I attended my first ever Postural Restoration Institute® course, specifically for Fitness and Movement. If you've not heard of PRI, don't be surprised. I didn't realize I knew what PRI was until about six years ago, but even then, I didn't understand it. I just knew I was a classic PEC, left AIC patterned athlete (many powerlifters are!). I sought out help from Dani LaMartina and Bill Hartman, and this was how I was introduced.
If you've seen people breathing with balloons, you've seen PRI.
As a small gym owner, I not only wanted to work on fixing my own low back problems but also how I could help provide my clients and athletes benefit from certain aspects of PRI. I wanted to truly understand it, so I booked a course and made it happen.
These courses are a whole weekend, 16 plus hours of lecture and hands-on work, and for the average person with no real understanding of anatomy and physiology, it could be daunting. However, the 16 hours helped me understand everything so much. I immediately saw how I could use this to help benefit my athletes and clients (and hopefully, I can help you help your clients and athletes).
So What's All The Breathing About
I'm going to try to make this as simple as possible. Dani has written some amazing articles on her experience, and I would highly recommend checking out her material. She's far more intelligent than me. But there are some key points you need to understand for this to make a bit more sense.
RECENT: World Record 12-Week Squat Cycle
In essence, PRI involves controlling the rib cage and pelvis, and how to optimally keep them stacked over each other, known as the zone of apposition (ZOA). The issue is our diaphragm isn't even on both sides (one side is bigger than the other), we don't have the same organs on both sides of the body (spleen, liver, heart, etc.), and we're just not "even" in general from the inside out. This can cause issues when compensation patterns are created and never addressed. The thing is, we've all got them, some of us just get in and out of these patterns better than others.
In simple terms, the central tendon from the right diaphragm is longer and attaches lower to the lumbar spine than the left. This causes a "pull" to the right with every breath we take. This pull to the right will pull the left hemipelvis to the right as well (since the lumbar spine is oriented that way), which in turn causes the left psoas to tighten and tip the left hemipelvis anteriorly. Since we live in a forward-facing world, our rib cage will orient to the left to keep us square.
The goal with PRI is to get back to the left, in the simplest terms. To do this, we need to work on breathing to set the ZOA, and get the muscles to hold us in the position during respiration for it to "stick." In most cases, people stuck in a left AIC pattern need more left abs (internal obliques), left adductor, and left hamstring. The problem is, we can't just do more side planks, leg curls, and adductor exercises. They need to be performed with meaningful respiration.
So How Do We Make Sense Of All This?
This is the number one question I asked myself after my weekend with PRI. I spent my weekend with incredibly smart physical therapists who have 45-60 minutes with a single patient/client. I run a semi-private training facility with 50+ youth athletes training for approximately 50-75 minutes. I don't have the time to prescribe five breathing exercises for each kid and coach them all up. It's just not feasible.
I went back to our screening process and looked at some of our older kids. What kind of dysfunctions were they having? Were they in any kind of pain or chronic issues? Did my screening show a hip shift? Elevated shoulder? A positive Thomas Test on the left?
Sure enough, most of them had something that could be linked back to the left AIC pattern.
Immediately we started implementing the 90-90 hip lift (with a balloon) before and after training for every client. I just wanted to see how well they could breathe and get their ZOA. Many did excellent (usually the better athletes, ironically), and others could not find their ZOA whatsoever.
This told me what kids needed to work on this particular exercise. With our other athletes and clients, we started to prescribe different breathing exercises based on watching them move during their training sessions. I'll discuss this more in a bit.
How You Can Implement PRI
Below I've got some of the common PRI exercises that I learned about and have been using on myself and with various athletes and clients. Certain exercises will work better for certain movement compensations you are seeing. I am not a physical therapist so if there is a huge underlying issue, I refer out. What we've done is pick ONE exercise to implement before and after training. We perform it for five good breathing cycles with three to four seconds inhaling through the nose, and six to eight seconds exhaling through the mouth. It's not ideal, but it's what we have to work with, and it's better than nothing. For some, they use a balloon to ensure they can create the ZOA, and once this is mastered, we let them perform it without a balloon. Ideally, you'll have a foam roller or small ball to help aid in some of these exercises (which helps aid in adductor facilitation and "turn off" the external rotators of the hip).
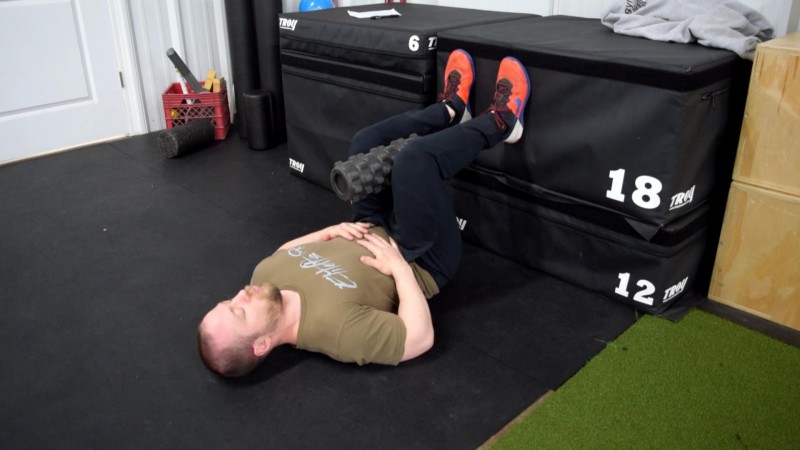
90-90 PRI Hip Lift
The 90-90 PRI Hip Lift is where we choose to start all of our clients. This helps posteriorly tilt the pelvis and get the erectors to relax. The athlete or client should press into the wall or box and pull their heels down towards the ground. This will activate the hamstrings and help get the pelvis even with the rib cage during exhalation. The back should still be on the ground, but the hips should be slightly hovering off the floor.
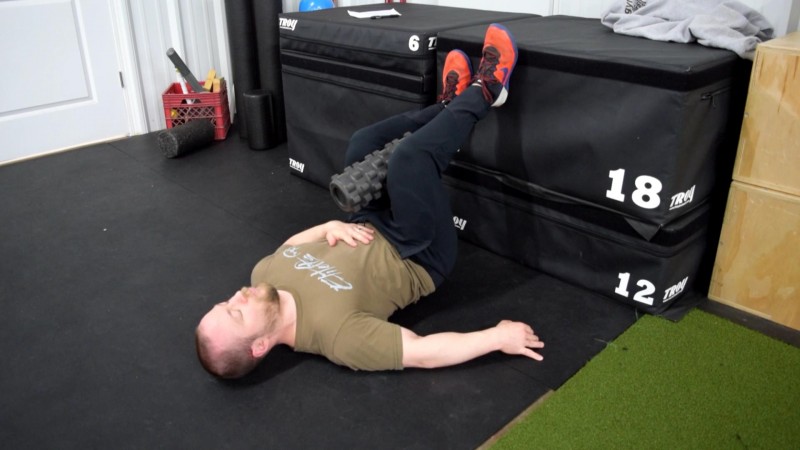
90-90 PRI Hip Lift With Right Hip Shift
The 90-90 PRI Hip Lift With Right Hip Shift would be our next progression, and for athletes that are presenting a positive one their hip flexion with the Thomas Test. If your athlete or client is complaining with left hip flexor pain, this would be a good option. This is similar to the 90-90 Hip Lift, but we will raise the right leg off the wall to facilitate only the left hamstring. When the right foot leaves the wall, the athlete should shove their right knee higher than their left knee, and focus on their left heel coming down towards the ground. Focus on breathing into the left lower back and abs (internal obliques).
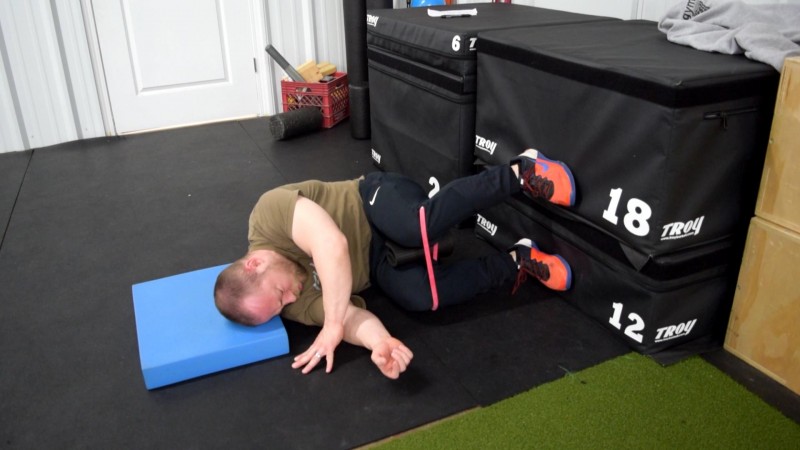
PRI Right Sidelying Left Adductor Pull Back
This progression we opt to use for athletes that have poor left internal rotation of their left femur. You could also notice this with an adduction drop test. This is similar to the 90-90 PRI Hip Lift With Right Hip Shift, but now we are laying our ride side on the floor. Set the right leg and foot flush to the floor and the left leg raised so that the left ankle is higher than the left knee. Posteriorly tilt the pelvis to stack the ribs and pelvis. Once this is achieved, perform your pull back with the left leg, so that the left knee is behind the right knee, or the right knee seems jutted out in front of the left. Press the right knee into the floor. Take your breath in, and during exhalation, pull the left leg back and use the left adductor to pull the left knee towards the midline (right).
*In this image, I have a band around my knees to help shove my left knee towards the midline even more. This will help when athletes have a hard PEC pattern. You can also place a towel or thin pad between the knees and ask the athlete to squeeze it with their left adductor to aid cueing.*
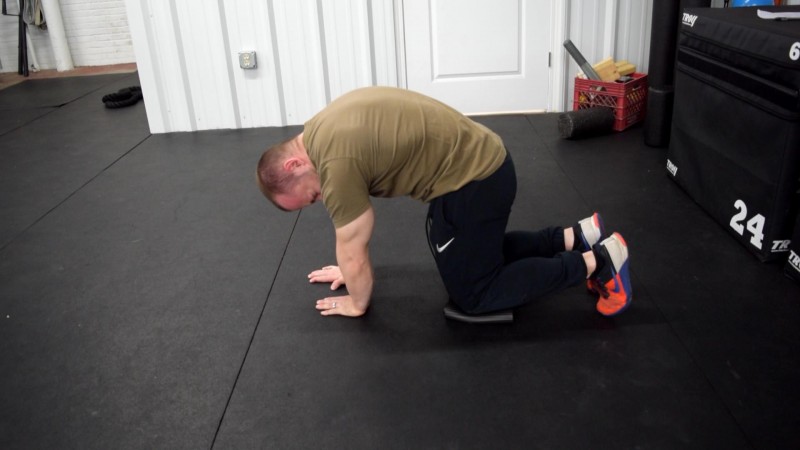
PRI All Fours Belly Breath With Right Staggered Stance
This exercise is great for athletes that need more upper back kyphosis. If you see an athlete with a flat upper back, this is excellent for teaching ribcage expansion with a slight bias towards the left internal obliques. Have the athlete get in an all-fours belly breathing position, but have them place their right hand and knee slightly in front of their left hand and knee. Elevate the left knee on a rolled towel or foam pad. Have the athlete round their upper back between their scapulas and push the floor away. While doing this, have them tuck their pelvis underneath. During inhalation, have the athlete attempt to feel their upper back and left rib cage expand. During exhalation, they want to feel their left abs (internal obliques) pulling their ribs down. Their right side should lengthen as their left side shortens. Hold the position and continue taking breaths.
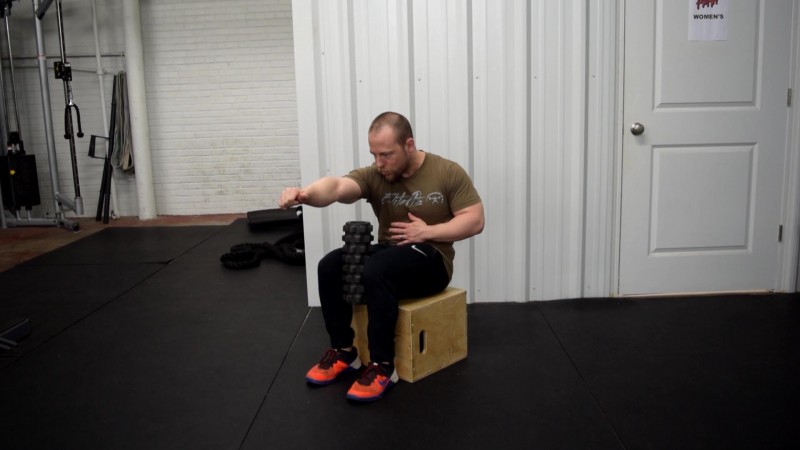
PRI Seated Left Adductor Pull Back With Reach
This exercise option gets athletes to a seated position and begins to mix a couple of exercises above. This can be utilized for overhead athletes to help open up and restore right shoulder range of motion. You'll want to get a box that can let the athlete get below a 90-degree angle at the hips if possible. We're going to get into the same position as our Right Sidelying Left Adductor Pull Back, but add a reach component with our right arm. The pelvis should be posteriorly tilted, left leg pulled back, right leg shoved forward, and left adductor squeezing a small implement. Each breath in should be felt in the upper back, especially the right side. The athlete will try to reach as far as they call with each exhalation while feeling the left abs (internal obliques) and adductor.
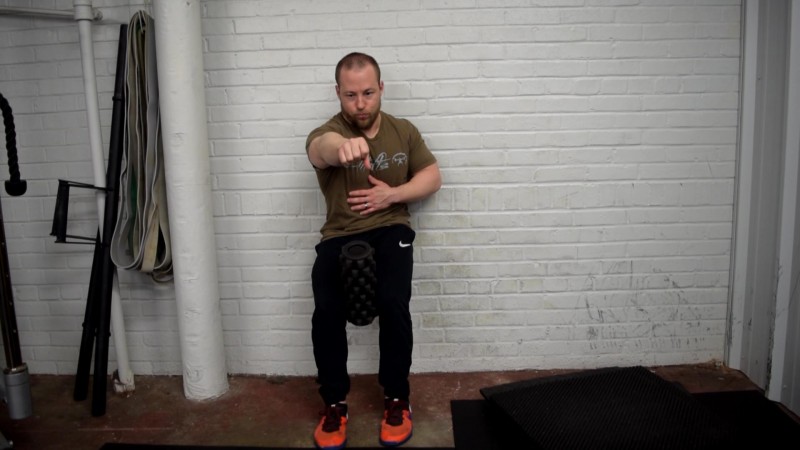
PRI Wall-Supported Squat with Right Arm Reach
This progression and option gets the athlete to their feet and standing. Just like with the seated option, we want our left leg pulled back, right leg shoved forward, and right arm to reach out in front. Our back should be against the wall but our upper back can leave the wall some here, and our pelvis will still be posteriorly tilted. Each breath should feel like the right arm is coming further forward, and the left adductor will engage with the left abs (internal obliques).
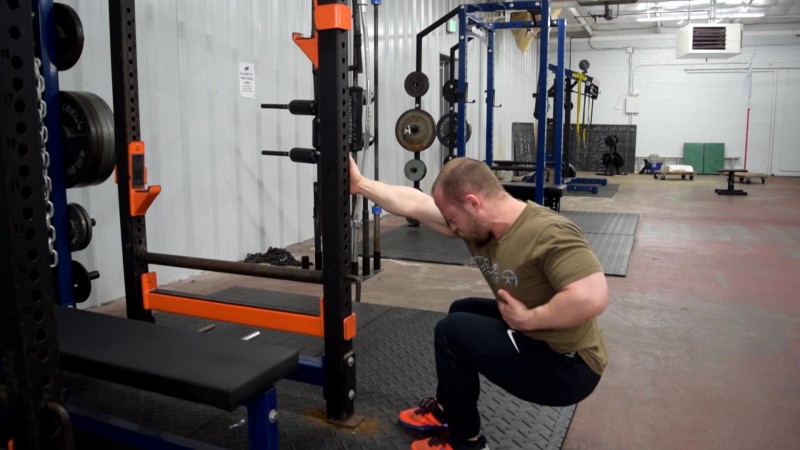
PRI Deep Squat Breathing With Right Rack Hold
This final exercise option gets the athlete up on their feet but using a rack to help pull themselves to face towards the left. The athlete still needs to have a slightly staggered stance with the right leg in front of the left with the pelvis posteriorly tilted. During inhalation, the athlete will try to feel their right ribcage expand. During exhalation, the athlete wants to feel their left adductor pull back on the left leg while the left rib cage comes down with the left internal obliques.
Making Sense Of Everything
I know that I threw a lot of information out with a variety of exercise options you can use. I, by no means, am an expert at this and am merely showing what we've been able to use and benefit from with our clients and athletes. We've managed to eliminate clients with low back pain, improve shoulder mobility drastically with overhead athletes, improve thoracic rotation, and get rid of some pretty awful hip shifts. If you are unsure of how to create a position or make use of an exercise, either refer out or get in touch with someone that understands PRI to a greater extent. I would highly suggest if you're able to attend a PRI course, do it without hesitation. You'll learn a plethora about compensations and how to optimize your client's and athlete's training.
The Postural Restoration Institute® (PRI) course I took helped me understand body position optimization so much. I immediately saw how I could use this to help benefit my athletes and clients (and hopefully, I can help you help your clients and athletes).
This article breaks down my training cycle when I hit my world record squat of 567 pounds in the 132-pound weight class. I utilized conjugate ideas with a very high volume approach. I would not recommend most follow this training cycle exactly as written. It’s a very demanding training cycle and requires that nutrition, recovery, sleep, and training are the highest priority.
However, I do believe you can take plenty away from this program on how to structure a meet prep training program to peak a particular lift, and alternate accessory work and supplemental work to aid in building the squat.
Keep in mind, most of my extra sessions were done very light, except for at certain times and when I was feeling good.
When I did this cycle, my training days were as follows:
- Saturday - Max Effort Lower
- Tuesday - Dynamic Effort Lower
- Wednesday - Extra Session
Enjoy digging through the training cycle, and let me know if you have any questions.
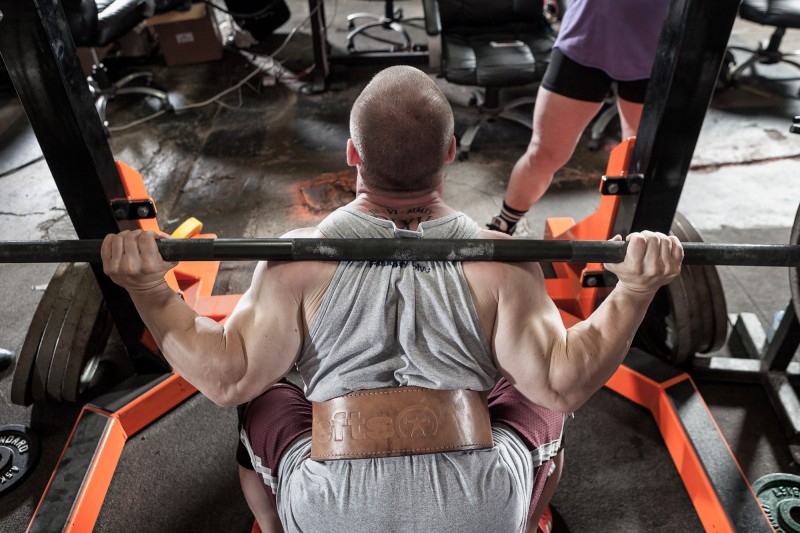
Week 1, Day 1 - Max Effort Lower
A1) Competition Squat
2x4 @RPE 7
2x3 @RPE 7.5
B1) SSB Squat vs. 3 Chains Per Side
Work up to a hard set of 5 @RPE 9
C1) SSB Pause Squat vs. 3 Chains Per Side
3x10
D1) Walking Lunges
3x12 per leg
E1) Reverse Hyper™
3x30
F1) Straight Leg Sit Ups vs. Band
4x15
Week 1, Day 2 - Dynamic Effort Lower
A1) Duffalo Bar Speed Squats vs. Average Bands
40%x9x2
B1) Duffalo Bar Squat
3x10
C1) Sumo Speed Deadlifts vs. Quad Mini Bands
50%x6x1
D1) Chair Deadlift (stand every 3rd rep)
3x12
E1) GHR (Back End Elevated)
3 sets, max reps
F1) DB Stiff Leg Deadlifts
3x20
F2) Standing Band Crunches
5x30
Week 1, Day 3 - Extra Session
A1) Leg Press
3x30
B1) Close Stance Leg Press
3x30
C1) Cable Pull Throughs
5x20
D1) Standing Single Leg Leg Curls
3x20 per leg
E1) Leg Extensions
3 sets, max reps
F1) Adduction Machine
50 straight reps
3x10 - with a 2-sec hold at the top
H1) Leg Press Calf Raises
3x15
Week 2 Day 1 - Max Effort Lower
A1) Competition Squat
1x4 @RPE 7.5
2x3 @RPE 8
B1) SSB Squat vs. 3 Chains Per Side
Work up to a hard set of 5 @RPE 9 (beat week 1)
C1) SSB Pause Squat vs. 3 Chains Per Side
3x8
D1) SSB Bulgarian Split Squats
3x10 per leg
E1) Reverse Hyper™
3x20
F1) Kneeling Band Crunches
6x15
Week 2 Day 2 - Dynamic Effort Lower
A1) Duffalo Bar Speed Squats vs. Average Bands
40%x12x2
B1) Duffalo Bar Squat
Work up to a moderate set of 10 @RPE 8
C1) Competition Deadlifts
1x4 @RPE 7.5
2x3 @RPE 8
D1) Deficit (1.5") Sumo Deadlift vs. 6 Chains
Work up to a hard set of 10 @RPE 8.5
E1) Band Pull Throughs
3x15
F1) Reverse Hyper™
5x30
F2) Hanging Leg Raises
3 sets, max reps
Week 2 Day 3 - Extra Session
A1) Leg Press
Sets of 10, up to a heavy set of 10
- MASSIVE DROP SET after the top set with a total of 3-4 drops
B1) Single Leg RDL
4x15 per leg
C1) Seated Leg Curls
1x20
1x15
2x12
D1) Leg Extensions
2x20
1x15
2x12
E1) Hip Abduction Machine
3x30 sec holds
Week 3 Day 1 - Max Effort Lower
A1) Competition Squat
1x3 @RPE 8
2x2 @RPE 8.5
B1) SSB Squat vs. 3 Chains Per Side
Work up to a hard set of 3 @RPE 9
C1) SSB Pause Squat vs. 3 Chains Per Side
4x6 @RPE 8
D1) Walking Lunges
3x12 per leg
E1) Reverse Hyper™
3x20
F1) Wtd Sit-Ups off GHR
3x12
Week 3 Day 2 - Dynamic Effort Lower
A1) Duffalo Bar Speed Squats vs. Average Bands
45%x10x2
B1) Duffalo Bar Squat
3x8 @RPE 8
C1) Sumo Speed Deadlifts v.s Quad Mini Bands
50%x8x1
D1) Chair Deadlift (stand every 3rd rep)
3x12
E1) Wtd GHR (Elevated)
4x10
F1) Reverse Hyper™
5x20
F2) Wtd V-Ups
3x20
G1) Prowler® Push
5 min straight, empty
Week 3 Day 3 - Extra Session
A1) Seated Leg Curls
4x12
B1) Single Leg Hack Squat
4x15 per leg
C1) Close Stance Leg Press
Up to a heavy set of 25, then 2 drop sets after that
D1) Leg Extensions
3x12, then 1 drop set
E1) GHH/Back Extension
3x20
F1) Hip Abduction Machine Hold
3x20 sec
G1) Hip Adduction Machine
1x50
Week 4 Day 1 - Max Effort Lower
*This session was performed at an elitefts UGSS Session. Accessory work and the planned training was modified to get the most from training with elitefts teammates.*
A1) Competition Squat
Work up to:
Meet Last Warm Up x1 (with knee wraps)
Meet Predicted Opener x1 (with knee wraps)
*These should be about 85% and 90% respectively*
B1) Pit Shark Belt Squats
5x15
C1) True Squat
4x12
Week 4 Day 2 - Dynamic Effort Lower
A1) Duffalo Bar Speed Squats vs. Average Bands
50%x8x2
B1) Duffalo Bar Squat
Work up to a hard set of 8 @RPE 8.5
C1) Competition Deadlifts
1x3 @RPE 8
2x2 @RPE 8.5
D1) Deficit (1.5") Sumo Deadlift vs. 6 Chains
Work up to a moderate set of 5 @RPE 8.5
E1) Wtd GHR (Elevated)
2x10
1x8
1x6
F1) Reverse Hyper™
5x20
F2) Standing Cable Crunch
4x15
Week 4 Day 3 - Extra Session
A1) Seated Leg Curls
3x12 + 2 drop sets
B1) Leg Press
Up to a heavy set of 20, then 2 drop sets after that
C1) Single Leg Leg Extensions
3x15 per leg
D1) DB Stiff Leg Deadlifts
5x20
E1) Hip Abduction Machine Hold
3x30 sec
Week 5 Day 1 - Max Effort Lower
A1) Competition Squat
Work up to:
Meet Last Warm Up x1 (with knee wraps)
Meet Predicted Opener x1 (with knee wraps)
Meet Predicted Second Attempt x1 with Reverse Bands (with knee wraps)
*These should be about 85%, 90%, and 95% respectively*
B1) SSB Squat vs. 3 Chains Per Side
Work up to a hard single @RPE 9
C1) SSB Pause Squat vs. 3 Chains Per Side
4x4
D1) Reverse Hyper™
3x20
E1) Hanging Leg Raises
3 sets, max reps
Week 5 Day 2 - Dynamic Effort Lower
A1) Duffalo Bar Speed Squats vs. Average Bands
55%x6x2
B1) Duffalo Bar Squat
4x6 @RPE 8
C1) Sumo Speed Deadlifts vs. Quad Mini Bands
55%x7x1
D1) Chair Deadlift (stand every 3rd rep)
3x12
E1) Wtd GHR (Elevated)
3x10
1x8 + drop set
F1) Single Leg Reverse Hyper™
3x20 per leg
F2) Band Resisted Reverse Crunch
4x20
Week 5 Day 3 - Extra Session
A1) Standing Single Leg Leg Curls
1x20
1x15
2x12
2x10 + 2 drop sets
*Per leg
B1) Horizontal Hack Squat
Up to a heavy set of 15
2 Down Sets of 20 with a closer stance
C1) Single Leg Leg Press
3x12 per leg
D1) GHH/Back Extension
3x20
E1) Pull Throughs
2x25
Week 6 Day 1 - Max Effort Lower (DELOAD)
A1) Competition Squat
50%x5x3
B1) SSB Strip the Rack Squat
4x20
C1) Lying Band Leg Curls
4x50
D1) Reverse Hyper™
4x25
D2) Standing Cable Crunches
4x25
E1) Prowler® Pushes
3 trips down and back, moderate weight
Week 6 Day 2 - Dynamic Effort Lower
A1) SSB Speed Squats (straight weight)
40%x2x2
45%x2x2
50%x2x2
B1) SSB Squat
Work up to a moderate set of 6 @RPE 8
C1) Competition Deadlifts
1x3 @RPE 8
2x2 @RPE 8.5
D1) Deficit (1.5") Sumo Deadlift vs. 6 Chains
Work up to a hard set of 5 @RPE 9
E1) Wtd GHR (Elevated)
4x6
1x15 - with bodyweight
F1) Reverse Hyper™
4x20
F2) Sit-Ups off GHR vs. Band
4x15
Week 6 Day 3 - Extra Session
A1) Front Squat
Work up to a moderate set of 5 @RPE 7.5
B1) Leg Press
3x15
C1) Pull Throughs
5x20
D1) Walking Lunges
4x20 per leg
E1) Leg Extensions
3x20
E2) Seated Leg Curls
3x20
Week 7 Day 1 - Max Effort Lower
A1) Competition Squat
Work up to:
Meet Last Warm Up x1 (with knee wraps)
*These should be about 85%.*
B1) Competition Squat vs. 3 Chains Per Side
Work up to a hard single @RPE 9
C1) SSB Strip the Rack Squats
3x15
D1) Reverse Hyper™
3x20
E1) Standing Cable Crunches
4x12
Week 7 Day 2 - Dynamic Effort Lower
A1) Speed Squats vs. 3 Chains Per Side
40%x12x2
B1) Competition Squat
3x5 @RPE 8
C1) Sumo Speed Deadlifts vs. Quad Mini Bands
60%x6x1
D1) Chair Deadlift (stand every 3rd rep)
3x9
E1) GHR (Elevated) vs. Band
4 sets, max reps
F1) Reverse Hyper™
3x15 + drop set on the last set
F2) Wtd V-Ups
3x20
Week 7 Day 3 - Extra Session
A1) Standing Single Leg Leg Curl
1x20
1x15
1x12
3x10
B1) Single Leg Leg Press
4x12 per leg
C1) GHH/Back Extension
3x30
D1) Leg Extensions
100 total reps in as little time as possible
Week 8 Day 1 - Max Effort Lower
A1) Competition Squat
Work up to:
Meet Last Warm Up x1 (with knee wraps)
Meet Predicted Opener x1 (with knee wraps)
Then take 1-2 more singles to a near max single (with knee wraps)
*These should be about 85%, 90%, and 95+% respectively*
B1) Pit Shark/Belt Squat
4x15
C1) Lying Leg Curls
3x15
C2) Reverse Hyper™
3x20
D1) Bulgarian Split Squats
2x20 per leg
E1) Standing Cable Crunches
4x12
Week 8 Day 2 - Dynamic Effort Lower
A1) Speed Squats vs. 3 Chains Per Side
45%x10x2
B1) Competition Squat
Work up to a hard set of 5 @RPE 8.5
C1) Competition Deadlift
Work up to:
Meet Last Warm Up x1
Meet Predicted Opener 2x1
Then take 1-2 more singles to a near max single
*These should be about 85%, 90%, and 95+% respectively*
D1) GHR (Elevated) vs. Band
4 sets, max reps
E1) DB Stiff Leg Deadlifts
3x20
F1) Reverse Hyper™
3x15
F2) Standing Band Crunches
3x20
Week 8 Day 3 - Extra Session
A1) Standing Single Leg Leg Curl
1x20
1x15
4x12 + drop set on the last set
B1) Single Leg Seated Leg Press
4x15 per leg
C1) Single Leg Leg Extension
4x15 per leg
D1) Hip Abduction Machine
3x20
D2) Ab Machine
3x15
Week 9 Day 1 - Max Effort Lower
A1) Competition Squat
Work up to:
Meet Last Warm Up x1 (with knee wraps)
*These should be about 85%.*
B1) SSB Squat
Work up to a hard single @RPE 9
C1) Bulgarian Split Squats
3x15 per leg
D1) Reverse Hyper™
3x20
E1) Standing Band Crunches
4x15
Week 9 Day 2 - Dynamic Effort Lower
A1) Speed Squats vs. 3 Chains Per Side
50%x8x2
B1) Competition Squat
3x3 @RPE 8.5
C1) Sumo Speed Deadlifts (straight weight)
75%x8x1
D1) Chair Deadlift (stand every 3rd rep)
3x9
E1) GHR (Elevated) vs. Band
3 sets, max reps
F1) Reverse Hyper™ (long strap)
3x20
F2) Blast Strap Fall Outs
4x15
Week 9 Day 3 - Extra Session
A1) Standing Single Leg Leg Curl
1x15
1x12
3x10 + drop set on last set
B1) Horizontal Hack Squat
5x20 (ramping weight)
C1) Walking Goblet Lunges
4x12 per leg
C2) Leg Extensions
4x12
D1) Pull Throughs
4x25
E1) Single Arm KB Swing
3x20 per arm - minimal rest
Week 10 Day 1 - Max Effort Lower
A1) Competition Squat
Work up to:
Meet Last Warm Up x1 (with knee wraps)
Meet Predicted Opener x1 (with knee wraps)
*These should be about 85% and 90% respectively*
B1) Competition Deadlift
Work up to:
Meet Last Warm Up x1
Meet Predicted Opener x1
*These should be about 85% and 90% respectively*
C1) Prowler® Push/Pull
3 trips down and back - moderate load
D1) Single Leg Reverse Hyper™
3x15 per leg
E1) Wtd Spread Eagle Sit-Ups
4x12
Week 10 Day 2 - Dynamic Effort Lower
A1) Speed Squats vs. 3 Chains Per Side
50%x6x2
Then keep taking doubles up to a max double @RPE 9
B1) Sumo Speed Deadlifts
60%x6x1
D1) GHR (Elevated)
3 sets, max reps
E1) Reverse Hyper™
3x15
E2) Dead bugs
3x60 sec
F1) Prowler® Push
10 minutes straight - no weight
Week 10 Day 3 - Extra Session
A1) Goblet Squat
3x20
B1) Single Leg Hack Squat
3x12 per leg
C1) Bulgarian Split Squats
3x20 per leg
D1) Glute Machine
3x15 per leg
Week 11 Day 1 - Max Effort Lower (Deload)
A1) Competition Squat
60%x5x1
B1) Competition Deadlift
60%x5x1
C1) Reverse Hyper™
4x25
D1) Reverse Sled Drag
3 trips, down and back
E1) Hanging Leg Raises
3x15
Week 11 Day 2 - Extra Recovery
30-minute walk outside
Week 12 - Meet
You can take plenty away from this program on how to structure a meet prep training program to peak a particular lift, and alternate accessory work and supplemental work to aid in building the squat.
I’ve been fortunate enough to be personal training for more than a decade now. With many training options moving toward the online training space, working with clients in person is becoming more challenging. Compound this with new clients who get into the personal training space, most of whom are wanting results now, and you’ve got an even bigger challenge.
Over my years of training clients and now running my own training facility, I’ve learned some tricks not only to help to deliver results more efficiently but also to help to create buy-in from your clientele.
Just as with any personal training client, make sure that you’re doing your homework and implementing some kind of needs assessment and consultation with a health history questionnaire. This will be your first piece to help you to set up a training program with the client’s goals in mind. Most personal training clients are coming to you to lose weight. We all know that strength training is an important part of this puzzle to help to improve body composition and movement quality, but 90% of clients are a bit skeptical when it comes to lifting weights. Provide your information on how this will aid the client in reaching his or her goals.
RECENT: How to Start a Gym with Less Than $20K
An important factor I’ve learned over the years is to end a training session with a client with something that he or she enjoys based on his or her goals. Most clients are going to remember the beginnings and ends of their training sessions. They want to leave knowing that they got great workouts, but this will also help to keep you on their minds later in the day. With new clients, though, this can be a challenge because exercise selection needs to be safe but also easy to learn and adopt early on.
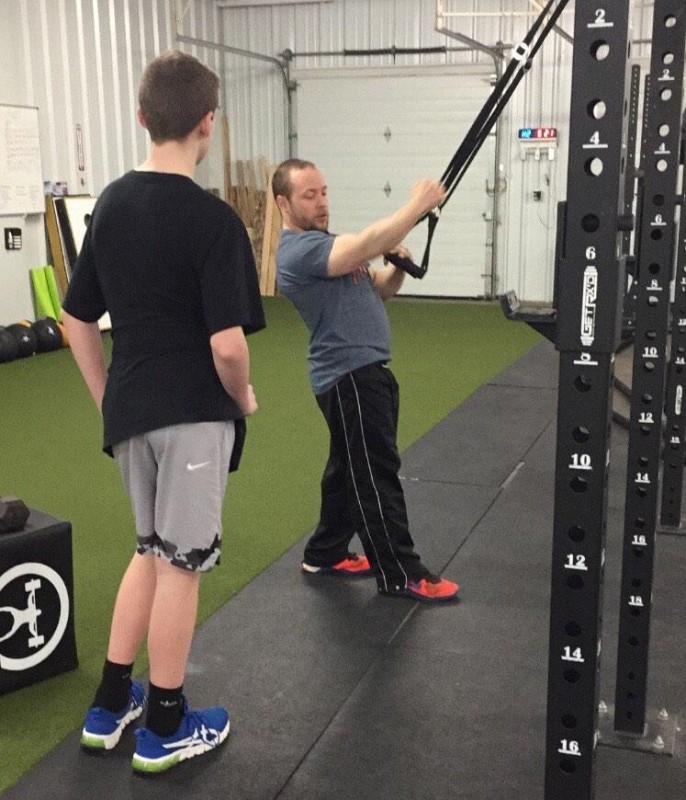
For example, when I work with clients who want to lose weight, I always implement finisher and conditioning components that work the areas they want to improve. This will vary based upon what your clients want, but generally, they’re looking to improve the following areas:
- Glutes and hamstrings
- Shoulders
- Arms
- Abs
As trainers and coaches, we know you can’t “spot reduce” an area. Weight loss doesn’t work that way. We can educate our clients all we want, but if they don’t feel that the areas they want to improve are being worked, they can at times feel that they are leaving their sessions on a bad note.
Below are six conditioning finishers that I’ve used to help clients to end tremendous sessions but also give them swift kicks in the asses, coming back for more.
Finisher #1 - Full Body
3 Rounds - 30, 20, 10 Reps
- Split Squats
- Band Pressdowns
- Band Pull-throughs
- Hand Elevated Mountain Climbers
This finisher is known as a “chipper” in the CrossFit space, but for each round, the reps for each exercise decrease. The following exercises are relatively easy to coach and execute for most clients. We’re addressing single-leg work, glutes and hamstrings, the triceps, and abs with an upbeat tempo.
Finisher #2 - Full Body
6:00-Min AMRAP
- 12 Inverted Rows
- 10 Goblet Box Squats
- 8 Push-ups
- 6 Tall Kneeling Med Ball Slams
This finisher gives us a time cap with performing as many rounds as possible, with the reps decreasing for each exercise. This will allow us to use some weight for stronger clients but also to stick with bodyweight exercises if needed. I really like this finisher, as it hits a tremendous amount of big movement patterns in a safe manner.
Finisher #3 - Ab Focused
3 Rounds
- 25 Yard Suitcase Carry (Per Side)
- 10 Deadbugs (Per Side)
- 10 Band Pallof Presses (Per Side)
- 10 Toe Touches
This finisher is for the client who is wanting all of the “core” work. We have a plethora of exercises that resist movement, which will help to aid our clients in more real-work applications. Toe touches can be used to help them to feel their abs contract. I’ll admit that I’m not big on toe touches, but if I can have the client do three exercises I really like, for one that he or she likes - that’s a win in my book.
Finisher #4 - Upper Body
3 Rounds
- 25 Band Face Pulls
- 20 Band Pressdowns
- 15 DB Curls
- 12 Lateral Raises
When I get male clients who want to fill their shirts out, I love sending them home with finishers that blow their arms and shoulders up. These aren’t really big exercises, but if they are performed at an upbeat pace, the newer client who is detrained will have his or her heart rate spike relatively high and leave with a pump that he or she won’t forget.
Finisher #5 - Lower Body
5:00-Min AMRAP
- 12 Walking Lunges
- 12 Goblet Squats
- 12 KB Swings
- 12 Glute Bridges
We all get that female client who is wanting to improve her butt and legs. A finisher like this will do wonders to have her realize that her butt is on fire the next day and her legs feel like Jell-O. We also get a chance to coach up good-quality exercises and build on good movement patterns. These five minutes will have her leaving highly satisfied.
Finisher #6 - Ass Kicking
3 Rounds
- 25-Yard Prowler® Push
- 10 Cal Row
- 12 Med Ball Slams
- 20 Band Pull-Aparts
This finisher is designed for the client who is just wanting an ass kicking. Obviously, no conditioning-based finisher is complete unless you give your clients the taste of the Prowler. Add in some rowing, med ball slams, and band pull-aparts for active recovery while they catch their breath, and you’ve got a finisher that will have your clients leaving drenched with exercises that they can immediately pick up on and get to work.
In Summary
Although these are just some of the conditioning finishers I’ve used, you can certainly come up with your own using similar ideas. When I’m creating these, I always try to ensure that I’m picking exercises that are safe, are easily coachable in a short amount of time, aid in quality movement patterns, and meet the client’s goals. Understand that you might have to meet the client halfway sometimes, and that’s okay. If the main part of your training program did its job (addressed big movements, focused on weak areas, and aided in building some muscle and strength), this will be icing on the cake that helps to sell your clients so that they keep coming back for more.
Header image credit: Wavebreak Media Ltd © 123rf.com
Here are six conditioning finishers that I’ve used to help clients to end tremendous sessions but also give them swift kicks in the asses, coming back for more.
Anyone who has followed my log on elitefts for a period of time knows that I was training out of my garage for years. My story of starting powerlifting goes back to my undergraduate days at Purdue University. But far before that, I always wanted to be a gym owner.
From the earliest beginnings, I was traveling to learn from Julia (Ladewski) Anto, Chase Karnes, David Allen, Matt Wenning, and JL Holdsworth; I interned for Wil Fleming; and I worked for Dan Brown.
RECENT: 20-Week Raw Dog Yoke Program Cycle
Those who have followed me from the beginning have probably seen a very cool story take place for over five years. The building of Terre Haute Intensity and Resistance and Sports Training (THIRST) has finally come into fruition and is now a year old.
Enough about that. But the crazy thing is it cost me less than $20,000 last year to open my gym.
Yes. Less than $20,000. Cheaper than your car, most likely.
How did I do it? Well, the help of my amazing wife was a huge factor. But let's dig deeper into this story.
From Humble Beginnings
To kick this story off right, let's go back to about 2012, when I moved back home from Purdue University. After getting back home, I was in a pinch to try to find a job. I ended up finding a decent part-time personal training and strength coach job about 30 minutes from home. It wasn't the best gig, but it let me continue doing what I loved, and that was train and coach people.
After about six months of doing this, I applied to Indiana State University for my master's degree in physical education and coaching. I was still training clients but was having some issues with the owner and his ethics on training and working with younger populations. I decided to remove myself from this issue entirely (it ended up costing ME money, but it was what was best for the athlete and myself as a coach).
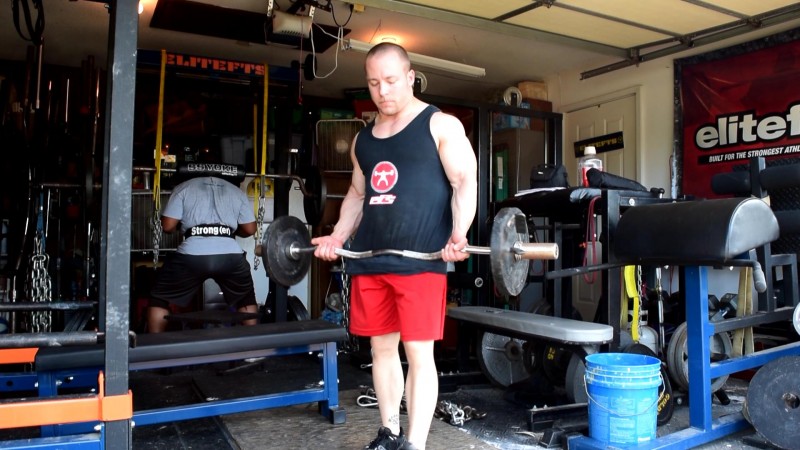
I was back to trying to find a job, so I went to work at the local Lowe's Home Improvement store while volunteering with Coach McMannus at Indiana State. I got to work with cheer, dance, cross-country, women's golf, and a couple of other smaller sports. It wasn't the best, but at least I was learning and getting better.
That summer, I went to intern for Wil Fleming at Force Fitness and Performance. This was the best educational experience I had working with clients and athletes, and Wil even offered to hire me full-time. I ended up turning down the position as I was selected for a GA position at Rose-Hulman working in the facility and the rec center for a student management position. I was getting a paycheck and school paid for, it so it was a financial decision more than anything.
That experience ended up being pretty lackluster at best, but I made some more great connections with a now amazing cross-country coach in Michigan: Jake Issacson.
I started my garage gym while I was finishing up grad school. I was still living at home, so I just started to buy cheap equipment as I could find it. A crummy rack here, a bench there, a few dumbbells, and some plates there. Next thing you know, I've got enough to do some decent training.
That final year I ended up joining elitefts, and I made even better investments in my garage gym. After grad school, I went back to personal training and working crummy part-time jobs to save up money and build up the garage.
By the time this was all said and done, from 2013 to 2017, I added the following:
- elitefts Collegiate Power Rack
- elitefts Monolift
- Almost two dozen bars
- Plates
- Dumbbells
- Kettlebells
- Attachments
- Bands
- Reverse Hyper
- elitefts GHR
- Lat Pulldown
- And much more...
How THIRST Came To Life
Back in 2017, I met my wife Adrian at work while doing personal training and working the desk at Indiana State.
I had all the business stuff lined up for my future gym, but I never had a space or a business partner that I felt I could go in on this comfortably.
After dating for nearly a year, I asked Adrian to be my wife on December 2nd, 2017. A month later, I got the best news I had heard in a long time.
My very first training partner, Kyle Dean, hit me up on my cell phone and told me he had something I need to see. So I took a day where I had some free time and went to meet him at a building he and his dad owned.
I pulled up to this older building on the north side of Terre Haute, Indiana, wondering why he wanted me to look at this huge building. There was no way I could afford it, and I hadn't seen this building in years.
Kyle and his dad (my landlord), took me into the building to look at this huge space. It looked like total shit with crummy, rusty bricks, stuff all over the place, and it smelled like someone left a dump in the bathroom for over a year... with no heat.
Kyle and Kenny asked me what I thought.
At first, I was awestruck. It was massive at 6,500 square feet. But it looked like shit.
I told Kenny, "The size is great, but I don't know if I can even afford this. And there is so much to be done just to get it ready to be a commercial business space."
Kenny told me, "Don't you worry about that, I'll take care of all that for you when I talk with Dave. How's $XX,XXX sound for monthly rent? You tell me how long you want the lease for. We'll get it done."
I was baffled. I couldn't even offer a counter-offer to his price. He was going to dump his own money in on me (and his space) at my own pace. Needless to say, a couple of months later, they dropped the lease in my hands in April 2018, and by May, I was a gym owner (kind of).
I leased a gym space before I bought my house or married my wife, which was probably one of the most selfish things I did, as I immediately wrapped my future wife into a legal contract with me before we even said our vows (hence why at the beginning I said I'm lucky to have the wife I do).
After the paperwork was done, every day after working my full-time job and working with clients, I would go to the gym and work on moving my gym from my garage to the new space of THIRST. This took dozens of trips in a regular truck, hours upon hours of moving and lifting stuff, more help from my friends and training partners than I ever care to ask for help from them again.
All the meanwhile, I got on the phone with Matt Goodwin at elitefts and ordered the equipment I needed to make the gym happen:
- 2 Power Racks
- Competition Bench
- Lat Pulldown Machine
- And a couple of odds and ends
I also took the time to order the turf, flooring, and build more platforms. I bought all of the little stuff: desks, office supplies, printer, bathroom needs, and all of the other things you never care to think about.
From a business perspective, here's the kicker: I didn't even spend $20,000.
I tried to get a small business loan to help out just a little from what I had saved, and what I needed was so small that I couldn't qualify for one anywhere. No one wanted to loan me such a small amount of money for a new business.
As much as I hated it, I had to open a new business credit card (so I banked on the sky miles and free interest for the first 18 months), which in hindsight was probably cheaper than a business loan once interest is factored in.
I had so much saved up from my days of building my garage gym that I didn't need much more, and it turned out to be the best thing.
Now at THIRST, we've got more equipment than I thought we would have after a year of being in business:
- Hammer Strength Machines
- Pit Shark
- Another Reverse Hyper
- Another GHR
- Over 40 different bars
- More bumpers
- More dumbbells
- More kettlebells
- Strongman stuff
Needless to say, it's growing a good, healthy rate!

gajus © 123rf.com
The Logistics You Need To Know
OK, so I guess the main thing here is: How can someone take a look at this article and figure out how to open their own facility?
I'll be blunt: You're going to have a hard time doing it the way I did things.
This was a vision for over a decade.
I knew the right people. Things came into my lap better than they ever could have. I learned the right business skills that my community was lacking. I earned a spot on elitefts that has given me more than I can ever repay. I met an amazing woman that supports all my crazy acts and business ideas. I've got a reputation in my area of being the best.
I'm not saying you can't do it. I'm just saying that I'm the outlier.
But I do feel that my wife and I are proof that if you want to open a facility badly enough and impact your community for the better, you CAN do it. But be ready to bust your ass to a new extreme.
When I was planning this out from undergrad on, I already was building systems to help with how we would make programs, what the name was going to be (which I kept in hiding for nearly eight years), what I wanted the logo to look like (thank you, Dustin), what kind of equipment we would have, services we'd offer, etc.
After internships and working with other people, I knew what point of sales system I wanted, how it ran, and how we could improve from other business models to create what is unique in our area.
I did research on income and economics of our area compared to similar services around the country, especially the Indy area. I built my own personal website, knowing that one day I was going to flip it into the gym and making my online services a sub-option.
Everything I did was meticulous. It was calculated. And it was all planned: how I could either become a better coach, athlete, business guy (and I still suck at it), and mentor to others.
If you're serious about getting this done, find a personal mentor whom you can bounce ideas off of and has been through what you want to do.
Don't go find a guy who owns a chain in town. Go find the gym that is owned by the ex-strength coach, the couple that has been working with parents for a decade, etc.
- Sit down and write down EVERYTHING you do have. Look at the trends and gaps. What do you need so you can offer the services you want/need? Start chipping away at those for your own garage gym.
- Figure out all your systems NOW. When you're ready to pull the trigger, it will be easy.
- Build a website NOW. Even if you don't publicly use it, build it and practice writing blog posts, how you update stuff, etc. It's not as hard as you would think. If anything, produce content and work on your SEO to help your rankings improve.
- Do your research on insurance policies, loans, and how you're going to afford everything. When I did ours, I planned and saved like I wouldn't have a single person show up in my gym for six months so I could still afford it.
- Do your research on the businesses around you that will be your competitors. What will you offer they don't? What will you do better? Do a SWOT analysis and see what you can do to be the best in your area.
- Price yourself so you're the best. We screwed this up and undershot our prices on our training. We're now higher (not as high as I'd like, but we did increase prices this year) and not seeing any issues still. But our membership is the most expensive by far. But we still sell memberships because we are the ONLY facility of our kind.
- Figure out your staffing. We don't have any, so it was easy. But we had to decide that we didn't want to be 24-hour access. It was a hard decision, but it has been for the best for us.
- Do all of your legal paperwork, contracts, etc. Have them ready to go so all you have to do is fill in blanks with business name, info, etc. This will save you headaches!
- Then just sit back and do your research to find that perfect space.
How It's Worked
In one year, THIRST has already been recognized as the best gym in our town. People rave about what we can do, what THEY can do in our walls, the atmosphere, and the family we've created, and ultimately, the way we treat our members.
We've worked with athletes in a variety of sports, trained wide ranges of personal training clients, helped powerlifters achieve elite status, given strong people a place to call home, and we have a culture that strength training is for everyone.
While my wife and I are still working full-time jobs, we're on the cusp of getting my wife away from her job, which will make my job easier. We've invested the majority of our profits back into the business to continue to grow it and give back to our members and provide more of the best for them.
In summary, we're doing well. We are not where we want to be; however, we managed to start turning profit in less than four months. We've grown. And we're hoping my wife doesn't have to work again by the end of the year (fingers crossed).
I'm sure there is stuff that I have left out, but this is a good place for many of you to start your journey to gym ownership.
Please feel free to ask questions and email me at thirst.training@gmail.com or anything in between.
And if you're ever in the Terre Haute, Indiana, area, please swing in! We'd love to have you in to train at our facility and see how we can help you and show you what's worked for us.
Header image credit: Dimitar Sotirov © 123rf.com
Believe it or not, it took less than $20,000 to get my gym, THIRST, up and running. It’s a little over a year old now, and it’s still going strong. Point is, you don’t have to be a millionaire to start up your own gym. Here’s how I did it with THIRST.

This is the exact program that I devised after my meet at Raw Unity 7. My goals were simple: I needed a bigger back in all aspects. I took the time to lay out a program where your back is trained every single session along with other systems to yield PRs at the end.
This is based on a conjugate style of programming and is excellent for raw lifters. To say it’s hard is an understatement. The volume is high, the work is heavy, and you will want to quit. You will need to eat your face off and make recovery a priority, but I can promise you, your back will never be thicker and your PRs will become something of the past.
What can this program do for you? In 20 weeks, I made the following progress:
- Squat (sleeves) — 455x1 to 430x5
- Bench — 303x1 to 270x9 and 320x1
- Sumo Deadlift — 455x1 to 500x1
Notes
- My programming goes with sets, then reps (i.e., 4x3 = 4 sets of 3 reps).
- Use recovery modalities as you need — extra foam rolling, naps, contrast showers, Epsom salt baths, hot/cold tubs, cheat days (wisely), etc.
- On Squat Day, you can use knee wraps, although I highly recommend you avoid this in the off-season. Stick with knee sleeves until you know you have a meet planned and are about 10-12 weeks out.
- After your Max Effort Work, you will see a percent with sets and reps. This percent is based on the heavy set you hit. For example, if you front squat 250x5, that equals a 281 front squat... take your percentage from this. If it comes to an odd number (i.e., 233), ALWAYS round down (i.e., 233 to 230).
- If you don’t use bands for speed work, add 10% to speed work numbers.
- If your elbows are feeling beat up, perform 2-3 sets of curls as needed.
- DO NOT MISS LIFTS! If you miss on Max Effort Day, you are DONE! Move on!
- DO NOT take multiple attempts on Max Effort Day! If your set felt heavy, stop there. Try to beat that weight in 2 weeks. Don’t get greedy!
- Speed work for upper body will ALWAYS be mini bands — NO EXCEPTIONS!
- Speed work for lower body will vary based upon deadlift and squat maxes.
elitefts Band Recommendations for Squat
elitefts Band Recommendations for Deadlift
If bands are not listed, that will be straight weight. If you have access to chains, decrease the percentage by 5% (for example: 50% at 9x3 straight weight = 45% at 9x3 with chains).
Week 1
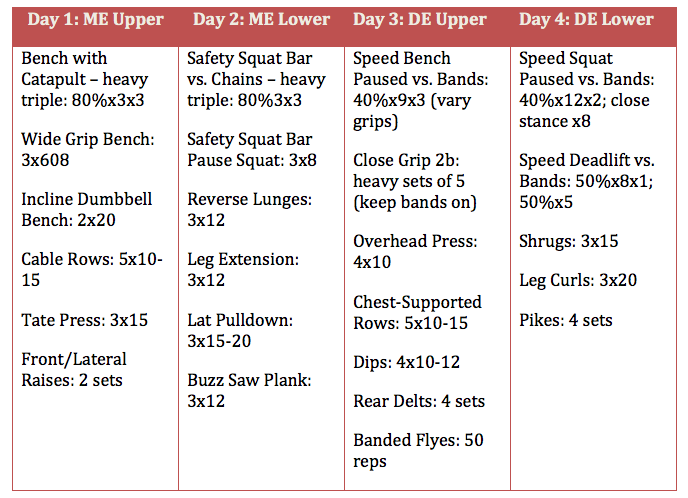
Week 2
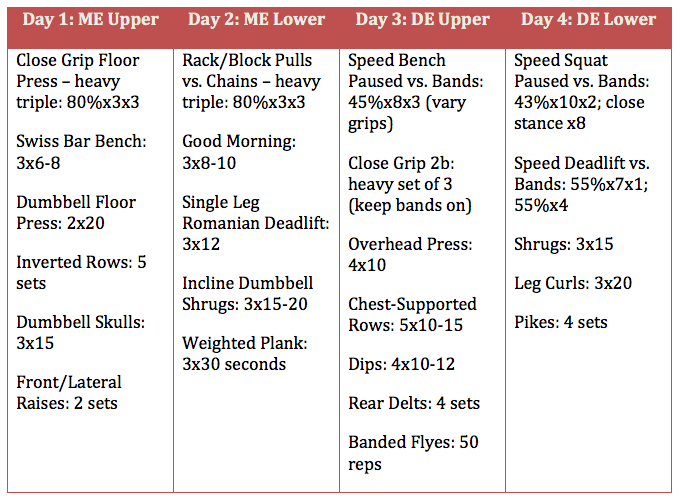
Week 3
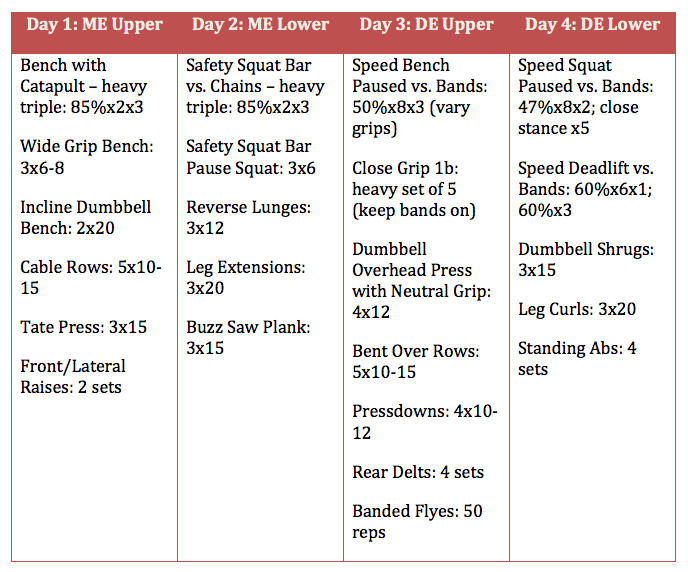
Week 4
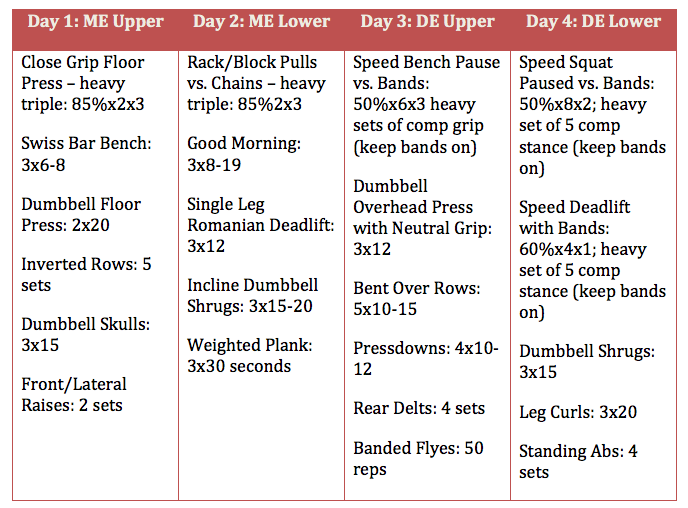
Week 5 / Deload

Week 6
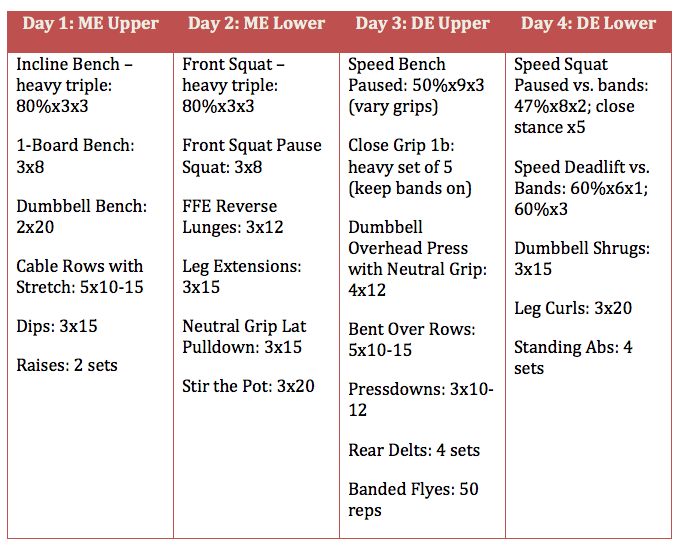
Week 7
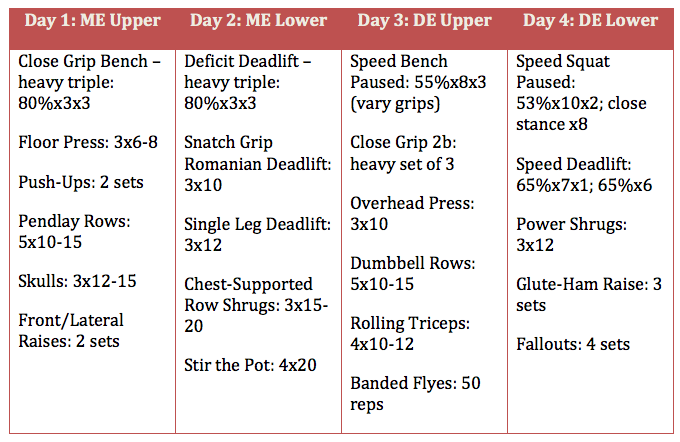
Week 8
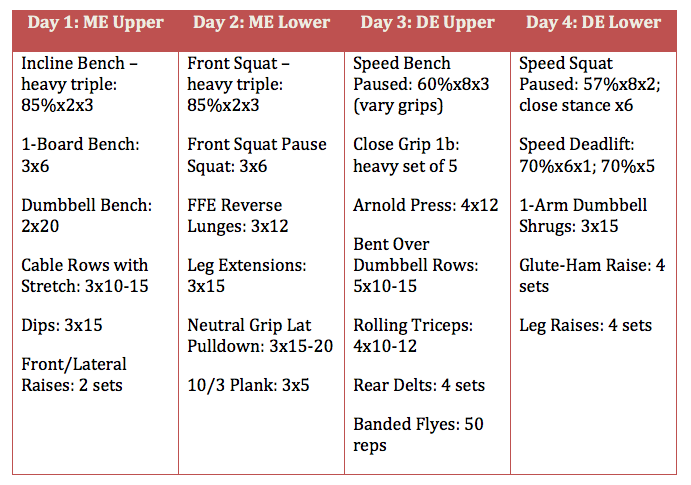
Week 9
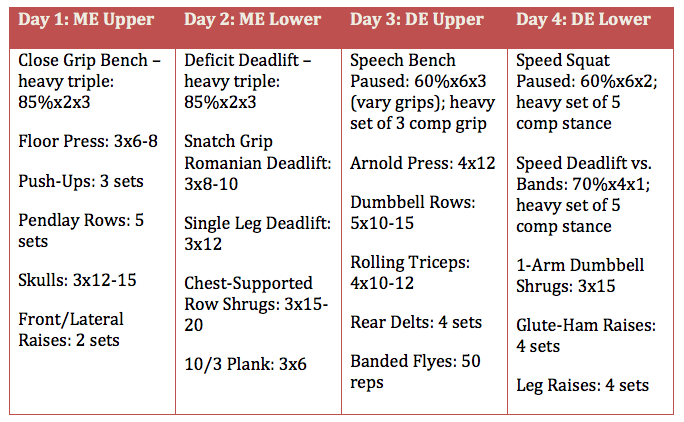
Week 10 / Deload
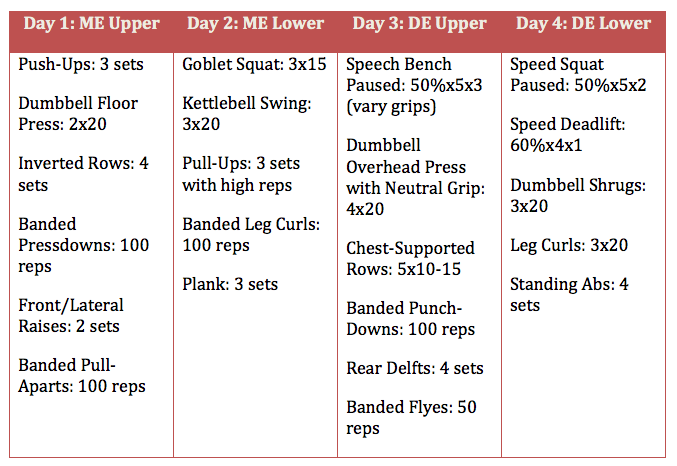
Week 11
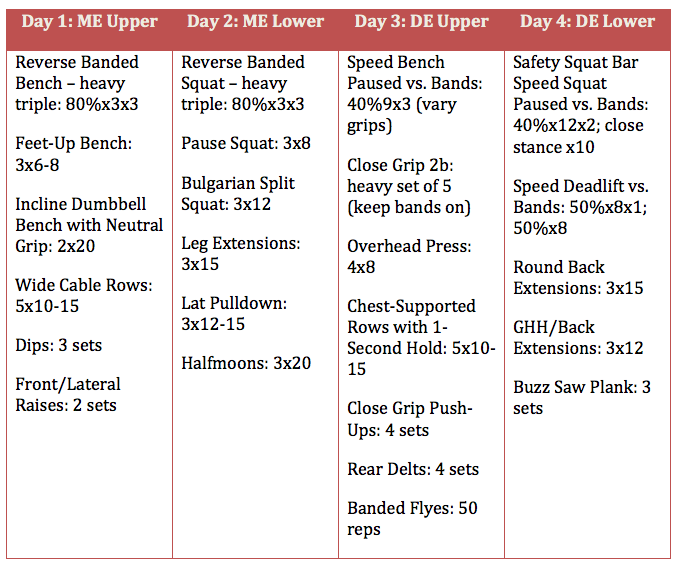
Week 12
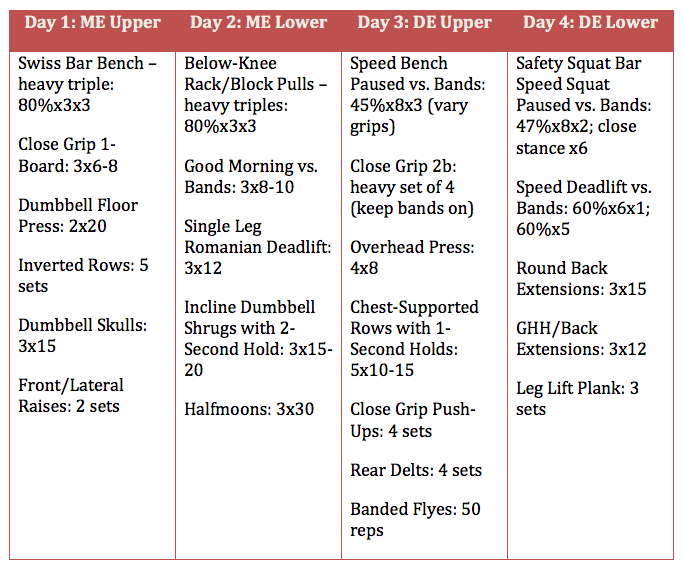
Week 13
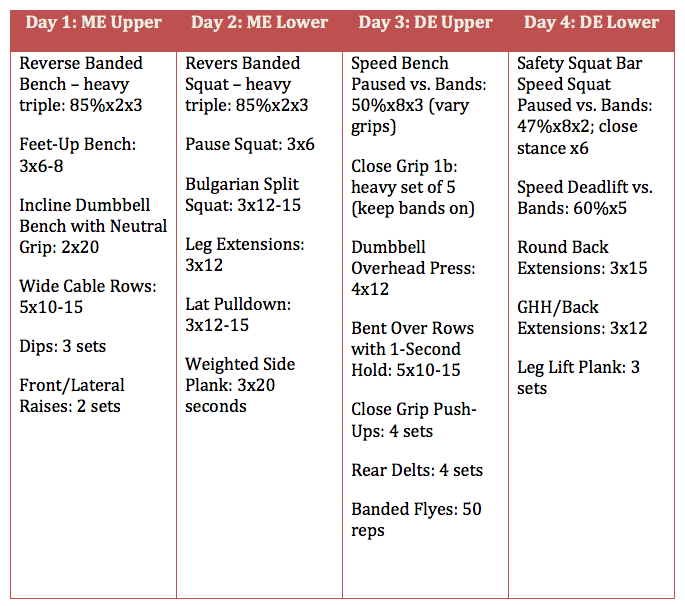
Week 14
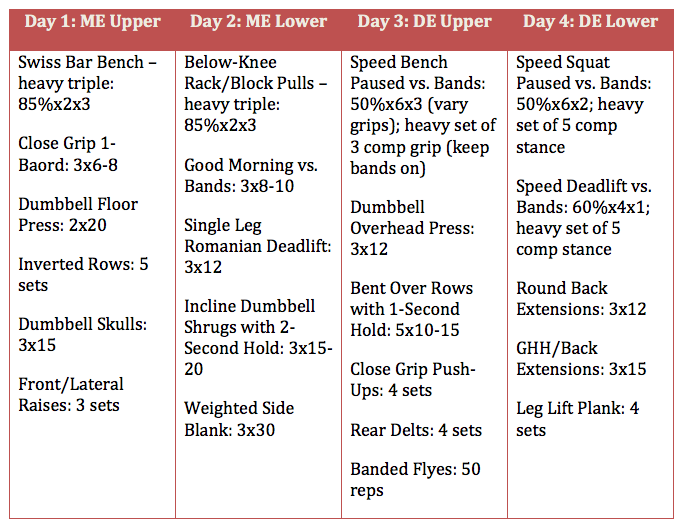
Week 15 / Deload
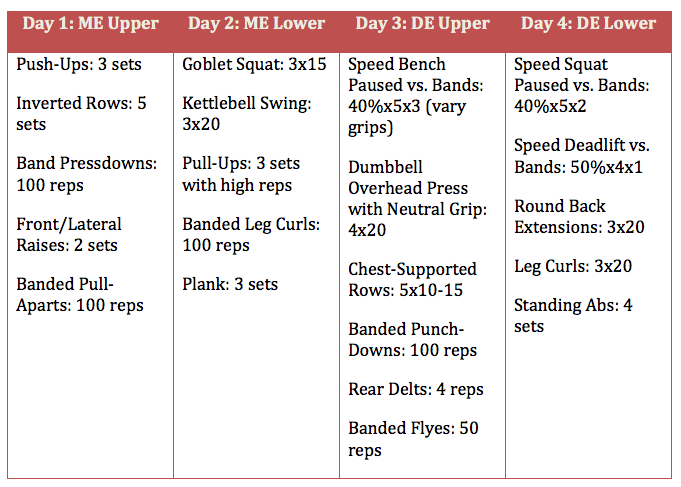
Week 16
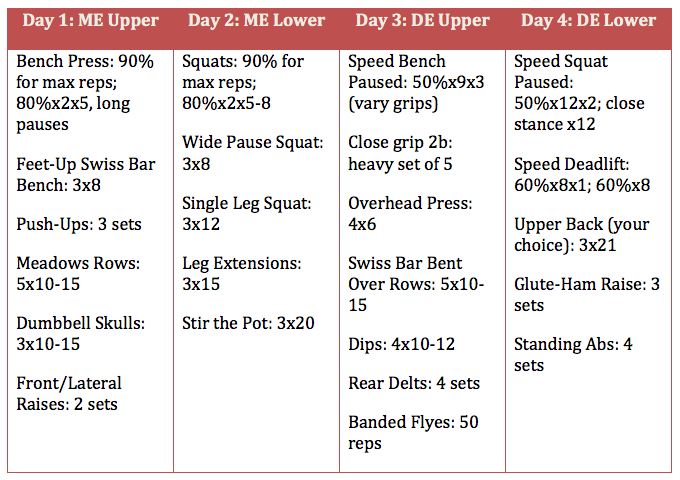
Week 17
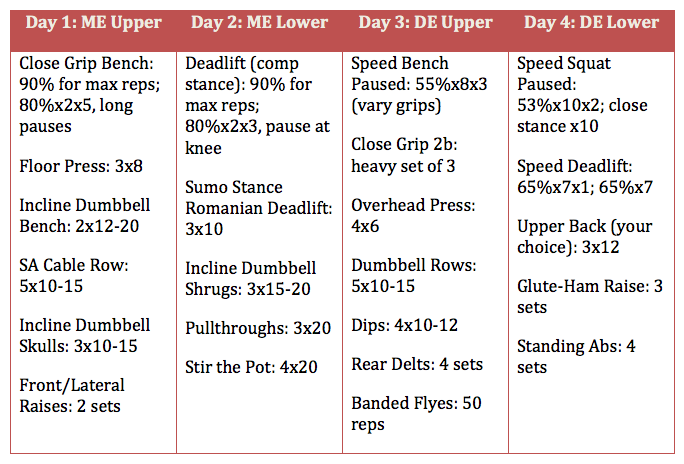
Week 18
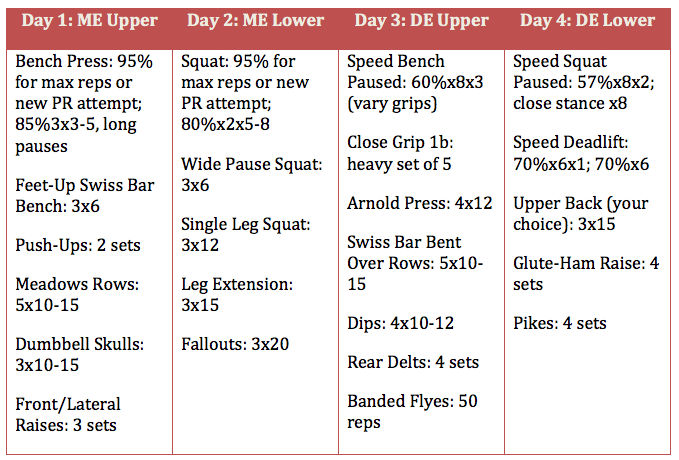
Week 19
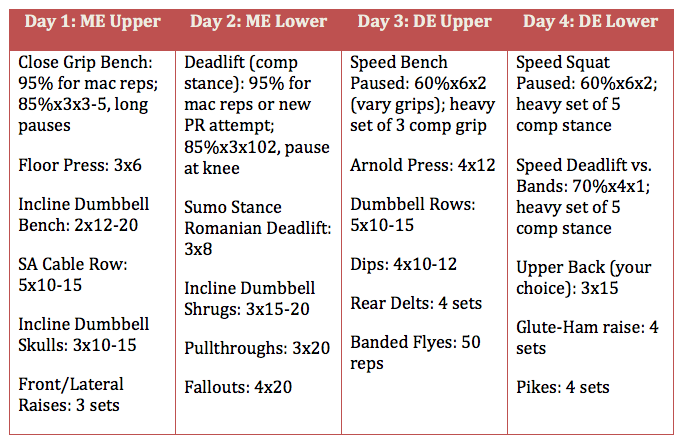
Week 20
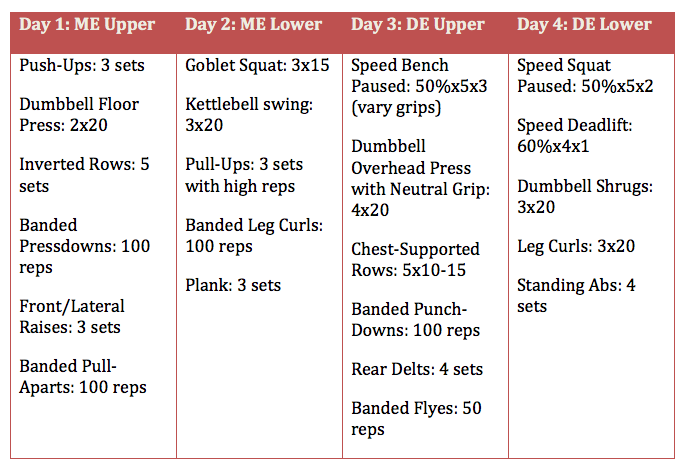
To call this program hard is an understatement. The volume is high, the work is heavy, and you’ll want to quit. But I can promise you, your back will never be thicker and your PRs will become something of the past.
On April 27th, 2019, I competed for the first time in a little over a year at an APF meet hosted by Eric Stone. Anyone who has done a meet by Eric Stone and 2XL Powerlifting knows that Eric and his crew do a phenomenal job of hosting and putting together meets. Eric reached out to me about eight to ten weeks before asking me if I would like to compete in this bench press-only competition to help raise money for Autism and Autism Awareness.
With an offer like this, I couldn’t say no. I love competing, but I love being able to give and help provide awareness and money for charity in any way I can. Before I get to the meet recap, let’s get a little bit of background prior to the meet.
RELATED: Meet Report: Taking Third Place at APF Women's Pro-Am
Background
For those that have followed my log on elitefts, they know I’ve been dealing with some chronic low back pain for the greater part of two years. After a freak accident while training after WPC Worlds and my best powerlifting performance of my career, I had an accident while squatting, and my back has not been the same since. Things have certainly improved, but I’ve still got a lot of movement compensations that I’m still trying to resolve.
Last year, I competed in the XPC Bench Bash, where I had my first bomb-out of a meet. After the meet, months later, I got married, bought a house, and opened up Terre Haute Intensity Resistance and Sports Training (THIRST) with my wife. We’re a 6,500-square feet facility that works with youth athletes and general population clients and provides a top tier atmosphere for serious strength training athletes and enthusiasts.
Needless to say, I’ve had stress overload and I’ve been busier than I ever have been. I’ve had to sacrifice training more times in a year than I have my whole career. I wasn’t sure what my future would be competitively right now and have opted to stay bench-only for the time being until I can get a full grasp on things.
I inform you of this because I wanted to compete in the spring or early summer, and when Eric reached out to me, I knew I had to put up or shut up. I love what Eric has done with this meet, and it was just too good to be true.
Training For The Meet
My training cycle for the meet was a decent one. It wasn’t the best (as I mentioned earlier due to life), but that’s most training cycles when you’ve been powerlifting for a decent time. But I knew I could put together a good day, and after my last meet, I just wanted to get back on the platform, not bomb, and have fun again. I opted to compete equipped in multi-ply and try to beat my PR of 451 pounds.
About three to four weeks into the training cycle, I got a new Metal Jack Bench Shirt. I have needed a new one for some time, as the old one I have was a hand-me-down from Dave Tate back in 2013, I believe after I trained at Westside one weekend. My new shirt fit like a glove, and I made my training cycle fit accordingly so that I could get ample time in to break it in.
Training as a whole went well, and I hit a successful 485 in training with a near miss at 505 at the three weeks out point. My nutrition and sleep were by far my biggest downfalls, as I was working at least 75 hours a week, and unfortunately, I just could not make my schedule fit the needs I truly needed. This is not an excuse, I’m just being honest with myself and you as a reader. If anything let this be a moment for you to understand that these things are just as important as the training cycle you lay out.
The Meet
Since this was a bench-only meet, weigh-ins were at 5 p.m. on Friday the 26th. This kind of threw off my cut down to 132 to begin with. When I got to the hotel Thursday night, I had still about seven pounds to go. I’ve made this cut many times, and I thought I would be good to go with a full day to get the rest off.
On Friday, I woke up and went to the sauna to get the rest of the weight off. This is where I had trouble, as my body started to rebel against me, and I started to show signs of heat exhaustion at about 134.5 pounds. I managed to get off another 1.5 pounds but stalled there. For the first time in my life, I was going to miss weight. I opted to shut it down there, go weigh in with what I was and just have fun and compete at 148.
On meet day, I had ample time to get my weight back up, and I stuck to the plan I had laid out.
First Attempt
My opener was 413, and I wanted to open in my old shirt since it was looser and broken in. I wanted to really make sure I got in the meet. My opener felt awesome, and everything went perfect and to plan like I had hoped in training. I was in the meet.
Second Attempt
On my second, I wanted to jump straight to a PR attempt. I knew that I had to change shirts between attempts (which I practiced in training), so if something went wrong, I wanted to be able to adjust and make those changes between my second and third. I went with 457, which was a six-pound PR. It moved just like I had hoped it would, and things felt great, other than it was just a big jump.
Third Attempt
Here I knew I was going to have to get gutsy but also try to keep it realistic. By the way my second attempt felt, I knew I had about 15 to 25 pounds in me. I put in for what I thought was 468, but it turned out I gave them 474. By the time I was ready to go, it was too late to change it, so I just went with it. The 474 came down great; I stayed lock in and tight, but once the bar got about three inches off my chest, I didn’t get my right elbow underneath my wrist and lost the right side back toward the rack (while my left was nearly locked out). Just a close miss with a good call on weight selection. I just technically didn’t execute it.
Summary
All in all, I had a great time! I managed to get a PR, helped raise money for Autism (the whole meet raised over $12,000), and I got back on the platform to do my thing. It’s helped light a fire in me to work on my stress management, my training, become a better bencher, and learn the aspects of equipment even more.
I can’t thank my wife Adrian enough for all the sacrifices she made for me to be able to train and compete at the level that I can. Also, to my THIRST training partners and family, thank you for coming in on Saturdays just to help and traveling to help me do my best. And thanks to Mark Glazier at Nutrabio, Dave and Traci here at elitefts, and all the family and friends who took the time to reach out and give me support and donations.
I look forward to getting back on the platform again sometime this year hopefully and take another stab at another big bench press.
When a friend invited me to a bench press-only APF meet that also raised money for Autism and Autism Awareness, there was no way I could say no — even though I haven’t competed in quite some time.

I’ve compiled three articles covering the three competitive lifts for the raw powerlifter: the squat, bench press, and deadlift. The keys to building these lifts and knowing how to program to optimize them are very important. However, your meet strategy and how you are going to put them together to get your best total is what really matters. It’s what you do on meet day, not in training, that counts.
For this article, I’m going to go cover the following:
- Peaking and Programming Concepts
- Meet Strategy and Attempt Selection Guide
- When to Cut Weight
- Optimizing Meet Day Nutrition and Supplementation
There will, of course, be differences from other coaches and lifters, but these are methods that I’ve found to work well for myself and my clients.
Peaking and Programming Concepts
When we’re looking to hit the platform and put together a PR performance, the first step is just having the programming lineup, and working backward from meet day. There will be a lot of generalizations in this section, but that’s merely because each person will have slightly different peaking based on their size, general physical preparation, and frequency of training they are implementing in the off-season and during contest prep.
To understand peaking for a competition, we first need to understand the concept of super-compensation. Super-compensation, in its simplest definition, is the body increasing performance potential above baseline after a brief stint of intentional overtraining (commonly called overreaching) followed by detraining (or deloading). We’re focusing on increasing our performance by overreaching, or an intentional time of overtraining, to force the body to respond greater than normal. We usually would not want to hit a period of overtraining, but we know that we will program a deload period and emphasize rest after the overreaching period is over, and thus super-compensating for meet day.
PART 1: Building the Raw Squat
Now that I’ve got that out of the way, let’s briefly talk about residuals. Residuals are the time frames that certain fitness qualities can be maintained. These should be used in programming concepts regardless of your goal, but for the sake of this article, we are going to talk about strength, hypertrophy, and speed. We could also talk about endurance, but so long as you have a moderate base of aerobic work and general physical preparedness at the beginning of a meet prep, this should take care of itself (and should be the focus of your offseason program).
Strength - Maximal strength has a residual of approximately a month. This is important to know because we need to hit our biggest and strongest lifts of a meet prep cycle within a month of the competition. This can change based on the competitive lift and the size or gender of the athlete and will be mentioned more below.
Hypertrophy - Muscle size has a residual of approximately three weeks. This isn’t to say that you’ll lose all your gains in three weeks, but that the muscle size you’ve acquired has about three weeks until that muscle tissue could begin to atrophy. So, in short, we will need to keep hitting our accessory work until the three weeks out point, especially for specific lagging muscles groups that we know can have carryover to our lifts.
Speed - This quality is probably the most important that we have, as the residual is about five to seven days or a week at the longest. We need to keep training our speed and CAT (compensatory acceleration training) up until a week out. This should really go without saying if you really think about it, but I think it’s a very overlooked quality to training that can help you immensely.
Now that we’ve got these concepts covered, let’s briefly discuss gender, size, and competitive lift specifications to help tie all this together.
Gender - Quite simply, men need more time to recover from training than their female counterpart. This is probably due to the fact that men have greater lean muscle tissue, more testosterone, and can just handle heavier loads than females.
Size - Across the board, a larger person is going to need more time to recover than a smaller one. This is similar to the gender issue: the larger person can just handle more weight in training, and thus the CNS needs more time to recover before a competition.
Competitive Lifts - If you recall from my previous installments, the most taxing lift is the deadlift, followed by the squat, and then the bench press. Knowing this, we can program when we need to take our heaviest lifts in training to allow for the most recovery from each.
Sample Templates
Here are some sample templates for when a competitor would ideally take their heaviest lifts in training while getting ready for a competition. Each competitive lift shows how many days away from competition the competitor would be when they need to take their heaviest attempt.
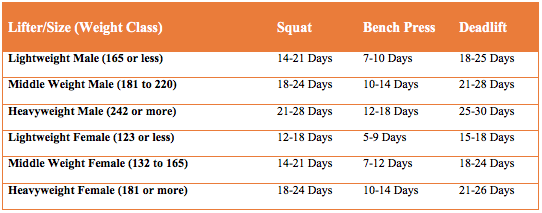
Meet Strategy and Attempt Selection Guide
Knowing how to put your best lifts together to get a PR total can be a daunting task, and the further you get in your career the more options you have for setting PR totals. Eventually, you’ll even get to a point where you don’t have to hit a single PR all day but can still get a PR total. It all comes down to putting together your best day, not necessarily your best lifts (but at points in your career this will also have to likely happen).
When determining your attempts, here are the percentages I recommend for my clients. These percentages should be based off a clean lift in training that you would give three white lights. Do not use any questionable gym lifts.
- Last Warm-Up (in the warm -up room): 82%-85%
- Opener: 88%-92%
- Second Attempt: 94%-100%
- Third Attempt: 97%-103%
We know that meets will never go your way, and you may need to make adjustments on the fly, but going into meet day, this should be a guideline that your attempts fall under. You can get more aggressive or conservative as the meet goes and your subtotal is known more throughout the day.
PART 2: Building the Raw Bench Press
Here are some general guidelines that I follow for meet days and use when I’m handling lifters:
- Open LIGHT. Pick something you can hit even on bad days.
- If you miss your opener, RETAKE IT. Get in the meet.
- Very rarely will you get a PR total with anything less than a 6/9 day. Make your lifts.
- Base your second and third attempts on the way the previous lift felt. Use auto-regulation and listen to your body. Don’t chase lifts that aren’t there. Chase the total.
With these guides, you should be good to go for meet day. However, ensure that your warm-ups are something you’re used to and you can account for a crazy warm-up if needed. So, plan for the worst where you might only get four to six warm-ups. I’ve been there multiple times and it sucks, but if you can be prepared for that, it’s a little less stressful on meet day. Plan warm-ups to use primarily 45’s, 25’s, and 10’s. Lightweight females will need to use fives here and there, but don’t plan on using two-and-a-half's when figuring out your warm-ups for meet day. They are scarce and you don’t want to depend on them. If they are there, great, but just have a rough game plan. And for heaven’s sake, don’t do a million reps in the warm-up room. Take the bar for a few sets of five if you need to, then start dropping your reps to doubles and triples, and only singles after 50%.
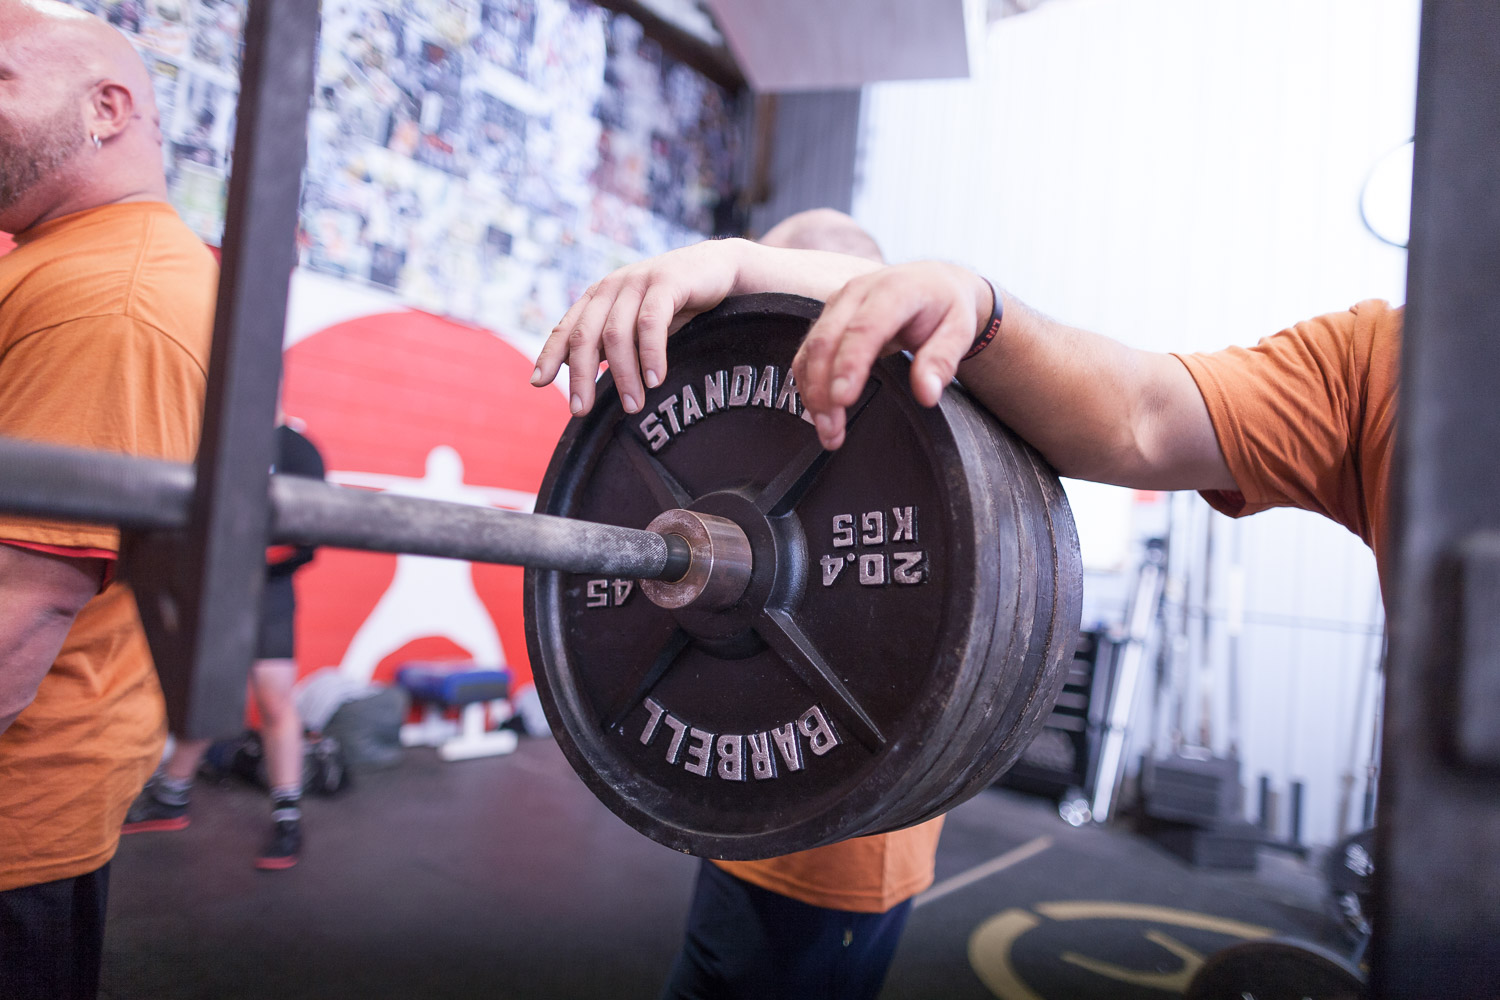
When to Cut Weight
This isn’t something that I really wanted to discuss is this article, but if you’re going to build your raw powerlifting total, there very well might be some point in your career where you cut weight to be more competitive. So, first things first: don’t cut weight if any of the below points apply to you.
- You don’t have an elite total.
- You’re not chasing a top 20 all-time ranking.
- There is no money involved.
- There is no championship involved.
- You don’t need to qualify for another meet (in which one of the above circumstances would happen).
- You’re mentally weak.
- It’s your first meet.
I’m sure I could come up with more, but that should cover most of the circumstances that tick me off. So now the real question: when should you cut weight? Pretty much when you’re at the top of the game for your weight class or there is some serious money or a championship on the line. Getting in a top ranking or chasing a world record is also a viable excuse.
I’m not going to cover the details of my weight cuts and what I do in this article, but if that’s something that you’re interested in, contact me privately. But you should certainly talk with someone experienced and actually good at it (not just the cut, but actually performing well after it) before you do it.
Quite simply, focus on getting stronger.
Optimizing Meet Day Nutrition and Supplementation
Probably one of the biggest issues I see when it comes to people competing is what they are eating (or aren’t eating) as they prepare for their big meet day. Here are some things that will likely help you out on meet day.
Focus On Hydration
Regardless if you cut weight or not, the first thing you need to do after weigh-ins is get some fluid in your body. 99% of the time it should just be water. No Pedialyte or Gatorade, especially if you’ve cut weight. The sugar/dextrose content chugged in the quantities that most powerlifters will consume will likely give you the runs and further dehydrate you. Give your body about 50 ounces of water over the next hour. If you’ve cut weight, still focus on liquids for about two hours before putting down any massive amounts of solid food. The food will slow down your water absorption, and if you’re dehydrated, that’s priority number one.
PART 3: Building the Raw Deadlift
After that, use an electrolyte mix of Gatorade or Pedialyte mixed 50/50 with water. This will dilute the dextrose yet still get you the electrolytes and minerals you need. You should focus on about two gallons of liquid, and perhaps more if you’ve cut weight or are a bigger athlete.
Post Weigh-In Food
The day before a meet, people like to eat like total fatasses, and this baffles me. You’re going to attempt to perform your best, and you’re going to eat crap? Now, I’m not saying eat like a bodybuilder, but don’t go eat greasy food and junk. Eat things like Chipotle, peanut butter and jelly sandwiches, toast, eggs, biscuits, rice, baked potatoes, steak, pretzels, granola bars, etc. You’ll get plenty of sodium and have good energy on meet day. You can have that greasy burger post-meet after you’ve hit PR’s.
Meet Day Food
I suggest eating lower fat foods on meet day. Things that I depend on for meet day are cereal, granola, dried fruit, pretzels, and my electrolyte mixes. It’s enough to keep me going, but not feeling like crap all day.
Supplementation
Supplements can help tremendously in training and on meet day, and here are a few that I would highly recommend:
Multi-Vitamin – While ideally, we get all these from food, it’s likely not going to happen, and if you’ve cut any weight, you’re also likely going to have been deficient for a period of time. It doesn’t really matter that you take a specific one, but I would just be sure it has the basics. I prefer to take one three times the day before the competition, and one the morning of competition.
Creatine Monohydrate – A widely studied supplement and proven to help with strength and performance. However, it’s also an amazing supplement for bloat and water retention, which is incredibly helpful at a powerlifting meet. Taking about 10-15 grams the day before, and another five to 10 grams on meet day should be plenty.
Glucose Disposal Agents (GDA) – What you opt to take here is entirely up to you, and there are a multitude of formulations available. I usually take chromium polynicotinate and alpha linoleic acid. Glucose disposal agents will help maintain healthy blood sugar levels, and may help with storage of glycogen, something very important when you’re ingesting a massive amount of carbohydrates and calories all day long. Just take these with each solid carbohydrate containing meal.
Highly Branched Cyclic Dextrin (HBCD) – This is probably one of the fastest growing supplement products on the market. Its carbohydrate structure is very unique and is excellent for intra-workout training. Knowing this, it makes for a great supplement to use during meet day. I prefer to have 50 grams in my large Nalgene bottle for meet day to keep my glycogen levels capped, energy high, and not have any insulin crashes.
Rounding Things Out
While this article is by no means covering everything that can help you put together your best total, I do feel that there are very vital pieces of information that go overlooked and undervalued when it comes to doing your best on the platform. Take some time to really look at your training, nutrition, sleep, and other factors and see how that can help your overall performance. It’s not always the strongest person that wins in powerlifting; it’s usually the healthiest and smartest that are consistently putting up the best totals and taking home championships.
Best of luck on the platform!
Making a Run at the 132-pound All-time Equipped Bench Record

Here are several very vital pieces of information that often go overlooked and undervalued when it comes to doing your best on the platform.
It’s been a long time coming, but here’s the installment on building the raw deadlift. In this article, we’re going to cover everything that it’s going to take to build the raw deadlift. I’m not the greatest deadlifter, and arguably it’s the lift that has seen the least improvement in my training career. But to that note, I also feel like that has helped me in the long run by having to be creative to just add a few pounds to this lift. Some are built to pull (the infamous Lamar Gant comes to mind), while others need to slave away at it. Like the other installments in this series, this will not cover a lot of technical issues regarding the deadlift, as elitefts has ample articles and resources on this matter. I highly suggest you look to Deconstructing the Deadlift if you’re looking for technical help.
The basics that I would like to keep in mind throughout the article though are the following:
- Pull the slack out of the bar.
- Keep tension on the hamstrings and glutes.
- Weight should be on your heels.
- External rotation is still key on the setup.
- Big air and a diaphragmatic breath into the belly.
- Keep mid-back tight.
- Place shoulders approximately directly over the bar.
- Pull up and back.
You’ll see some variations and different cueing and options based upon how you pull (sumo or conventional), but these are the basics you certainly need to master to be able to move on to some of the work listed below.
Needs Analysis
When it comes to the needs analysis for raw lifters and the deadlift, there isn’t much difference between the raw and equipped counterparts. When it comes to equipment, the deadlift suit (or squat suit) provides the least amount of support and aid in the lift. I’ve heard of some lifters being able to only get about 25-35 pounds out of equipment, which for some may only be very small percentages compared to the squat and bench press. The primary difference is going to be getting into position (it will be easier raw), and getting a little extra pop from the equipment off the floor. So with that stated, let’s take a look at what needs addressed to build the lift.
Glutes and Hamstrings
In general, most powerlifting coaches and athletes are going to stress how important the posterior chain is to the deadlift, specifically the glutes and hamstrings, and this still holds true. The leg drive, lockout, and transition from passing the knee are all dependent upon how strong your glutes and hamstrings are. When we speak about the hamstrings, we’re also talking about the strength as a hip extensor, not a knee flexor. That will come in handy when it comes to supplemental and accessory work to help build your pull. I’m not going to say that leg curls won’t help, as it will aid in overall knee health and leg balance, but at no point during the pull are you actively going through knee flexion. So with that said, we can lump these two body parts together. Having strong glutes and hamstrings is going to help you in the setup and prevent the hips from rising first and having that cat-back rounding that we see in so many social media posts. This tends to happen from either poor technique (just not knowing better), or from a true weakness in this area, causing the low back to become the primary mover because it happens to be stronger. Bringing up your glutes and hamstrings can definitely help with this. They are also responsible for a strong and smooth lockout as the hips get closer to the bar towards completion of the lift.
Lower Back
The lower back is a very important aspect of being a strong deadlifter. However, the lower back should not be a prime mover when it comes to the execution of the deadlift. As mentioned above, if the lower back is being an actual prime mover, you’re going to see a lot of missed pulls at lockout, as you’ll be unable to activate the glutes because the pelvis will be in an excessive posterior tilt. This can also lead to long-term problems and injuries if not addressed. The lower back is important because of its ability to maintain the proper position we need to activate those glutes and hamstrings. The low back needs to be strong in an isometric contraction and to help brace the spine with the abdominal and trunk musculature. Training this can be difficult, but there are some ways we can address this, which will be listed below. Just know you do indeed need a strong lower back, but that it’s not doing the actual “moving” of the weight, so to speak.
Adductors
The adductors seem to only really be thought about when it comes to the sumo deadlift, but what many people don’t realize (or forget if you’ve taken some basic anatomy classes) is that the adductor magnus actually performs hip extension as well. So even in your conventional pull, your adductors are helping aid your pull. Perhaps this is why conventional deadlifters see some good carryover from training the opposite stance in which they tend to compete in. Regardless, the adductors are important, and you’ll probably notice if you’re having issues with them if your adductors get sore when you squat or sumo deadlift (more than baseline soreness from general training DOMS). This would explain why we see torn groins with the deadlift, even with conventional deadlifters.
Middle and Upper Back
Just like the lower back, the middle and upper back also play a crucial role in deadlifting, but more so in an isometric fashion. It could be argued that having a weak middle and upper back will lead to lower back rounding, presenting itself as having weak glutes and hamstrings (since a lot of misses will occur towards lockout). However, if the middle and upper back can maintain the proper position at the knee or as the bar passed the knees, it will be easier for the lower back to hold it’s position and then we can activate our glutes and hamstrings for an efficient lockout. The mid erectors will help hold the spine in a strong position, and the rhomboids and other scapular retractors can help keep the scapulae in place, making it easier to keep our lats tight and the bar close. If the bar begins to get forward on you, this could be a sign that the mid and upper back are weak and need some work. Strong deadifters usually have a massive back to go along with their pull.
Quads
I know you’re thinking, “Whoa, why are quads in a deadlift article?”
Quite simply, this is covering both stances, and I’d be a fool to not talk about the quads for the sumo deadlift. With the sumo deadlift, the knee goes into more flexion, meaning we will have more knee extension to get to a full locked-out position. The demands aren’t nearly as high as a squat, but you do see some people have issues with soft knees, or have issues such as their knees locking out drastically before the glutes do. Just know that your quads are somewhat important if you pull with a sumo stance, and if you have any of the issues I’ve mentioned above, look to your quads. The lower the lifter sets the hips, the more important the quads become. This is why it’s important to keep the hips as high as possible during the setup. You’ll more than likely have the quads doing their role naturally without even having to think or address them specifically (for the deadlift anyways).
Grip
There are ample resources on elitefts talking about grip training, but this is an often-neglected aspect of deadlift training. Some people are blessed with huge hands and can use hook grip or just never really have much of an issue in this department. Then there are people like myself with tiny, fat hands that struggle to hold onto nearly anything. Grip training for the deadlift is rather specific, and is not the same as someone who competes in grip, namely the Captain Crushers. When it comes to grip for your deadlift, make sure you’re training it for isometric holds, ideally with bars and implements that are of similar diameter. A fat bar is going to train the fingers in an open position — a place where we don’t want our fingers to ever get. Working specifically the thumb and pinky fingers is where you’re going to see the most carryover for your pull. With that in mind, the holds and training should be for strength, not endurance. A max deadlift will last probably at most five to six seconds, and therefore we need our hands to be strong. So when working with implements and bars, keep the timed holds for similar durations and implement work to lower, max effort based reps (one to three rep maxes, for example).
Which stance should you choose? Sumo or conventional?
This might be one of the most debated aspects when it comes to the deadlift. Generally speaking, if we’re looking at trends and what is the “norm”, the lighter a lifter is (in terms of bodyweight) the more likely they are to pull sumo, and vice versa.
The real tricky area seems to be in the 180-210 pound area, where it can really go either way. I’m not saying that a lightweight can’t pull conventional (again, look at someone like Lamar Gant), or that a heavy weight can’t pull sumo, but rather, when it comes to body types, these are what tend to work best.
I would say that if you’re got longer arms, and a shorter torso (i.e. Lamar Gant) you’ll probably favor conventional. And if you’ve got longer legs or torso (proportionally speaking) and shorter arms, sumo would probably be a better choice.
At the end of the day, though, you’ll need to experiment with each stance to see what works best for you, but this should be enough to help you make an informed guess at what would work best.
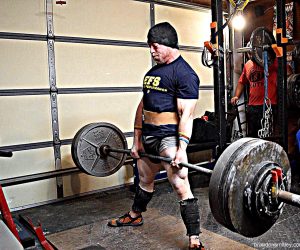
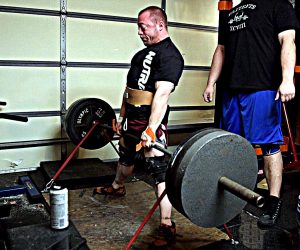
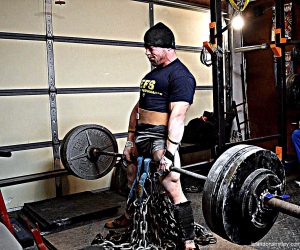
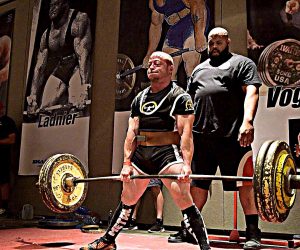
Programming Considerations
The deadlift has some unique ways to set up programming, and I believe that it should be trained differently than the other two competitive lifts (squat and bench press). The deadlift is a rather taxing lift. Think about it: you have to pick up a weight that isn’t moving, and get it to move to a final end point (lockout). The demands placed on the CNS are much higher because we actually have to break some inertia to the get bar moving fast enough to finish the lift. So for example, if you need to deadlift 500 pounds, you have to be much stronger than 500 pounds to actually deadlift it. But with the squat and bench press, there is an eccentric motion, letting us benefit from the stretch-shortening cycle. For this reason, I think the deadlift needs to be trained a tad bit differently.
Specificity
As I’ve mentioned in the other installments, you’ve got to train the lift to actually become better at it. But with the deadlift, I firmly believe that there is a point of diminishing returns. With the higher demands of the CNS required for the deadlift, actually deadlifting for higher volume or heavier sets week in and week out might accumulate a lot more fatigue than the squat and bench press. There might be a point in your career where you only deadlift truly heavy (the competitive movement) every two to four weeks. If you get to this point in your powerlifting career, you might find that supplemental and accessory work and lighter technique work (or dynamic effort work) helps your deadlift just as much when you have to weigh your overall recovery vs. time invested. I’ll expand on this a bit further as we go.
Frequency
With the programming consideration mentioned above, this is going to tend to have us training the deadlift less frequently than the squat and bench press counterparts of powerlifting. Most powerlifters are going to be seen deadifting anywhere from once to twice a week, and that’s about it. Very rarely will you see someone actually deadlifting three or more times per week. Based upon how you opt to set up your programming and manage your loading, you’ll either see once a week training heavy or twice a week training with one moderate to heavy day and then one assistance-based day. I’ve personally trained with both and have seen results with both, so you’ll need to experiment with this yourself. More than likely, the less experience you have or the lighter you are, the more likely it is you will tend to lean towards twice a week, and vice versa with heavier and stronger lifters drifting towards once a week.
MORE: Bodybuilding Exercises for Powerlifters — Widen Your Grip to Beef Up Your Back and Deadlift
Something you might want to keep in mind, though, is how you can get more from less. I know this has been beaten into the ground when it comes to training in general, but with the deadlift being more CNS taxing, you might be better off with training it specifically once a week so that you can put that extra (recovery) time and effort to the other two lifts. In my personal experience, I’ve found that deadlifting heavier less frequently lets me bench and squat heavier more frequently.
Bodybuilding
This has been a growing area for powerlifting in general, but I think this holds specifically true for the deadlift. One beneficial thing is that similar muscles are used to squat and deadlift, so we can somewhat hit two birds with one stone. Yet, they are different movement patterns and require the muscles to operate under different demands. When it comes to having a strong deadlift, your hypertrophy work should be emphasized towards the glutes, hamstrings, upper back, and lower back. Strong glutes and hamstrings don’t really exist, as they can’t really be too strong for the deadlift. So if you’re seeing a lack in progress of your deadlift, increasing your posterior chain work is a good recommendation (Matt Ladewski has touched on this quite a bit).
Needs Analysis Weak Point Index
Here are some tables that might assist you with ideas on how to train and build your deadlift:
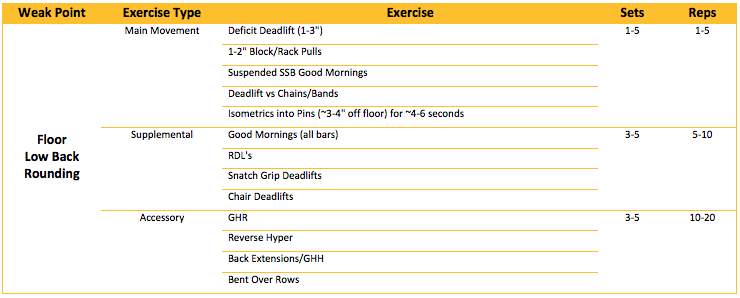
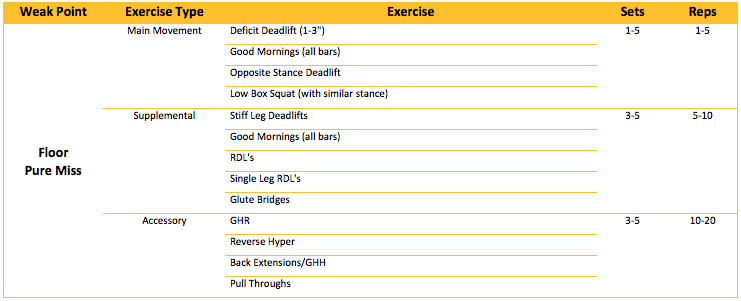
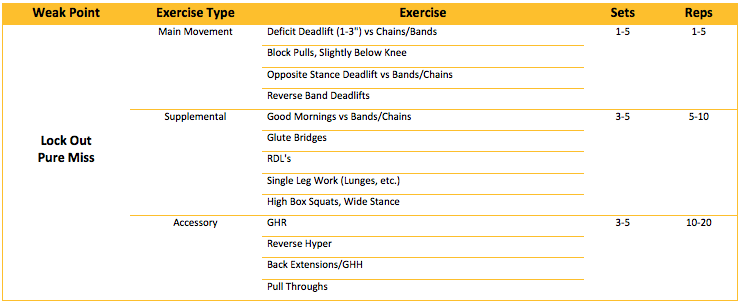
Now, I know some of you might be thinking, “What do I do if I miss at the knee?”
There can be a few factors at play here:
- You’re more than likely missing this due to not being in the correct positioning when you start the pull. So look at the first table for back weaknesses and see if that helps.
- This is technically the hardest part of the lift if you pull conventional, so understand that missing here is pretty normal. Just keep doing what you’re doing and look at your position when you miss. Then see the appropriate table.
- Increase your back work. I didn’t give much in terms of back accessory work, but you should be doing is in general with your training. An overall stronger back from lat pulldowns, rows, straight-arm lat pulldowns, trap work, etc., will help you maintain the proper position.
- If you pull sumo, there could be some quad weakness at play if you’re in the right position, but again, more than likely if you’re squatting regularly this isn’t your problem. Just keep hammering your hip extensors.
Carryover
As you’ll see in the tables above, a lot of the movements and exercises listed have a lot of carryover. You really need to be aware that training the deadlift is going to hit a lot of the same stuff as you need it to. There will be specific areas you need to hit, based upon what is going on with your deadlift, but positioning and technique can fix a lot of the issues seen. Don’t be afraid to load up on the accessory work to bring up your backside and let your actual deadlift training take a bit of a back seat with less frequent heavy pulling. The options are limitless for how you can address your deadlift, but if I’ve learned anything it’s that pulling heavy frequently doesn’t usually pan out for the best, and this can be seen from the best deadlifts around the world. So look at why you missed the lift and go from there.
Pulling Your Weight
The deadlift is often seen as the manliest lift on the platform, and for good reason. It takes a ton of balls to chalk up and hoist more than 500, 600, or 700 pounds. But nothing looks more badass than pulling a PR deadlift to end the meet. Get technically proficient, hammer your posterior chain, and trust the process. The deadlift is either your favorite or least favorite lift, but regardless, give it the respect it deserves. The meet doesn’t end until the bar hits the floor.
Building the Raw Squat
Building the Raw Bench Press

This article will cover everything you need to build a big deadlfit as a raw lifter, from needs analysis, to the role of specific muscles, to choosing your best stance.
Well after coming off my worst meet performance of my career at APF Nationals, I can say that without a doubt I did the exact opposite at the 2016 WPC World Championships in Baton Rouge, Louisiana. The training cycle itself was great, and I felt really good about the work I had put in, but we all know that many times a good training cycle doesn’t mean a damn thing when it comes to meet day performance. There are just way too many variables at play to consider. With me competing on a Monday, I ended up leaving town on Saturday morning with my training partner, Trey, a little after 9am. We had a good 12-hour drive down to Baton Rouge, and I was in no rush since I was well overweight when we left. We actually set things up to where we would stop halfway in Memphis to stop by NBS Fitness and catch up with David Allen, Christian Anto, and the other awesome NBS family I’ve gotten to know well over the past few years. Trey got some training in while I checked weight, and then we made our last leg of the trip to Baton Rouge, arriving a little after 11:30pm. I was pretty damn tired and depleted, but arrived just barely overweight and knew that I would float the rest of the weight off overnight.
RECENT: Joe Sullivan's 2000-pound Total at SPF Reebok Record Breakers
Sunday morning I woke up (I say this loosely as I sleep like crap when cutting) a hair underweight and just chilled out until weigh-ins. I made weight, and then immediately started my rehydration protocol and getting things right for Monday. Lots of fluid and food, rest, and football. Not a bad day, really. That afternoon though we ran into teammate Sheri Whetham as she was weighing in at the later session. We would be sharing the platform together, but unfortunately on different sides. Big bummer, but at least I knew I would be seeing her and Ken all day Monday. After a good dinner at Texas Roadhouse, we made our way back to the hotel and called it a night.  Monday morning I woke up plenty early to head downstairs to hit the breakfast buffet and get some good quality carbs in me before squatting. I never tend to eat a huge breakfast, but just enough quality food to ensure I make it through my flight, and then I’ll eat a little bigger after squats are over. Just some toast and biscuits with jelly, fruit, and a few eggs and I was good. I then made my way to the warm-up room for the rules meeting, and we were ready to rock and roll. I was in the first flight of platform 2, so I knew when they said a 9am start time, we would be starting sharp.
Squat
Warm-ups 65x10 155x5 245x3 335x1 385x1 455x1- add Metal Mystical Knee Wraps Opener — 490, Good Unfortunately, my warm-ups were all over the place. The warm-up room was a cluster. I can’t blame anyone but myself, but the sheer amount of weight changing was eating up time, and as a result my warm-ups. I was nearly closing out the flight and needed to get the heaviest, but was just having a hard time managing my warm-ups with others warming up at the last minute. I can only blame myself, so having taken a big final just on my warm-ups I was worried a bit about the 490, but I opened light on purpose. Judging was TIGHT, and this was a perfect opener to build some momentum. Second — 529, Good The way my opener moved, I stuck with my planned second attempt. Trey wrapped me up in the Metal All-Blacks for this attempt and it was a smoke show. Right on pace where I wanted to be so far. Third — 545, Good After some discussions with Trey, we opted to make a small jump on a third to something that would build my total and that I felt was a done deal lift. I felt that 545 was a good weight to take, and it would put me in a good position to build my total. I wanted to take 567 to break my all-time record, but we figured let’s see how 545 moves and if it’s good, then go to break the record on the 4th. Fourth — 567, Good I finally got the damn monkey off my back. After over 18 months of breaking the all-time world record squat at XPC’s, I got my redemption of setting the bar a little higher. The bar part was I had to take this lift about 7 minutes after hitting my 545. I felt I was good for 572 based on my 545, but with such a short turn-around between lifts, I just opted to take the smallest jump I could to break it. The bar rolled on me a little bit about a third of the way up, but I managed to save it and keep the bar moving.
Bench Press
Warm-ups 55x10 105x5 145x3 195x2 235x1 265x1 285x1 Opener — 303, Good Bench warm-ups felt awesome. I was a bit exhausted from the squatting and the pace at which the meet was moving, but weights felt good and light. My opener was good and easy like I had expected. Second — 319, Good After all the changes I made to my bench press after Nationals, this was a weight I was a bit worried about. At Nationals this weight stapled me twice, but I knew that I needed this weight to help get a PR total in the bag. It moved pretty damn well. Still on pace. Third — 330, Good Again talking things over with Trey, I was having a hard time deciding if I wanted to take 330 or 336. I really wanted to give a bench PR a run, but I just felt that I was within reach of a 1400 pound total, and that I needed to get every pound I could going into deadlifts if I wanted to do that. This was the perfect call in weight, and was technically a half pound PR. I’m not counting it for my records, but hell, I’ll take it.
Deadlift
Warm-ups 135x5 225x3 315x1 365x1 405x1 445x1 Opener — 479, Good I took my planned opener, and I finally didn’t mess shit up and drop it! I was in the meet with a 1355 total. Second — 501, Good I was having a bit of a hard time deciding what to do here. I only needed 490 to secure a 1-pound PR total, but I felt that such a small jump was a waste. I wanted 1400 and so I decided to split the difference. Find a weight that would give me a total PR, challenge me, but also be a stepping stone to 1400, and 501 fit the bill nicely. Not hard, but enough to make me stay focused. Sitting at 1377 now. Third - 529, Miss Well with the kilo conversions to pounds, I would need to pull 529 to break 1400. The 523 would put me at a 1399.5 total, and in my book that was no good…and it would have drove me nuts until I compete next. Plus the 529 would have gave me a four times bodyweight deadlift, another bucket list item. Unfortunately, it just wasn’t in the cards for the day. The weight started to swing away from me, and then it ended up just getting stuck and I couldn’t save it. After the day I had, I could live with it.
Wrap Up
The meet was super quick and efficient and I can’t thank all the fine people of the WPC and APF for their hard work all weekend. It was hands down the best meet I’ve done, and a really cool experience. I was done lifting shortly after 2pm and was up in the room by about 4:30pm hanging out until dinner. I ended up having one hell of a meet, and I could not be happier with my performance and ability to bounce back the way that I did after Nationals. I knew I was capable of so much more, but for whatever reason was just having a hard time putting things together. However, WPC World’s was a different tail. I walked away with a two-pound squat PR and breaking my all-time world record, a fraction of a pound PR on bench, and a 12 pound PR total. Soon enough, 1400 will be mine. With no one in my weight class I won the 60kg weight class, and ended up taking best overall male lifter in the open division. A pretty stellar day with a world championship to my credit. I would like to sincerely thank my man, Trey, for the awesome job of handling me all meet and helping me all weekend. The dude sacrificed college classes, his weekend, his training, and who knows what else just to let me lift some weights. I could not have had the meet I did without him. I’d also like to thank Dave and Traci for the continued support and allowing me to represent EliteFTS. It’s always an honor and a privilege. And finally, thank you to my training partners, Team EliteFTS and Team NutraBio, friends, family, and everyone else that reached out to me all day long. I really appreciate all the support.

So what’s next? While I posted this in one of my training logs, I have decided to compete in some bodybuilding shows over the course of the spring of 2017. Training for that will start in December after Thanksgiving and some time off. My next powerlifting meet will likely be AAPF Nationals in the Chicago area in May of 2017. I’ll have more details over in my training log as things move forward. 
I walked away with a two-pound squat PR and breaking my all-time world record, a fraction of a pound PR on bench, and a 12 pound PR total. Soon enough, 1400 will be mine.
Just like my previous article, Building the Raw Squat, I’m going to go into great depths about what it takes to build the raw bench press. Also just like with the squat, there is a plethora of information on this site to help you with the technical side of things, so this will not be discussed in great lengths. If you need some direction, So You Think You Can Bench Press is a good place to start.
To cover the basics, though, whether you bench press raw or in gear, there are a few quality things you will notice that must happen to be a successful, strong bencher:
- Utilization of leg drive
- Bar is squeezed, weight is settled on the lats
- On the descent, the bar is pulled apart and lowered controllably with the lats
- Elbows remain tucked to some degree
- Belly should be full or pushed up
- Scapulas will be pulled back and down, wedged into position
- There will be some sort of arch (big or small)
There will, of course, be variance between lifters, but you should be able to see these in all successful bench pressers.
Needs Analysis
Now let’s cover some of the differences you’re going to see in the raw bencher versus equipped. Just like in the squat article I wrote, we need to look at the needs analysis of a raw bencher. Without a bench shirt, things begin to change a bit in terms of muscle loading and the strength curve.
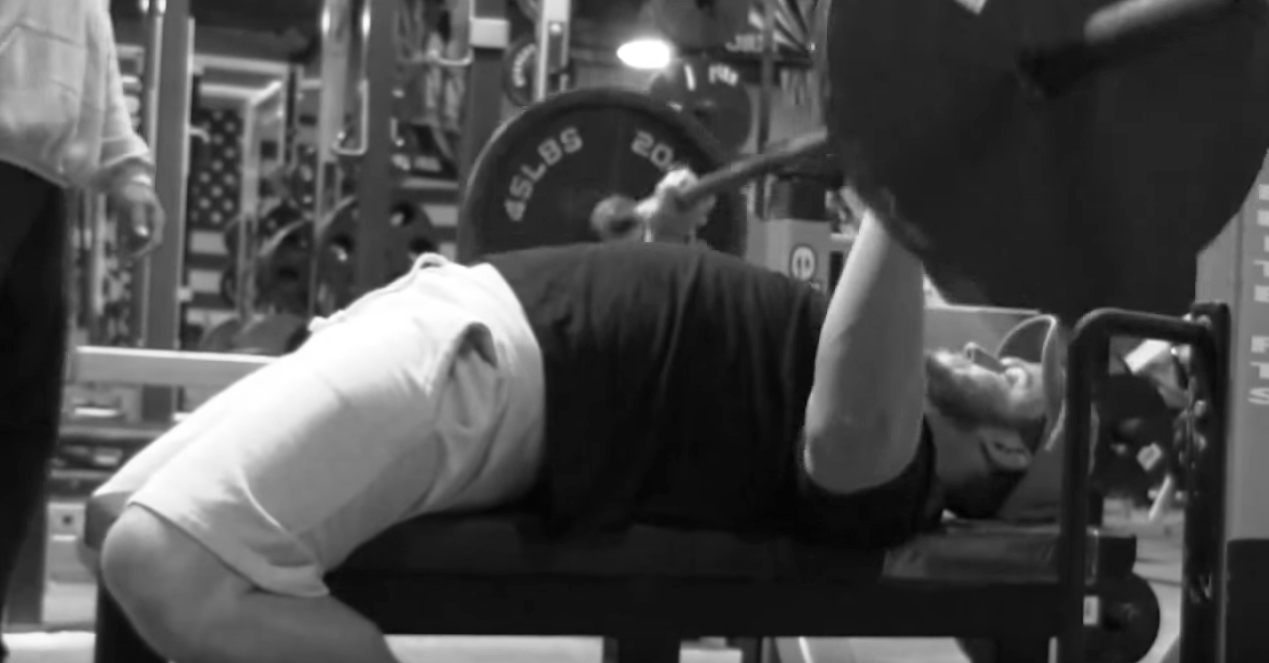
Chest/Pecs
In most powerlifting realms you’re going to hear how unimportant the chest is. “Benching happens with the triceps, bro.” I’m not knocking the triceps, they’re very important (we’ll get to them in a minute), but go ask a person that’s blown their pec how benching is now. It sucks. They likely can’t get over 225 without it bothering them. The pecs are indeed important for the raw bencher.
However, how they are trained needs to be different than our bodybuilding counterparts. We’re not really so concerned about building fluffy, ripped pecs, but rather pecs that can contract hard and explosively while maintain a good, solid isometric contraction on the chest (for the pause). If you aren’t training your chest with some isolation work, you should probably start. Not only will you less likely blow a pec, but your strength off the chest is going to get better.
Triceps
This is the bread winner you were probably looking for, and without a doubt the most important part to a successful bench press. With the elbow position being tucked at about a 35-55 degree angle, the triceps are going to take a much larger grunt of work than the style of your typical bench bro, elbows-out bench press. Specifically the medial and long heads are the parts of the triceps you are going to want to work. The lateral head is going to have minimal contribution to your bench press. I can’t remember where I heard the saying, “lateral head, lazy head”, when speaking about the bench press, but it definitely holds true.
Once the barbell has been lowered and is on the chest, and a “press’ command comes, the pecs will help get the bar started to move due to the stretch reflex and deficit of the humerus. As the pecs horizontally adduct the humerus, the triceps will be forced to engage to maintain that great elbow positioning you had on the way down.

Lats
In addition to the triceps, we often hear a lot about how the lats help you bench press. This is only partially true. Yes, you need your lats to bench massive weights, and yes, it can be argued that the lats help somewhat off the chest, but I think most look at the way the lats are used in the bench press incorrectly. One of their most important roles in benching is to help stabilize the humerus. If the lats are strong enough to do this, the elbow position we desire will hold, weight can be transferred better via the triceps, and more than likely you’re going to finish the lift. Your lats will also help with the eccentric aspect of the movement, and it’s highly suggested that you do let the lats take this grunt work, so that your pecs can do their role on the press more efficiently. So, “using your lats” is generally meant more in terms as an isometric, not a concentric action.
Shoulders
The shoulders are the last aspect that I’m going to cover, mainly because they aren’t really doing anything of true significance. You’ll need some strong anterior delts to help move the weight off the chest, but too strong and you’ll get that nasty “flaring” motion (or too tweak of lats and triceps, depending on your point of view). So for your shoulders, if you’re flaring you know you need more lat and tricep work, and if you’re not flaring, you can stand to do some more shoulder work if you’re missing around chest level. The rear delts are going to be important to help give you that big shelf to press through. The bigger the foundation, the bigger the building. Build a big upper back and rear delts, and you’ll be able to display more of the strength you’ve got on the front side — not to mention, it will help keep your shoulders healthier long-term. But the lateral head of the shoulders? Not all that important, really. You’ll need to train them a bit for some balance and general health, but otherwise, don’t think lateral raises are going to increase your bench press any time soon.

Programming Considerations
The bench press has some interesting considerations to take into account compared its powerlifting brethren, the squat and deadlift. Due to the bench press having much less overall muscle mass involved, and typically less overall weight used during the execution, it’s going to be less stressful to the nervous system and recovery.
Specificity
Just like I mentioned in the previous article about the squat, to be good at the lifts, you are going to need specificity to get better at the movement itself, but once you become technically proficient you can begin to use different movements, bands, chains, and bars to help build up the weak points you might have. I’ll cover this more below.
Frequency
With overall less stress from the bench press compared to the squat and deadlift, this allows for the bench press to receive more frequency during a microcycle. For female and smaller male lifters, increasing strength in the upper body can take a bit more work than compared to some of the bigger lifters. This is in part due to the fact that making five pound jumps end up being a larger percentage of the training/competition max and we’re not getting as much CNS stimulus from the lack of total weight.
So increasing overall volume and stimulus during a microcycle can help keep the lifting moving in the long run, and also help build some quality muscle tissue. From my experience, benching seems to work well with two to three times per week for most lifters. Some might be able to stretch this into four days per week based upon how the training is managed, but this should probably be saved for highly competitive bench-only competitors, as the shoulder havoc and complications could affect lower body squat training days. The most important part to take note in with the increased frequency is overuse and tracking overall volume of work. You will need to have days where you have RPE or weight caps to help prevent overtraining, that way on your heavy days you can be fresh.
Bodybuilding
I mentioned in the squat article how the bodybuilding work would help with long term development and overall extend your career in powerlifting. While this is true, for this segment I want to focus on the overall sheer muscle mass that it takes to be an excellent raw bencher. Take a look at people like Casey Williams, Maliek Derstine, and Meana Franco. They have considerably more upper body mass in general than their competitors (and some impressive raw benches to their credit). The more muscle mass around a joint, the more stable it will be. Also, the more muscle mass one has, the greater surface area they have to apply force from the bench pad up into the bar. So overall, besides just staying healthy long term, having the size of a bodybuilder is going to help move some impressive weights (directly and indirectly).
Needs Analysis Weak Point Index
Below are some tables to give you some ideas of certain movements, accessory work, and set and rep schemes that can help you:
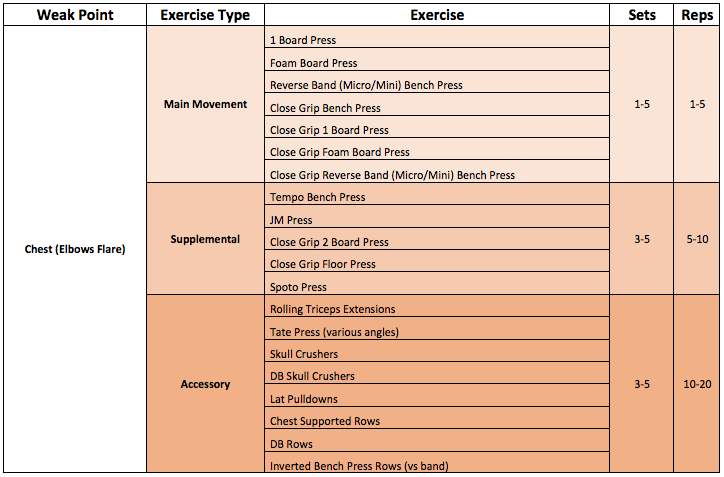

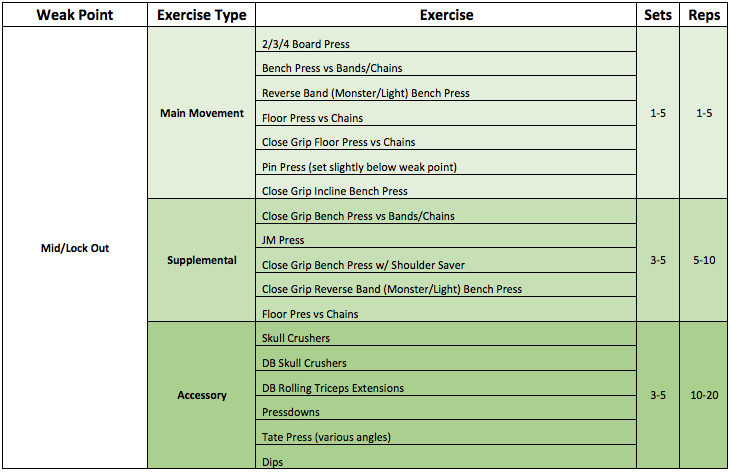
These lists aren’t inclusive of everything you could do to help with specific weak points, but it’s important for you to understand why you are missing max attempts. While I do believe that most lifters seem to miss around chest level, some miss for specific reasons, which is why I’ve lumped these into different categories. You’ll notice that upper back work is not really brought up in these specific tables. Generally, the upper back work is going to help keep the shoulders healthy, and should be included regardless of training needs. It might fluctuate between training cycles or issues you might be having, but for longevity I recommend having things like face pulls, rear delt raises, band pull-aparts, reverse pec dec, and Blast Strap shoulder circuits common place on your bench training days.
Understanding Carryover
You will see many similar movements in multiple categories above, and that’s for multiple reasons. First off, using bands and chains on some movements does make it more tricep dominant. However, it also teaches one to accelerate the bar faster (off the chest), so therefore this is an excellent movement for both muscular issues (chest/shoulders or triceps). A good blend of variation across the training session and microcycle should help you address multiple areas. So for example, if your triceps need work, you don’t need to have do purely triceps-dominated accessory work, nor should you. Having some variety will help build your bench press all around as a whole.
Keep track of your PR’s and get a good honest assessment of your bench press. This is the lift that is probably assessed incorrectly the most of the three competitive movements, and I believe it’s because people only look at where you miss the lift, and not why you missed the lift.
Putting It All Together
For the second part of this installment, we can see that the bench press has many components and pieces to yield a high success. Being technically proficient can take you a long way, but attacking specific areas with a methodical approach can help you put up some freaky bench press numbers to improve your total. After all, “What do you bench, bro?”

We first need to look at the specific needs of a raw bencher — once we know what body parts need brought up, we can then create a program that strategically utilizes the most beneficial exercises.
If you’ve been an avid reader of elitefts.com for any length of time, you can likely find an incredible amount of resources and tips to helping improve your squat. Whether it be technical, mental, or physical, Dave has taken the time to ensure that no stone is left unturned.
So why am I writing this article, and sharing my thoughts and viewpoints?
Everyone has different approaches, ideas, methods, and ways of communicating. Not one way of delivery is right or wrong, but it also means that not everything will sink in. This article is designed for me to share with you some of the things that I have learned over the years on what has worked best for myself and clients in building the squat.
What this article will not do is dissect technique. Why? There are dozens of ways you can get technical help, via the Q&A, our seminars, the coaching provided by athletes and coaches, Twitter chats, articles and videos, and even the training logs. I just feel like I would be repeating what the greats before me have for decades.
First Things First
I want to get this out of the way as soon as possible. Squatting in gear vs squatting raw really isn’t all that different. Yes, there ARE differences, but the major take home points remain the same.
- Big air into the belly
- Tight lats/back
- Hips break first
- Spread the floor/hip external rotation
- Drive the head/back/traps up into the bar first out of the hole
The major differences are going to be how far one sits back and the feedback loops from the gear. Yes, an equipped squatter is likely to have a wider stance, but you can still see those in gear squatting rather narrow and those that are raw squatting rather wide. So this is a personal factor, not a “must” like the points above.
WATCH: Spotting 101 — The Squat
Raw lifters are going to see a bit more forward knee travel, and rely on the stretch reflex a bit more. Otherwise, the squats are utilizing the same principles and can be approached similarly. The differences I’ll discuss below.
Needs Analysis
One thing we need to do before ever addressing the squat is to look at the needs of the raw squatter. We know that they do not have the support from gear in the hole, and that there will be more forward knee travel than their equipped counterparts. This can help us decide what we need to focus on to improve the lift.

The Hole
Without the support of the equipment, we need to build the bottom end strength of the lift. This can be done via a variety of training approaches, but this will likely be where most lifters fail (very rarely do you see a lifter miss a squat at the top unless they stumble or lose balance). Even if they are missing about 3-4 inches out of the bottom, this can be attributed to not having enough speed from the bottom.
The Quads
Without a doubt, this is probably the biggest change one will need to make to their training from the equipped lifters. With the forward knee travel, the range of motion and stress placed on the knee and quads increases. Building this strength is going to be vital to getting out of the hole, but also continuing the acceleration of the lift through the sticking point. The quads are huge muscles, and I challenge you to find a raw lifter with big quads that isn’t squatting some impressive numbers.
But What About the Hamstrings?
The hamstrings are still very important for the raw squatter. After all, the descent of the lift is loading them eccentrically, and they are going to provide a good stretch reflex from coming out of the bottom. However, they are not nearly as important to the equipped lifter who will be sitting back more into the gear and have a drastically more posterior chain dominant squat.
Now, before you have my head on a stake, hear me out. If your hamstrings are incredibly weak, then yes, you do need to do hamstring work! There is no such thing has having hamstrings that are too strong. But, relying on your hamstrings to be the dominant mover of your squat is incorrect.
WATCH: Best Secondary Movement for the Squat
The stronger your hamstrings, the stronger your quads can get. Your hamstrings are going to help stabilize the tibia while it transfers the force from the floor, into the legs, up through the torso, and into the bar. So the better you can stabilize the tibia, the more the quads can do their job and the healthier your knees will be.
So your take home point here: Train your hamstrings to be strong enough to handle the strength your quads want to display. For some, this might mean you need a ton of hamstring work (beginners). For others, it might just be whatever you need to keep the balance between your quads and hamstrings.
Programming Considerations
Now for the juicy stuff you’ve probably been waiting for: something you can actually use.
I’m going to cover a plethora of methods, ideas, and exercise approaches so just understand that based upon how you train, how long you’ve been training, and where you classify as a lifter (beginner, elite, etc.) can all dictate how you implement these.
Specificity
To be good at squatting, you have to actually practice the lift. Even as someone that is in favor of a concurrent training methodology with conjugating lifts, I still believe specificity to be at the forefront. You’ve got to do the movement to train the muscles the way they are planning to be used on the platform. So my first recommendation is to get good technically at the lift. Once you do this, then you can really begin to have some fun with bands, chains, specialty bars, and other variations of the movement to help address specific weak areas of your squat.
Needs Analysis Weak Point Index
Assuming you’ve got your technique dialed in, it’s time to see what happens when your technique breaks down under maximal loads. This can give you an idea of where you need to focus your supplemental and accessory work (and even your max effort or main movement).
Below are some tables giving you some ideas of certain movements, accessory work, and set/rep ranges that can help you:
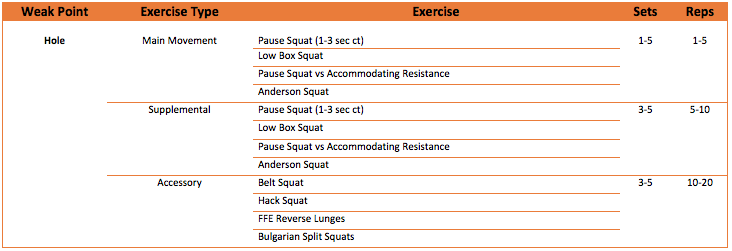
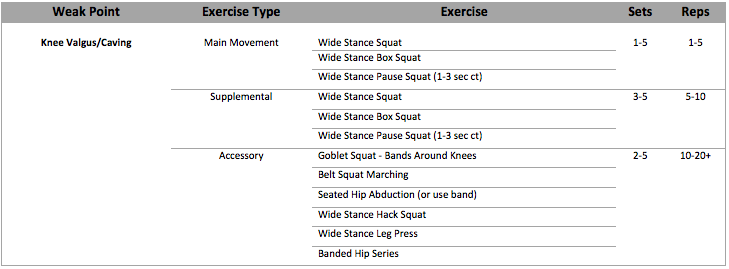
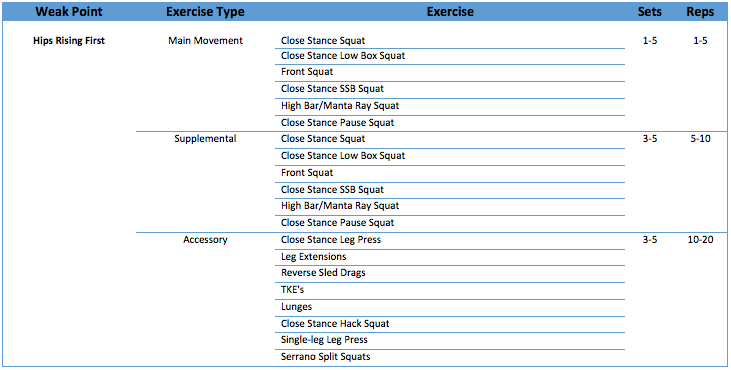
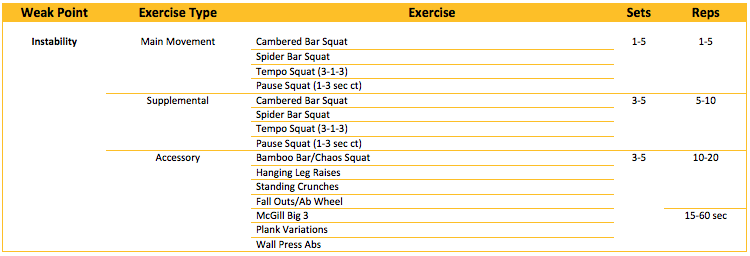
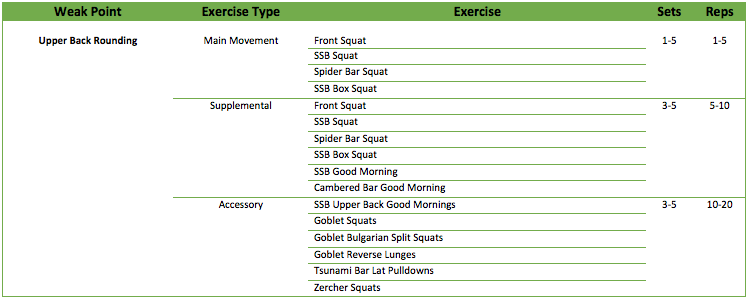
While these tables are not all-inclusive, these are things that I program and see results with on a regular basis. You might have access to some other options and special equipment, but for most people these are things that can be done on a regular basis.
Regardless of what your programming philosophy is, these can be implemented into any program and with some major success. The most important part is to make sure that you are addressing the proper areas for you. If you need help with some video critique, the Q&A is a great place to post a video and get some help for free!
Frequency
While this part can be highly individualized, I think that it’s best that the majority of people are squatting about twice per week on average. You might be able to handle more or less, but generally speaking two squatting sessions per week is a good place to start. One will likely be a heavier or emphasized squat day, and the other will be lighter or more of a supplemental day. One could use a specialty bar, while the other is the competition movement, or you could have none that use the competition movement for an entire block of training, and the next could be nothing but the competition movement. The possibilities are endless in how you truly set this up with all the programming options available, but finding a structure and template that works best for you and your lifestyle is what is most important.
Understanding Carryover
Now, if you’re one that is opting to use specialty bars, bands, chains, and various movement variations, you really need to keep track of PR’s for each one. This might seem like common sense, but having this tracked is going to let you see if you have direct carryover.
Having different variations is great, but if it’s not going to have carryover (or serve an underlying purpose of just keeping you healthy), you need to know so you can ditch it and find something else that works. For many, this might be using a specialty bar or variation after a meet for an off-season block of training.
You need to have some kind of assessment protocol in your training that lets you know whether your efforts are paying off. I personally like to throw in competition style squats every couple weeks and test some rep PR’s (10, 8, or 6-rep is the norm for me). If these are improving and looking better, then I know I can proceed. If things looks off or worse, I can reevaluate my approach and change things up.
I’m not saying my way is the best, it’s just what I’ve found that lets me track progress without having to actually take a max single in training.
Bodybuilding
I saved this part for last, as I know it will be something that can be highly debated, but that I think is well worth the investment for the long haul.
As a raw lifter, one of your most valuable assets to increasing your squat is just building more muscle mass. Muscle moves weight, improves leverages, and helps keep joints healthier. It seems like a no-brainer, but with powerlifting being all about being the strongest, some seem to get too specific for too long. Getting some time away from the barbell, and taking the needed down time to put on some quality muscle mass and utilize different loading schemes, intensity techniques, and extended time under tension will help build your foundation for when you do get back to a strength block of training.
You need to have some type of hypertrophy training year round, but know that the amount and focus of where will vary based upon the competitive season. After a meet you might hit nothing but hypertrophy training with various machines and movements you never do, while leading into a meet, your hypertrophy work will only be designated towards your specific weak points to help your squat continue to climb leading into a meet. Anything else is just going to be a waste of recovery capacity when intensities are at their highest. So don’t be afraid to really push your volume in the off-season and really try to build some muscle. Your strength will take a minor hit in the beginning, but when you come back to building that strength, you’re going to be able to display it better via more muscle mass contracting from the increased motor unit recruitment.
Bridging the Gap
While the squat is still the most technical lift we see in powerlifting, the gear whores and raw zealots have much more in common than we think. I grew up reading and learning all my powerlifting knowledge from the likes of Dave Tate, Louie Simmons, Matt Wenning, JL Holdsworth, and other various equipped lifters, but still learned how to take my squat from shit to good. After some tweaks and speaking with other great minds over the course of my training, I’ve arrived at my own philosophies in building what I feel is the best approach to the raw squat. Whether that is truly the case or not does not concern me; what does concern me is that my squat keeps climbing, and so does yours.

While the squat is still the most technical lift we see in powerlifting, the gear whores and raw zealots have much more in common than we think.
After seeing some of the recent debate and frustration after the IPF Raw World Championships regarding spotting, I realized that this is a topic that is rarely discussed, almost as if it's just something that everyone knows. Spotting is a very important aspect of training, as it ensures not only the lifter's safely, but also—when done correctly—the spotter's safety.
- Use your leverages to your advantage with a wide stance/base of support.
- Stay close.
- Make sure both sides of the bar are loaded evenly.
- When spotting from the side, surround the weight and keep the sleeve of the bar close to crease of your elbow.
- When spotting from the rear, have your hands under the arms of the lifter.
Knowing how to properly spot is not only important for the safety of the lifter but also for your own.
Powerlifting is evolving at a fairly quick rate. The improvements to gear, rules, addition of meet federations, the growth of raw lifting, and the public view of the sport is increasing. This is all great, but there are also some things that are happening that I attribute to the growth and “hip” part of powerlifting. If you’re doing any of these things, chances are, you’re leaving pounds off the platform.
Social Media Lifting
This kind of seems like a no-brainer, but it has to be listed.
Granted years ago, there was no such thing as social media, so the only way you knew what was going on was through PLUSA magazines or word of mouth. Social media has done a lot to help improve the visibility of the sport, but I also think it’s one of the main reasons why people even lift in the first place.
If you didn’t have a cell phone, or upload your videos to Instagram, how would you feel about this? Would you still feel “verified” or “accepted” within the sport? I’m guessing that many people probably wouldn’t even train. They’re glued to their phones and “likes” they are getting.
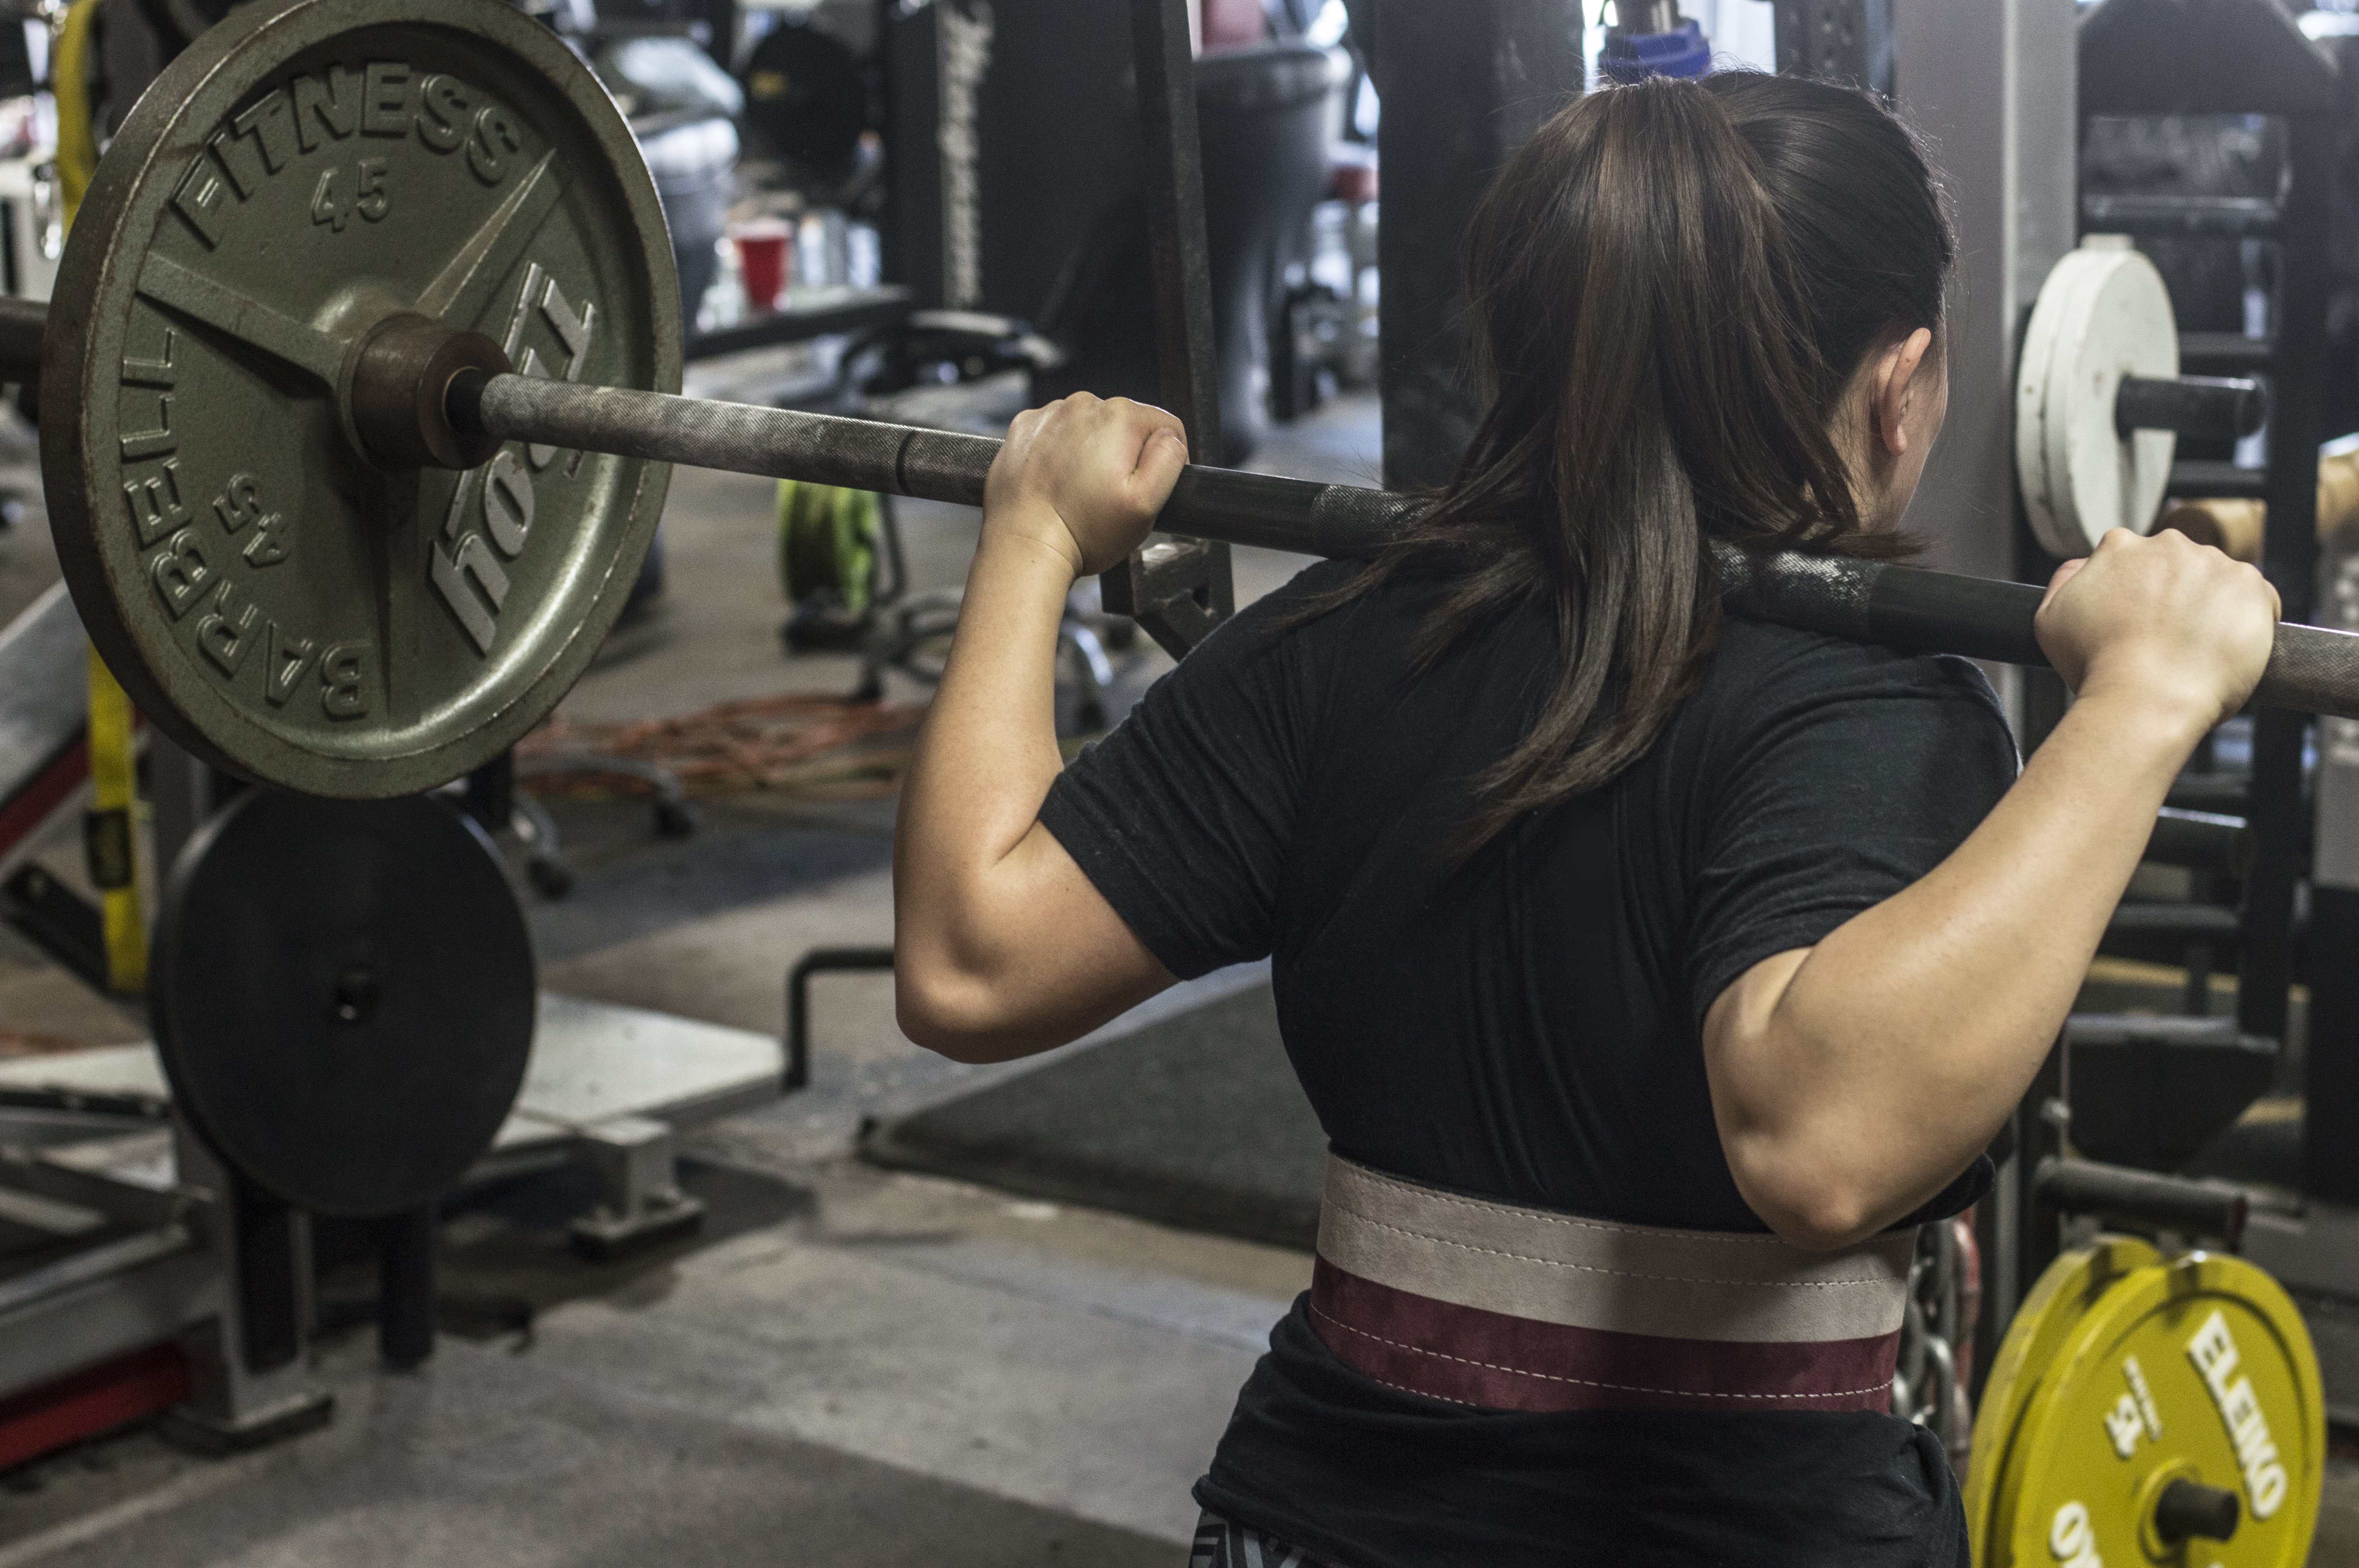
If these lifters took the time that they take to set up their phones and share their lifts, and reinvested this into more strict rest periods, self-education, and providing better coaching for their training partners, imagine how much better they could be.
Now, I will be the first to tell you that I record every training session for YouTube. I use a nice DSLR camera, that way I don’t have to mess with setting up a phone, and hitting record a million times during my training session. Or hell, even bother finding a way to set up my phone or asking that guy across the gym, “Can you video this for me?”
RECENT: Brandon Smitley's 9-Week Conjugate Training Program
In actuality, my YouTube videos are actually for MY knowledge and information. I can look back over years of training sessions, and know exactly how I felt, how things looked, what I did, and notice changes in technique. I can’t tell you how many times I’ve gone back to my channel and watched me hit certain lifts differently than I do now. With the voice overlay that I do, I can even remind myself of how things felt.
Now, I will say that this is why you should be keeping a written training log. You can pretty much keep all the data you need there, except for the visual aspect. So my suggestion would be, if you are going to film your lifts, get specific. List the date, training cycle, week and day of the training cycle, and make sure it’s easy to find.
A second aspect to this is seeing people lift more in training than they ever hit on the platform. I’m sorry, but there is only one day of a training cycle that matters, and that’s meet day. What you hit on Instagram doesn’t matter (unless the federation president overturns it…but that could be an article in and of itself).
If your Instagram total is better than your meet total, you might be social media lifter.
Imitating Top Level Lifters
This topic probably could have been placed among the social media lifting, because quite frankly, you probably saw the top level lifter on social media. So my first suggestion would be, if you want to be like a top level lifter, go actually TRAIN with them. Be there to witness what you aren’t seeing (the work ethic, dedication, attention to detail, and drive they train with).
Let’s talk programming first.
If you are trying to replicate a top level lifters training program, there is a 95 percent chance this isn’t going to work out for you. These top level lifters have spent decades under the bar, and they know their craft damn well. They have designed their program so specific to their needs and weaknesses that there is no way you have the same issues. When you get brutally strong, you have to get creative and find ways to add 5-10 pounds to a lift (likely in a year, maybe more).
The average powerlifter can likely still make progress off a training template like 5/3/1 or 5thSet. Where you need to get better is technique and consistency, and these are things the top level lifters already have dialed in. This isn’t saying that top level lifters don’t or can’t use these templates to get better, but more than likely if they are using them, they are also getting some coaching and ideas from other top level lifters that are specific for them (and maybe even the creator of the program!).
If you want to replicate what a top level lifter is doing from a programming standpoint, contact them, and ask them what they did to get where they are. I can guarantee you they are training much differently than they did five or more years ago. If you find this out, then you can take ideas that might be specific to your current situation and training age and apply it to your training program. But don’t think because a lifter is doing something now, that you should too.
Now let’s talk about the top level lifters technique.
As I mentioned above, most top level lifters have excellent technique. However, they have also made minor tweaks and changes to this technique to make it advantageous for their leverages and body style. They’ve spent enough time under the bar to figure out some minor tips and tricks to their technique that make it work better for them.
It’s very likely that you are not built like them, in the same weight class, lift the same numbers, and have the same recoverability as them. So why they hell are you trying to be them?
RELATED: 40 Things All Real Lifters Do
Accept the body and genetics that you have, and spend some time in trying to figure out what works best for you. Take the time to get the correct technique down first, and see where issues might be in that technique.
All the top level lifters are doing the basics of the main lifts: breaking the bar, using leg drive, keeping lats tight, bracing and breathing correctly, driving their traps/back up into the bar, etc. If you aren’t doing these things, but trying to take the same stance as Dan Green, you might be focusing on miniscule things that don’t even apply to you.
Basically, don’t major in the minor. Get the major take home points from each lift dialed in perfectly. If you have issues with this, this is why we have a Q&A, our seminars, and even many of us offer coaching. We want to help you get things right. Then once you are taking down big totals and beginning to see your lifts slow down, you can make these minor adjustments to your technique that might apply.
Bar Pop
I’m not sure what this phenomenon is even called, but I’m going to deem it “bar pop” moving forward. I know you’ve seen it, as I see it at every meet or even on social media a few times per week. This is where someone unracks the squat bar super hard or finishes their squat with an over exaggerated lockout.
If you are unracking the bar super hard, you are setting yourself up in a terrible start position. The starting position is going to dictate a lot when it comes to the squat. If you set up wrong, you can bet that you are likely going to miss the lift on the platform, or really make the lift much harder than it ever should be. This is going to have you lose all your upper back tightness. Once this happens, the bar is likely forward or rolled up on your back, and as soon as you come out of the hole, you’re going to pitch forward.
I like to call this, the “pick.” You’re simply going to slowly press more and more tension into the bar until it finally leaves the J-Hooks or monolift hooks, and then let the bar settle into you. This will keep all your positioning and back tightness. And it’s going to look a lot better when you smoke that weight, than when you picked it aggressively and had to rely on your spotters to save your ass.
Now for those that like to finish their squats strong, and have this “bar pop” at the end, this doesn’t impress me. Hell, I’ve even seen a lifter do this, and stumble forward and get red lights for their feet moving. It’s not about how much force you can put into the bar that final six to eight inches; it’s about finishing the lift strong and under control.
I completely understand accelerating through the lift and driving as much force as possible into the bar, but no top level lifters are doing this. It doesn’t prove anything. Just finish the lift, save your energy, and take a heavier attempt. This is merely a “fashion” thing to show how much weight you can lift because the weight was “light." No, you are just demonstrating how strong you can flex your glutes with 315 on your back.
Hopefully you aren’t doing any of these fads, but if you are, look yourself in the mirror and ask yourself if you want to improve your total faster. I’m willing to bet you do.
Work hard, train smart, and think logically. Lifting is not meant to be flashy. It’s meant to yield PR’s on meet day.
Training isn’t meant to be flashy — it’s meant to be effective. Resist the temptation of these “hip” techniques and stay on track to bigger PRs on meet day.

There are a variety of different ways conjugate programs can be set up, and likely each coach or athlete is going to have their own spin on how they seem to do things. In this program, there are quite a few principles that are tried and true: max effort work, dynamic effort work, bands, chains, etc. There are also things that I've put a spin on from my own training philosophy. This program was written as such that one would have access to a pretty high end training facility.
The typical layout is as follows:
Max Effort Lower Day — Always a squat variant, a supplemental movement up to a top set, and then accessory work for the hamstrings, glutes, low back, and abs.
Max Effort Upper Day — Always a pressing variant, a supplemental pressing movement up to a top set, and then accessory work for the triceps and rear delts and/or upper back, and abs.
Dynamic Effort Day — Always a squat variant for speed work (a box is optional), then every other week deadlifting will vary between dynamic work and maximal work. A supplemental lift is again done for a top set, and then accessory work is higher volume for the hamstrings, glutes, low back, and abs.
Dynamic Effort Day — Always a pressing variant for speed work, then a supplemental movement is hit for a top set. This is followed by volume work for the back and rear delts, and more abs.
I understand that not everyone will have access to all the equipment on this program, but if you would still like to do the program, you can make substitutions as you see fit.
When a movement calls for "sets of X reps, up to a top set," this means you will perform sets of X reps, and keep adding weight to the bar until you reach a top set of an RPE of 8-9. How hard you opt to push this will depend on how you feel for the day. These are how you will gauge progress on the program since it has so much variation. An example may be as follows:
SSB Good Mornings — 65x8, 115x8, 155x8, 185x8, 205x8, 225x8, 245x8 (this being the top set). This does two things: 1) You acquire more volume and 2) it is auto regulatory in nature. You should know after a few sets whether you will be able to really push it or not. Make smart weight jumps here, and opt for smaller jumps rather than larger ones.
At the end of the program, you will be taking the competition lifts for a top single, and this should set you up nicely for a PR at the end of the program.
Enjoy the program, and have a great New Year!
Week 1, Day 1 - Max Effort Lower
A1) Competition Squat vs 15% Band Tension - Work up to a 1-3 rep max; then 85% of that max for 2 sets of as many as possible
B1) SSB Good Morning - Sets of 8 reps, up to a top set of 8
C1) Glute Ham Raise - 3x10
D1) Single Arm KB Swings - 3x15 per arm
E1) Single Leg Reverse Hyper - 3x15 per leg
F1) Decline Sit Ups vs Band - 4x15
Week 1, Day 2 - Max Effort Upper
A1) 1 Board Press vs Doubled Mini Bands - Work up to a 1-3 rep max; then 85% of that max for 2 sets of as many as possible
B1) Swiss Bar Floor Press - Sets of 8 reps, up to a top set of 8
C1) Incline Tate Presses - 4x10
D1) Decline DB Skull Crushers - 4x10
E1) Overhead Band Tricep Extensions - 100 total reps
F1) Band External Rotations - 4x40
G1) Standing Band Crunches - 3x50
Week 1, Day 3 - Dynamic Effort Lower
A1) Buffalo Bar Speed Squat vs 25% Chain Weight - 40%x12x2; then proceed to work up to a top set of 10 reps
B1) Competition Stance Deadlift vs 25% Chain Weight - Work up to a 1-3 rep max
C1) Hack Squat - Sets of 8 reps, up to a top set of 8
D1) Step Ups - 3x10 per leg
E1) Cable Pull Throughs - 3x15
F1) Reverse Hyper - 4x20
G1) Landmine Oblique Twists - 3x15 per side
Week 1, Day 4 - Dynamic Effort Upper
A1) Speed Bench Press vs Double Mini Bands - 40%x5x5
B1) Close Grip Bench Press - Sets of 10 reps, up to a top set of 10
C1) Incline DB Bench Press - Sets of 12 reps, up to a top set of 12
D1) Wide Grip Pull Ups - 3 sets max reps (if possible add 5-10 pounds of weight)
E1) T-Bar Row - 3x8
F1) Chest Supported Row - 3x12
G1) Lat Pulldowns - 3x12
H1) Band Pull Aparts - 4x50
I1) Plank - 3x60 sec (if possible, add weight)
Week 2, Day 1 - Max Effort Lower
A1) Reverse Mini Band Squat - Work up to a 1-3 rep max; then 90% of that max for 1 set of as many as possible; then 80% of that max for 1 set of as many as possible
B1) Seated SSB Good Mornings - Sets of 8 reps, up to a top set of 8
C1) Glute Ham Raise - 3x10 (if possible do these against a band)
D1) Dimel Deadlifts - 30% (of deadlift) 3x20
E1) Seated Band Abduction - 4x25
E1) Weighted Decline Sit Ups - 3 sets of near failure (use either 10 or 25 pounds)
Week 2, Day 2 - Max Effort Upper
A1) Buffalo Bar Bench Press with Reverse Light Bands - Work up to a 1-3 rep max; then 90% of that max for 1 set of as many as possible; then 80% of that max for 1 set of as many as possible
B1) 2 Board Bench Press - Sets of 6 reps, up to a top set of 6
C1) Decline DB Rolling Tricep Extensions - 4x10
D1) Tate Presses - 4x12
E1) Band Pressdowns - 200 total reps
F1) Reverse Pec Dec - 4x20
G1) DB Side Bends - 4x20 per side
Week 2, Day 3 - Dynamic Effort Lower
A1) Buffalo Bar Speed Squat vs 25% Chain Weight - 45%x10x2; then proceed to work up to a top set of 8 reps
B1) Speed Deadlifts, Competition Stance - 70%x10x1
C1) Stiff Leg Deadlifts - Sets of 6 reps, up to a top set of 6
D1) Bulgarian Split Squats - 3x10 per leg
E1) Leg Press - 3x12
F1) Reverse Hyper - 3x20
G1) Hanging Leg Raises - 4 sets of max reps
Week 2, Day 4 - Dynamic Effort Upper
A1) Speed Bench Press vs 25% Chain Weight - 35%x15x3 (vary grips)
B1) Close Grip Bench Press - Sets of 8 reps, up to a top set of 8
C1) Push Ups - 3x20 (if possible, do these against a band or weight)
D1) Pull Ups - 3 sets of max reps
E1) DB Rows - 3x15 per arm
F1) Lat Pulldowns - 3x15
G1) Straight Arm Lat Pulldowns - 3x15
G2) Band Face Pulls - 3x30
H1) Plank Series - 60 sec plank, 30 sec side plank (each side); 3 sets
Week 3, Day 1 - Max Effort Lower
A1) Reverse Monster Mini Buffalo Bar Squat - Work up to a 1-3 rep max; then 95% of that max for 1 set of as many as possible; then 85% of that max for 1 set of as many as possible
B1) Suspended Good Morning - Sets of 6 reps, up to a top set of 6
C1) Glute Ham Raise - 3x10
D1) DB Stiff Leg Deadlifts - 3x12 (use a 3 sec eccentric on each rep)
E1) Leg Curls - 100 total reps
E1) Decline Weighted Sit Ups - Sets of 8 reps, up to a top set of 8
Week 3, Day 2 - Max Effort Upper
A1) Competition Bench Press vs 25% Chain Weight - Work up to a 1-3 rep max; then 95% of that max for 1 set of as many as possible; then 85% of that max for 1 set of as many as possible
B1) Skull Crushers - Sets of 8 reps, up to a top set of 8
C1) Incline Tate Press - 4x10
D1) Neutral Grip DB Bench Press - 4x15
E1) Band Pressdowns - 200 total reps
F1) Rear Delt Raises - 4x25
G1) Wtd V-Ups - 4 sets of max reps (hold weight in your hands)
Week 3, Day 3 - Dynamic Effort Lower
A1) Buffalo Bar Speed Squat vs 25% Chain Weight - 50%x8x2; then proceed to work up to a top set of 6 reps
B1) Competition Stance, 1" Block Pull - Work up to a 1-3 rep max
C1) Suspended Cambered Bar Good Mornings - Sets of 6 reps, up to a top set of 6
D1) Reverse Lunges - 3x10 per leg
E1) KB Swings - 3x20
F1) Reverse Hyper - 4x20
G1) Standing Band Crunches - 5x30
Week 3, Day 4 - Dynamic Effort Upper
A1) Speed Bench Press vs Doubled Mini Bands - 40%x8x3
B1) Close Grip Bench Press - Sets of 6 reps, up to a top set of 6
C1) DB Bench Press - Sets of 10 reps, up to a top set of 10
D1) Wide Grip Pull Ups - Sets of 6 reps, up to a top set of 6 (keep adding weight)
E1) Swiss Bar Bent Over Rows - 3x10
F1) Supinated Cable Rows - 3x12
G1) DB Shrugs - 4x20 (hold for a 1 count at the top)
H1) Prone Incline Rear Delt Raises - 1x50; 1x35; 1x20
H1) Single Leg Plank - 3x30 sec per leg
Week 4, Day 1 - Max Effort Lower
A1) Cambered Bar Squat vs 25% Chain Weight - Work up to a 1-3 rep max; then 85% of that max for 2 sets of as many as possible
B1) Good Morning Using Competition Deadlift Stance - Sets of 6 reps, up to a top set of 6
C1) Glute Ham Raise - 3 sets of max reps
D1) Single Leg RDL - 4x15 per leg
E1) Band Pull Throughs - 3x30
F1) Spread Eagle Sit Ups vs Band - 3x12
Week 4, Day 2 - Max Effort Upper
A1) Competition Bench Press vs Doubled Monster Mini Bands - Work up to a 1-3 rep max; then 85% of that max for 2 sets of as many as possible
B1) Close Grip Floor Press - Sets of 8 reps, up to a top set of 8
C1) JM Press - 3x10
D1) Tate Press - 3x15
E1) DB Tricep Kickbacks - 5x20 per arm
F1) Single Arm Band Pull Apart - 5x25 per arm (choke band to a power rack)
G1) Wtd V-Ups - 4x20 (hold weight in hands)
Week 4, Day 3 - Dynamic Effort Lower
A1) Speed Squat vs 25% Band Tension - 40%x12x2; then proceed to work up to a top set of 10 reps
B1) Speed Deadlift vs 25% Band Tension, Competition Stance - 50%x8x1
C1) Step Ups - 3x10 per leg
D1) 45 Degree Back Raise Extension - 3x10 (add weight or band tension)
E1) Glute Ham Raise - 3x10
F1) Strict Reverse Hyper - 4x15 (there should be no swing)
G1) Kneeling Cable Crunches - 3x20
Week 4, Day 4 - Dynamic Effort Upper
A1) Speed Bench Press - 60%x8x3
B1) Close Grip Bench Press - Sets of 10 reps, up to a top set of 10
C1) DB Overhead Press - Sets of 10 reps, up to a top set of 10
D1) Bent Over Barbell Rows - 4x10
E1) Chest Supported Rows - 3x12
F1) Wide Grip Cable Rows - 3x12
G1) Lat Pulldowns - 4x15
H1) Band Pull Aparts - 4x25
I1) Weight Plank - 3 sets of max time (use either 10 or 25 pounds)
Week 5, Day 1 - Max Effort Lower
A1) SSB Squat - Work up to a 1-3 rep max; then 90% of that max for 1 set of as many as possible; then 80% of that max for 1 set of as many as possible
B1) Leg Press - Sets of 8 reps, up to a top set of 8
C1) Hack Squat - Sets of 10 reps, up to a top set of 10
D1) Glute Ham Raises - 3 sets of max reps
E1) Reverse Hyper - 3x30
E2) Seated Band Leg Curls - 3x30
F1) Weighted Hanging Leg Raises - 3x10 (add weight to legs/ankles)
Week 5, Day 2 - Max Effort Upper
A1) 1 Board Bench Press - Work up to a 1-3 rep max; then 90% of that max for 1 set of as many as possible; then 80% of that max for 1 set of as many as possible
B1) Close Grip Swiss Bar Floor Press - Sets of 8 reps, up to a top set of 8 (use closest handles)
C1) JM Press - Sets of 8 reps, up to a top set of 8
D1) Rolling DB Tricep Extensions - 4x10
E1) Overhead Band Tricep Extensions - 100 total reps
F1) Reverse Pec Dec - 4x20
G1) Rolling Plank - 3x30 sec
Week 5, Day 3 - Dynamic Effort Lower
A1) Speed Squat vs 25% Band Tension - 45%x10x2; then proceed to work up to a top set of 8 reps
B1) Competition Stance Deadlift vs 25% Band Tension - Work up to a 1-3 rep max
C1) Snatch Grip Deadlift - Sets of 8 reps, up to a top set of 8
D1) Walking Lunges - 3x12 per leg
E1) Reverse Hyper - 3x20
F1) Lying Band Leg Curls - 5x40
G1) Ab Fallouts - 3x20 (can use Blast Straps, Ab Wheel, or Barbell)
Week 5, Day 4 - Dynamic Effort Upper
A1) Swiss Bar Speed Bench Press vs Doubled Mini Bands - 40%x8x3
B1) Close Grip Bench Press - Sets of 8 reps, up to a top set of 8
C1) Incline DB Bench Press - Sets of 10 reps, up to a top set of 10
D1) Wide Grip Pull Ups - 3 sets of max reps
E1) T-Bar Rows - 3x10
F1) Meadows Rows - 3x10 per arm
G1) Cable Rows - 3x12
H1) Band Pull Aparts - 200 total reps
I1) Hanging Leg Raise Hold - 3x60 sec (hold the 90 degree position)
Week 6, Day 1 - Max Effort Lower
A1) Competition Squat vs 25% Chain Weight - Work up to a 1-3 rep max; then 95% of that max for 1 set of as many as possible; then 85% of that max for 1 set of as many as possible
B1) RDL - Sets of 8 reps, up to a top set of 8
C1) Glute Ham Raise - 3x10
D1) Chair Deadlifts - 3x15 (stand every 3rd rep)
E1) Leg Extensions - 5x30
F1) Decline, Arms Overhead Sit Ups - 3x10 (add weight if needed)
Week 6, Day 2 - Max Effort Upper
A1) 1 Board Bench Press vs 25% Chain Weight - Work up to a 1-3 rep max; then 95% of that max for 1 set of as many as possible; then 85% of that max for 1 set of as many as possible
B1) Reverse Monster Mini Band JM Press -Sets of 8 reps, up to a top set of 8
C1) Incline Tate Press - 4x10
D1) Close Grip Push Ups - 4x15 (add a band or weight if you need to)
E1) Band Pressdowns - 200 total reps
F1) Prone Incline Rear Delt Raise - 3x20
G1) Cable Side Bends - 3x20 per side
Week 6, Day 3 - Dynamic Effort Lower
A1) Speed Squat vs 25% Band Tension - 50%x8x2; then proceed to work up to a top set of 6 reps
B1) Speed Deadlifts vs 25% Chain Weight, Competition Stance - 50%x8x1
C1) Seated SSB Good Mornings - Sets of 8 reps, up to a top set of 8
D1) Back Extension off Glute Ham Raise - 3x10
E1) Cable Pull Throughs - 3x15
F1) Reverse Hyper - 4x25
G1) Weighted V-Ups - 3x20 (hold weight in hands)
Week 6, Day 4 - Dynamic Effort Upper
A1) Buffalo Bar Speed Bench Press vs 25% Chain Weight - 35%x10x3
B1) Close Grip Bench Press - Sets of 6 reps, up to a top set of 6
C1) Incline Chest Press Machine - Sets of 10 reps, up to a top set of 10
D1) Weighted Neutral Grip Pull Ups - Sets of 8 reps, up to a top set of 8 (keep adding weight)
E1) Chest Supported DB Rows - 4x12
F1) Meadows Rows - 3x12 per arm
G1) Lat Pulldowns - 3x12
H1) Band Face Pulls - 3x50
I1) Standing Band Crunches - 3x30 sec (get as many reps as possible for the given time)
Week 7, Day 1 - Max Effort Lower
A1) Buffalo Bar Squat vs 25% Band Tension - Work up to a 1-3 rep max; then 85% of that max for 2 sets of as many as possible
B1) Front Squat - Sets of 8 reps, up to a top set of 8
C1) Weighted GHR - 3x10
D1) Dimel Deadlifts - 3x20
E1) Reverse Hyper - 3x20
F1) Band Good Mornings - 100 total reps
G1) Standing Cable Crunches - 4x15
Week 7 Day 2 - Max Effort Upper
A1) Reverse Monster Mini Band Bench Press - Work up to a 1-3 rep max; then 85% of that max for 2 sets of as many as possible
B1) Close Grip 2 Board Bench Press - Sets of 8 reps, up to a top set of 8
C1) Skull Crushers - Sets of 10 reps, up to a top set of 10
D1) Tate Press - 3x15
E1) Rolling DB Tricep Extensions - 100 total reps
F1) Single Arm Rear Delt Raise - 4x25 per arm
G1) DB Side Bends - 100 total reps per side
Week 7, Day 3 - Dynamic Effort Lower
A1) SSB Speed Squat vs 25% Chain Weight - 40%x10x2; then proceed to work up to a top set of 10 reps
B1) Conventional Pin Pull from below the knee (pin #1 or #2) - Work up to a 1-3 rep max
C1) SSB Good Morning - Sets of 10 reps, up to a top set of 10
D1) Bulgarian Split Squats - Sets of 12 reps, up to a top set of 12
E1) Glute Ham Raise - 3x10
F1) Reverse Hyper - 3x20
F2) Seated Band Leg Curls - 3x20
G1) Standing Band Crunches - 4x20
Week 7, Day 4 - Dynamic Effort Upper
A1) Speed Bench vs Doubled Mini Bands - 40%x5x5
B1) Close Grip Bench Press - Sets of 10 reps, up to a top set of 10
C1) DB Floor Press - Sets of 10 reps, up to a top set of 10
D1) Push Ups - 5x15 (add weight or band if possible)
E1) Meadows Rows - 3x8 per arm
F1) Swiss Bar Bent Over Rows - 3x10
G1) Straight Arm Lat Pulldowns - 3x12
H1) Band Pull Aparts - 5x60
I1) Plank - 3 sets of max time (if you can do 60 seconds, add weight)
Week 8, Day 1 - Max Effort Lower
A1) Front Squat OR SSB Front Squat - Work up to a 1-3 rep max; then 90% of that max for 1 set of as many as possible; then 80% of that max for 1 set of as many as possible
B1) Elevated Glute Ham Raise - 3 sets of max reps
C1) Walking Lunges - 3x12 per leg
D1) Cable Pull Throughs - 3x15
E1) Single Leg Reverse Hyper - 3x15 per leg
F1) Goblet Squats - 5x20
F1) Straight Leg Sit Ups - Sets of 10 reps, up to a top set of 10 (keep adding weight)
Week 8, Day 2 - Max Effort Upper
A1) Floor Press - Work up to a 1-3 rep max; then 90% of that max for 1 set of as many as possible; then 80% of that max for 1 set of as many as possible
B1) Close Grip Floor Press - Sets of 8 reps, up to a top set of 8
C1) Incline Tate Press - 4x10
D1) Decline DB Skull Crushers - 4x10
E1) Cable Pressdowns - 5x30 (use whatever attachment you want)
F1) Single Arm Band Pull Apart- 5x25 per arm (choke to a power rack)
G1) Weighted Side Plank - 4x20 sec per side
Week 8, Day 3 - Dynamic Effort Lower
A1) SSB Speed Squat vs 25% Chain Weight - 45%x10x2; then proceed to work up to a top set of 10 reps
B1) Competition Stance, Speed Deadlifts - 70%x10x1
C1) Snatch Grip RDL - Sets of 8 reps, up to a top set of 8
D1) Single Leg Leg Press - 3x10 per leg
E1) Glute Ham Raise - 3x12
F1) Reverse Hyper - 3x20
F2) Band Pull Throughs - 3x25
G1) Spread Eagle Sit Ups vs Band - 4x20
Week 8, Day 4 - Dynamic Effort Upper
A1) Speed Bench vs 25% Chain Weight - 40%x8x3
B1) Close Grip Bench Press - Sets of 8 reps, up to a top set of 8
C1) Neutral Grip DB Bench Press - Sets of 10 reps, up to a top set of 10
D1) Weighted Wide Grip Pull Ups - 3x8
E1) Neutral Grip Chest Supported Row - 3x10
F1) Wide Grip Lat Pulldowns - 3x12
G1) Inverted Rows - 4 sets of max reps
H1) Reverse Pec Dec - 4x25
I1) Weighted Plank - 3 sets of max time (use a 10 or 25 pound plate)
Week 9, Day 1 - Max Effort Lower
A1) Competition Squat - Work up to a 1-3 rep max; then 95% of that max for 1 set of as many as possible; then 85% of that max for 1 set of as many as possible
B1) Stiff Leg Deadlifts - Sets of 8 reps, up to a top set of 8
C1) SSB Good Mornings - 3x10
D1) Glute Ham Raise - 3 sets of max reps
E1) Strict Reverse Hypers - 3x15 (no swing in the bottom)
F1) Lying Leg Curls - 200 total reps
G1) Standing Cable Crunches - Sets of 10 reps, up to a top set of 10
Week 9, Day 2 - Max Effort Upper
A1) Competition Bench Press - Work up to a 1-3 rep max; then 95% of that max for 1 set of as many as possible; then 85% of that max for 1 set of as many as possible
B1) Close Grip 1 Board Press - Sets of 8 reps, up to a top set of 8
C1) DB Rolling Tricep Extensions - 4x10
D1) Dips - 3 sets of max reps
E1) DB Skull Crushers - 100 total reps
F1) Rear Delt Raises - 4x30
G1) Standing Band Oblique Twists - 5x20 per side
Week 9, Day 3 - Dynamic Effort Lower
A1) SSB Speed Squat vs 25% Chain Weight - 50%x8x2; then proceed to work up to a top set of 6 reps
B1) Competition Stance Deadlift - Work up to a 1-3 rep max
C1) Leg Press - Sets of 10 reps, up to a top set of 10
D1) Cable Pull Throughs - 3x15
E1) Single Leg Reverse Hyper - 3x20 per leg
F1) Alternating Reverse Lunges - 5x20 per leg
G1) V-Ups - 5x20
Week 9, Day 4 - Dynamic Effort Upper
A1) Speed Bench vs Doubled Mini Bands - 35%x12x3
B1) Close Grip Bench Press - Sets of 6 reps, up to a top set of 6
C1) Incline DB Bench Press - Sets of 10 reps, up to a top set of 10
D1) Bent Over Rows - 4x8
E1) Chest Supported Rows - 4x10
F1) Cable Rows - 3x12
G1) Reverse Band Bench Press Rows - 4x20
H1) Face Pull - 5x25
I1) Plank Hold off Glute Ham Raise - 3x60 sec

This program is built on the foundation of tried-and-true conjugate training methods and includes personal adjustments from a world-record philosophy.
Over on our Q&A section, we often get many programming questions. It’s not uncommon to receive questions regarding how to implement certain aspects of programs in combination with other programs. For most people, the general recommendation is to follow the program as it is intended. The developer of the program had intentions and reasons for why they laid our the programming as such, and changing it no longer makes it that program. However, over the past few years, I’ve played around with figuring out how to take ideas from Jim Wendler’s 5/3/1 and implement them into my own programming. So if you’re a fan of Jim’s work, but also like to run a conjugated program, there could be some really good adjustments to your program just by simply trying some of these out for a training cycle or two.
Let’s get to it.
Max Effort Backdown Sets
Anyone that follows my training log knows that after my main movement on max effort day, I perform a few backdown sets to acquire more volume. This works great for truly building upon the main movement and not just “testing” it. One of the things we know on max effort day is that generally we are working up to a 1-3 rep max for the day. You can also work up to a five-rep max if you wish, if you’re just jumping back into a training cycle. What rep max you use doesn’t really matter, but just know that the more weight you use, the higher your percents will be for the backdown sets. Essentially, when you hit these rep maxes, you are setting your training max for the day. Here are some variations I’ve tried with great success:
Standard 5/3/1
For this option, after you have worked up to your rep max for the day, you are now going to perform the traditional 5/3/1 set up off those numbers. Ideally you will run the same max effort movement for three weeks in a row here. The layout is as follows:

So for an example, let’s say your max effort movement is a low box squat. You work up to 405 for a three-reps max on week one. Your back down sets would be as follows:
- 265x5
- 305x5
- 345x5+
On week two, you would attempt to PR on the low box squat for a three rep max. Ideally you will just make a small PR attempt of, say five pounds. Then on week two, you would run off that number (in this example, 410).
- 285x3
- 330x3
- 370x3+
The great thing about this setup is that you are setting multiple PR’s week in and out. You will also be running off numbers that are applicable for THAT day. You likely won’t PR every single week, so it’s auto-regulating in nature based upon what you can hit. You’re also getting excellent technique work in with the lighter weights and truly improving your ability to get better at a movement that you should suck at.
Top End 5/3/1
This option is a more intensive based approach and works better when you are rotating max effort lifts more frequently, such as every week. Since the lift with be changing so frequently, you can’t run a full-fledged 5/3/1 cycle. You will still work up to your rep max for the day as the same option as above, but here are the prescribed back down sets:
- 95%x1+
- 85%x3+
Just like the first option, you get multiple changes to hit different rep PR’s and continue to build upon the lift you are training for the day. The reason for the two “as many as possible” sets is that with only two sets of backdowns, you can acquire more volume to make up for lack of the third set.
Supplemental Options
With these supplemental options it works best when you know a PR that you’ve hit for the movement (ideally a 1-5 rep max), but if you haven’t, you can go strictly by feel. Since this is a second movement for the day, it works much better with the added volume so that the hypertrophy will help build you max effort movement, so pick good exercises that you know will have direct carryover. Ideally, you will run this for at least a three-week cycle, but I’ve even had success at running them for nine-week cycles. Just make sure that after each three-week cycle, you increase the training max you are using like you normally would (five pounds for upper body movements, and 10 pounds for lower body movements). The great thing here is that you don’t really need to deload due to the lower percentages that are run. I’m not sure I would push this for more than 12 weeks, though, without deloading and then picking a different supplemental movement.
Boring But Big
Here on this option, you will be performing the Boring But Big protocol that Jim utilizes. However, this is only to be used on your supplemental movement. This is a great option for those that need to add mass to fill out a weight class, train with minimal equipment, or train with minimal time.
If you know of a rep PR for the movement, here are the ideal percentages to use:

First Set/Last Set
With the protocol, each week you will take the first set from the traditional 5/3/1 and hit as many reps as possible across three sets. Here would be the ideal percentages to use based upon the rep max you are running your numbers off of:

Standard 5/3/1
This option is designed only for the supplemental movement on dynamic effort days. This is will be run off a 90% training max for beginner to intermediate lifters, and an 85% training max for advanced lifters. The percents are based the same as above on max effort days, but just know the numbers will be not be off a daily training max, hence why the training max MUST be used. This works well for common lifts that you perform like front squats, good mornings, close grip bench press, etc. You can use whatever movement you want here, just make sure the training max you are running off of is rather current.

Dynamic Effort Work-Up Sets
Something I like to do from time to time is implement work-up sets after my dynamic effort work. I took a lot of time and experimentation to get these percentages to work out right with clients and my Purdue Barbell lifters. This option is certainly not for everyone, but the principles are still rooted in 5/3/1. If you opt to perform your work-up sets, please understand that your accommodating resistance should be set at approximately 20-25% of the lift you are training for that day. If you do not do this, I cannot guarantee that the percents will work out in your favor.
Dynamic Squat Cycle

Dynamic Deadlift Cycle

Dynamic Bench Cycle

Breaking It All Down
At the end of the day, how you opt to implement any of the above work is totally up to you. I would recommend that you only use one option at a time to get a gauge of how it works for you and truly see the rewards. After a lot of time experimenting on myself and clients with many of these principles, I’ve found that it not only packs on some serious mass, but builds some incredible strength while keeping numbers manageable and easy to plan for each training session. I by no means take credit for the work Jim did, but I just found a way to implement his methods into a system that I already believe in. There is no doubt that 5/3/1 is an amazing program, and so is the conjugate system. With the perfect blend, you can enjoy both training programs and still be N.O.V.

These options can help you combine the best parts of Wendler’s program with your regular routine of max effort and dynamic effort training.
Ever wondered how to set up your training for the next year? Questioned how to determine when to compete and how to prepare? Not sure how to train in the weeks directly before or directly following a meet?
You're not alone. These are the questions that all powerlifters struggle with during their careers, constantly trying to refine their approach to in-season and off-season powerlifting training. One holistic approach to powerlifting is to program within an annual plan that accounts for all 52 weeks of the year tying together.
In this final installment of his Annual Program for Powerlifting video series, Brandon Smitley explains how he selects exercises and set and rep schemes for max effort squat and deadlift days. With a 52-week training plain already established in his previous videos, Smitley now details the layout of individual training days and how to intelligently load main, supplemental, and accessory movements. This involves prioritizing movements based on their level of carryover to your building movements and also understanding that your specific needs must be addressed with exercise selection.
Annual Program for Powerlifting Video Series
- Weeks 1-5 After A Meet
- Reintroducing Moderate Barbell Movements in Weeks 6-13
- Preparing for a Qualifying Meet Weeks 14-27
- Off-Season Between Meets Weeks 28-40
Brandon's Training Log
Your yearly setup is complete. Now let’s look at individual days and how to program main, supplemental, and accessory exercises.
Ever wondered how to set up your training for the next year? Questioned how to determine when to compete and how to prepare? Not sure how to train in the weeks directly before or directly following a meet?
You're not alone. These are the questions that all powerlifters struggle with during their careers, constantly trying to refine their approach to in-season and off-season powerlifting training. One holistic approach to powerlifting is to program within an annual plan that accounts for all 52 weeks of the year tying together.
This fourth part of the video series picks up immediately after the first or "qualifying" meet of the year. Brandon Smitley begins by talking about the week following the meet, during which the lifter is expected to rest and recover. This time off will be important for the following weeks that require a long-term increase in intensity.
During this phase, it is important to remember what aspects of programming worked from the previous meet training cycle and which didn't. For instance, if you know you hit a bench PR at your meet because of Tate Presses, you want to save that accessory exercise for the 12-week meet prep at the end of the annual plan. The idea is to ensure you don't "waste" good exercises early in a training cycle.
Weeks 29-40 in this plan, much like weeks 1-13, will be an off-season style, in which you will do minimal competitions lifts and experiment with new exercises and rep schemes before training for the big meet of the year.
Weeks 1-5 After A Meet
Reintroducing Moderate Barbell Movements in Weeks 6-13
Preparing for a Qualifying Meet Weeks 14-27
Brandon's Training Log
With your qualifying meet out of the way, you now have an opportunity to return to building mode before starting a peaking cycle for your next meet.
Ever wondered how to set up your training for the next year? Questioned how to determine when to compete and how to prepare? Not sure how to train in the weeks directly before or directly following a meet?
You're not alone. These are the questions that all powerlifters struggle with during their careers, constantly trying to refine their approach to in-season and off-season powerlifting training. One holistic approach to powerlifting is to program within an annual plan that accounts for all 52 weeks of the year tying together.
In this edition of Smitley's annual programming video series, the world-record holding powerlifter talks about your first meet of the year. If you're following his setup, by this point in the training plan, you will have already completed a GPP phase and specialized exercise phase, for 13 total weeks. Now it's time to move on to pre-meet planning.
Remember that this annual plan accounts for two meets: one minor meet to qualify for one larger meet. For the plan Smitley discusses in the video, let's assume that your minor or qualifying meet is week 27. Now that you're thinking about competitive training, you need to consider how many weeks out you are from your qualifying meet.
From weeks 14-20, you will continue to push hard in off-season mode. Then for weeks 21-26, during which time you will bring back the competition lifts, you will transition to meet preparation. This is intentionally a short period of time, in order to allow more off-season training, as this meet is the "minor" meet of the year.
This is the time to bring out your knowledge about what works for you.
WATCH: How to Design An Annual Programming for Powerlifting — Weeks 1-5 After A Meet
WATCH: Annual Programming for Powerlifting — Reintroducing Moderate Barbell Movements in Weeks 6-13
Brandon's Training Log

With the first two phases behind you, it’s time to move into higher gear for the first meet of the year. Are you ready to apply what you learned in weeks 1-13?
Ever wondered how to set up your training for the next year? Questioned how to determine when to compete and how to prepare? Not sure how to train in the weeks directly before or directly following a meet?
You're not alone. These are the questions that all powerlifters struggle with during their careers, constantly trying to refine their approach to in-season and off-season powerlifting training. One holistic approach to powerlifting is to program within an annual plan that accounts for all 52 weeks of the year tying together.
WATCH: How to Design An Annual Programming for Powerlifting — Weeks 1-5 After A Meet
In this second video in Brandon Smitley's multi-part series on annual programming, Smitley covers weeks six through 13, with week one marking the first week after a meet. This phase reintroduces the barbell.
During these seven building weeks, the primary goal is to work with heavier weights in a rep range of three to five. Program to allow yourself to never miss a weight, and use specialty bars, bands, and chains to vary movements. This period of time functions as a testing phase that allows you to experiment with accessory work and learn your responses to specific movements. What you learn in this phase will be vital to setting up a pre-meet training plan.
Brandon's Training Log
Following an early GPP phase, the yearly program moves toward variations of competition movements and learning which exercises you’ll need later on.
Ever wondered how to set up your training for the next year? Questioned how to determine when to compete and how to prepare? Not sure how to train in the weeks directly before or directly following a meet?
You're not alone. These are the questions that all powerlifters struggle with during their careers, constantly trying to refine their approach to in-season and off-season powerlifting training. One holistic approach to powerlifting is to program within an annual plan that accounts for all 52 weeks of the year tying together.
In this first installment of this multi-video series, Brandon Smitley starts at the very top of an annual program, beginning with week one, and breaks down the early weeks of the yearly plan.
Brandon's Training Log
Header image courtesy of Kenneth Richardson
This 52-week approach begins immediately after a meet and constructs a long-term plan for tying together all parts of a training program.
In today's powerlifting world, we're all about the big lifts. The world record performances and single lifts are absolutely outstanding and powerlifting is seeing some great growth and improvements across the board. I often get asked how I manage to put together such great, consistent meets. I'm about to break down what I think it takes to put together your best meet performance. While most of this seems like common sense, apparently it isn't, because I still see lifters coming up short and apologizing on social media (I'm still trying to figure out why they apologize). Bust out the pen and paper, and I'll help you hit a PR total the next time you take the platform.
1. Mental Preparation
This is the most overlooked part of powerlifting. Everyone is looking for the magic program, supplements, diet protocol, and gear to get their total to keep moving. While some of these can certainly help, no one is talking about what they are doing to mentally prep for competition.
This is something I take dear to my heart, as I've had a few sport psychology classes in college and I always take away something that I can either apply to my clients or to myself. The mind is a powerful tool, and what you can envision and truly experience, you can make happen with enough time and training.
Yes, you can train your mind. Teammate Bryan Mann has written extensive articles on mental preparation and training.
It starts with finding some material and just reading and absorbing it. There are dozens of amazing books to get you started, so which one you pick doesn't really matter. What does matter is that you pick one up. I make it an effort to read a new book during every meet prep. I usually have it finished within a month or faster, and then I have the rest of the prep to apply what I've read to my training and meet day strategy.
See yourself hitting the lifts you want to hit. Feel the knurling, the knee wraps going around your knees, and smell the ammonia before your final attempt. Get in the moment like you would on meet day. The key is to control your emotions. It's great to get fired up, but getting too fired up will still result in a miss in most cases. Bottle that feeling up and control it and use it on meet day. Make it so you've executed the lift you want to hit hundreds of times.
The best time to do this is prior to bed when the lights are out, it's quiet, and you can give it full attention.
2. Nutrition - During Training and Meet Day
I'm honestly fed up with the "eat clean" crowd. You know why? THIS ISN'T NEWS. I don't know why it's so cool for you to post on Instagram how you are eating healthy food. We see it all the time how important nutrition is for athletes in the NFL and NBA, but for some reason people think that being a powerlifter means you can eat shit and progress and bring our best. The crowd that is pushing the healthy food isn't spewing anything new. Look back in the 70's and 80's and how those guys were eating. It was great, whole food, and they didn't brag about it. They knew if they wanted to bring their best that nutrition was a key factor.
Sure, there will be days when you need to get in some "extra calories," but generally speaking your nutrition needs to match your goals. We don't need to be bodybuilder shredded, but being lean and packing as much muscle on a frame without useless weight is only an advantage. I personally eat pretty well year round, because I can train harder and recover better. Between meets I can maintain high base levels of strength without too much effort because I'm not eating McDonalds for lunch with Oreo's for dessert.
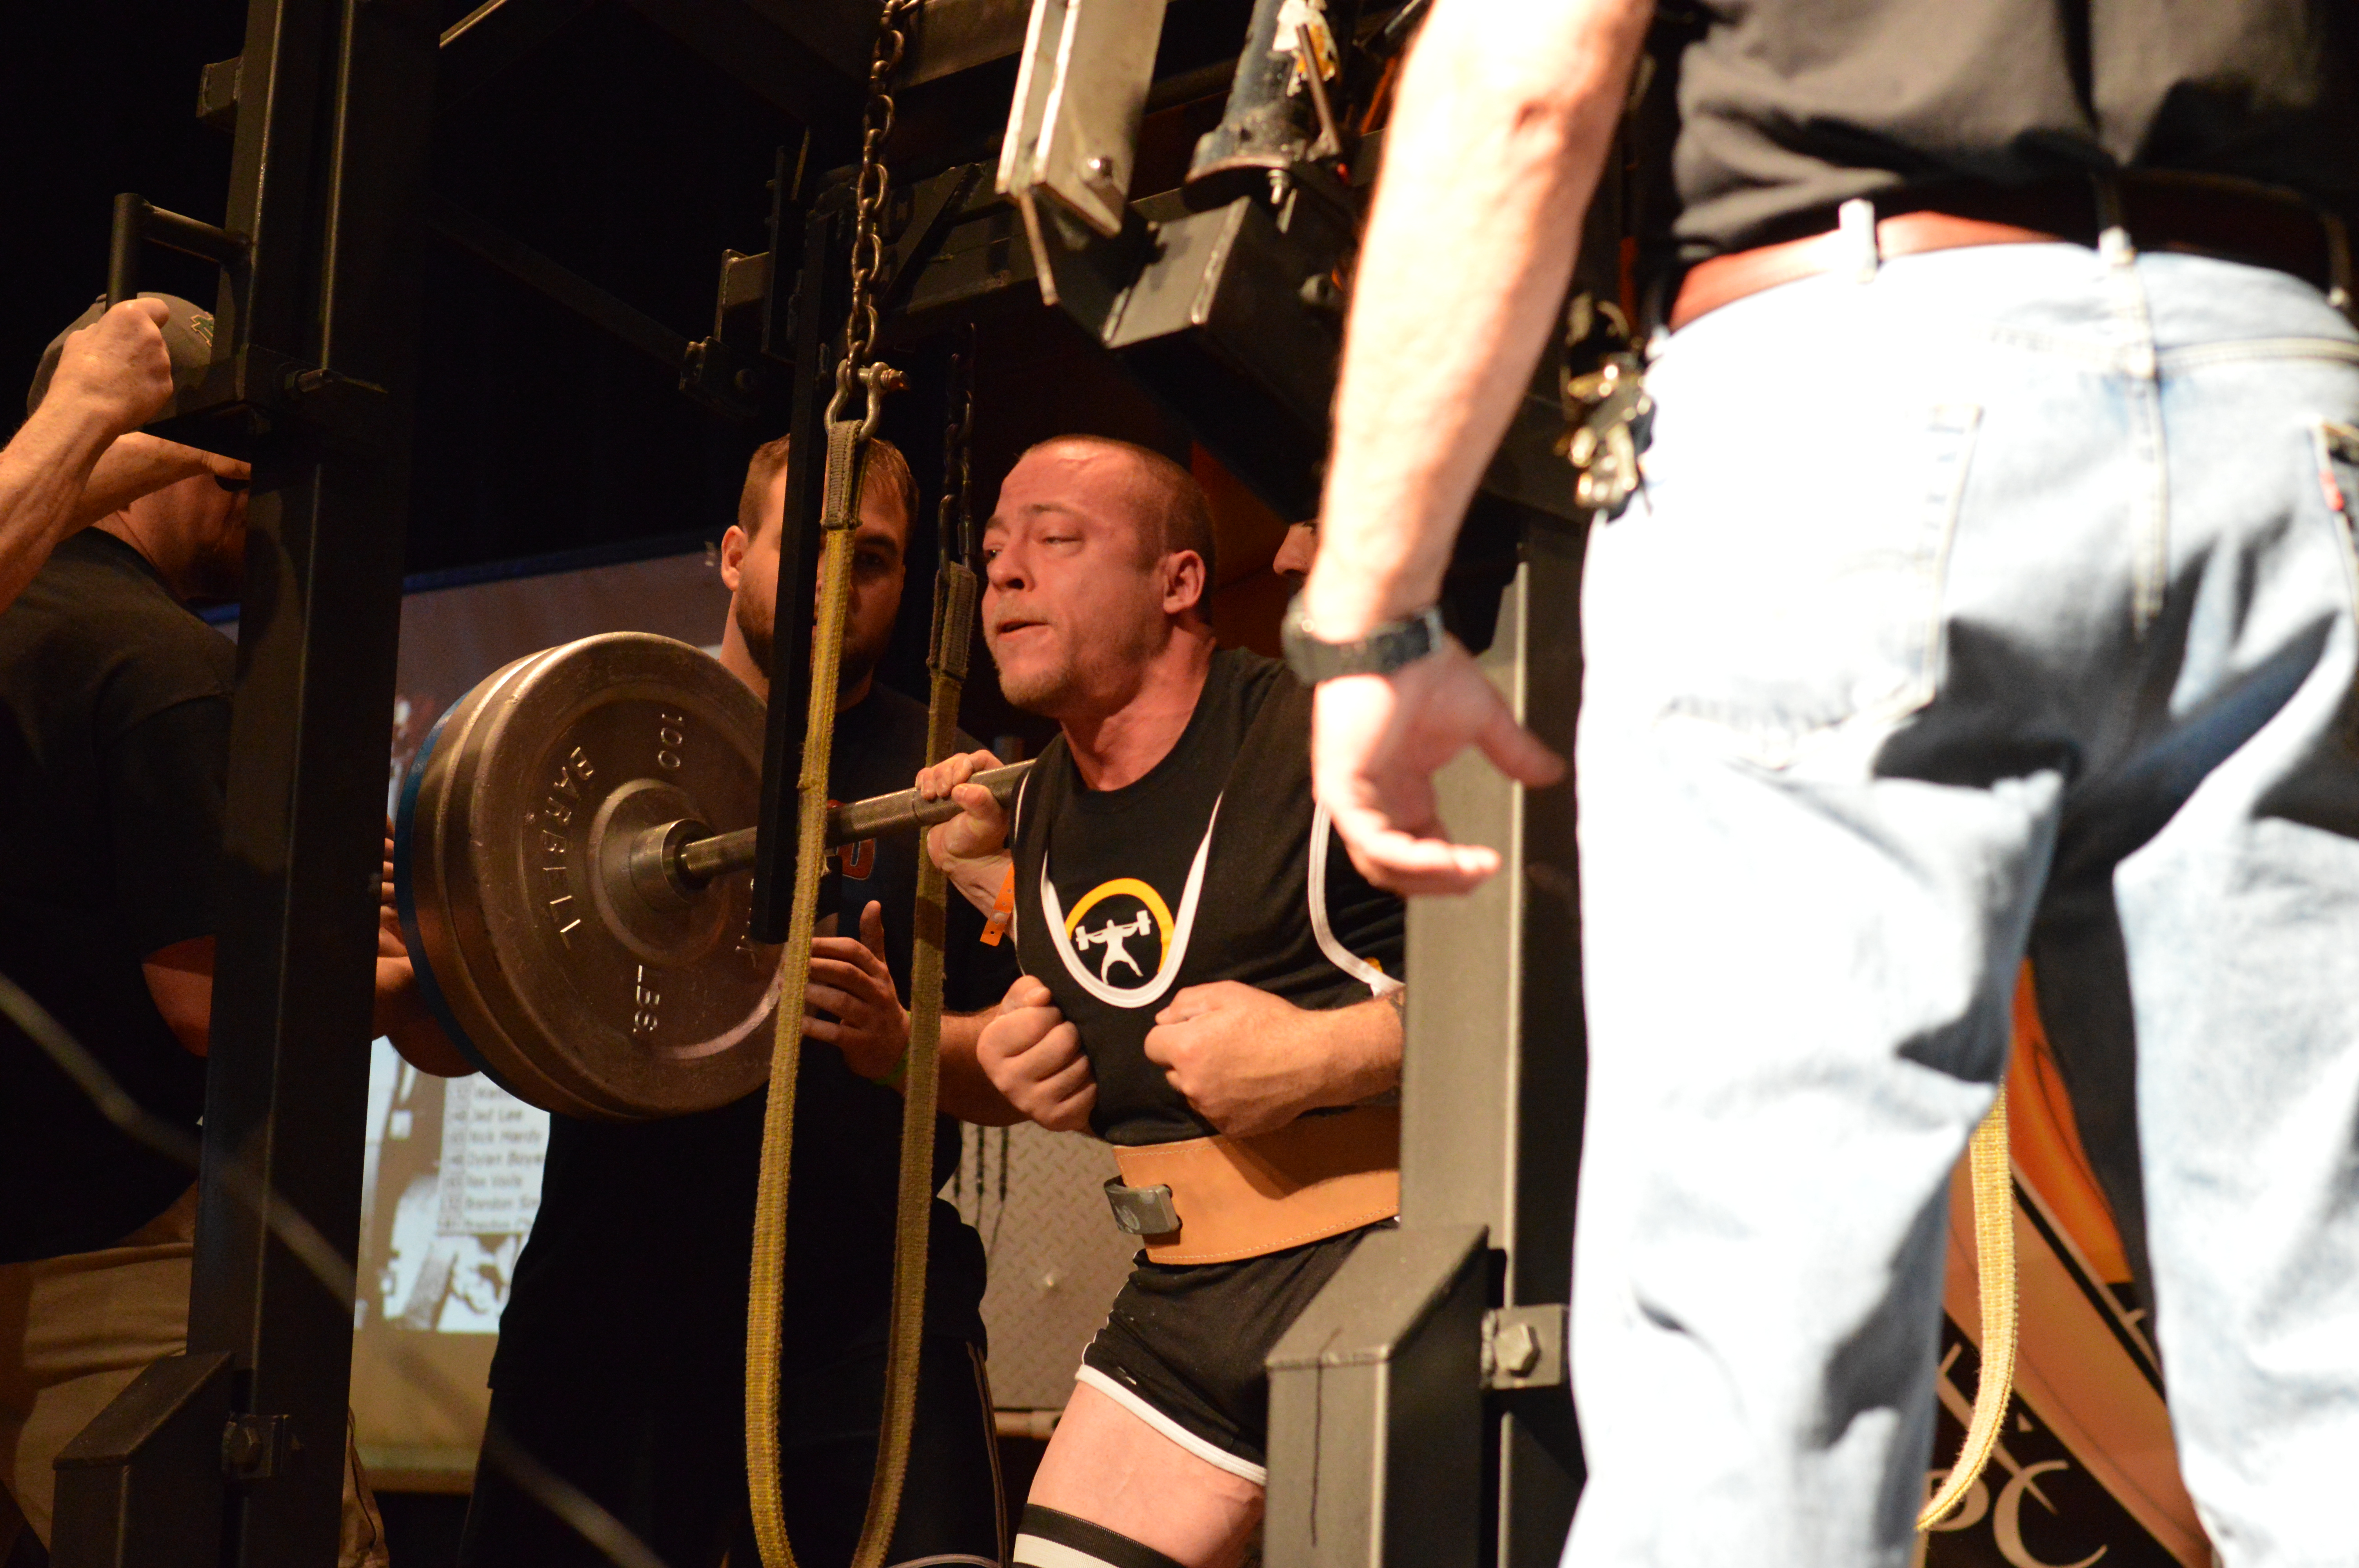
Give your body the fuel it needs to see the results you want. If you're eating like shit and your joints hurt and your lifts aren't moving, there is a correlation there. I personally don't have any issues and I attribute this to solid nutrition. It's not that hard, and it doesn't require an Instagram post showing how dedicated you are. Your lifts and PR's will do that for you.
On meet day, bring your same nutritional plan with you. I understand that if you cut weight you may need to refuel with some "bad" calories, but still getting your hydration and nutrition down is vital. I know exactly what to do immediately after weigh ins, how much liquid I need to ingest, how to space my meals, approximately how much food (quantity) it takes, and what supplements to use and where to promote optimal levels of electrolyte balance and glycogen retention. Get this figured out by having test runs in off season and note what is working and what isn't. We see it all too often with people cramping and not having enough energy to get through the meet. It's unacceptable and completely preventable if you take care of all this ahead of time. I've never had an issue in this area because I took the time to do test runs on myself.
3. Have The Right Support System
While powerlifting is an individual sport, it's just as much a team sport on the back end. A great meet performance is directly tied to your handlers and training partners. Having the right people training with you and keeping you accountable will have you come into meet day with realistic and obtainable attempts. If you're squatting high during training, make sure your training partners are relaying this to you and make the adjustments. Use them to come dialed in and know you gave it your best because they made sure you were up to par with the rules and were hitting meet worthy lifts in the gym. It can be humbling, but having a training partner tell me I need to work on a particular aspect is honest and only going to help moving forward and on the platform.
As for your handlers, bring someone that is going to cater your every need. I've been blessed to have amazing people help me at meets. They load my bars, get my drinks, wrap my knees, help me make smart attempts, and tell me when I need to sit the hell down. Listen to your handler as much as possible. You, the lifter, are there to lift. Have your handler do nearly everything else for you. It sounds selfish, yes, but your handler will understand and know that's what they would want on their meet day. While there are only nine lifts on the day, every bit of energy you have needs to go to those nine lifts.

There is also friends and family. If they can make it to your meet to support you, that is great. If not, make sure that they are also supporting you when you aren't training or at the meet. Have them help you manage stress levels, keep you positive and optimistic, and most importantly that support your efforts and desire to compete at a high level. My family and friends understand when I turn down weekend events to train for a meet. It sucks I can't go out and drink, but they understand and keep me accountable by reinforcing that what I may do that evening isn't going to help my training or meet day performance. It seems so little, but when it piles up over 12 weeks, it can be the difference between making and missing that third attempt.
4. Get Every Pound You Can
This is probably one of the most important parts of powerlifting on meet day: autoregulation. Only you know yourself best, and it's pivotal on meet day that you are honest with yourself on where your strength is and how the attempts are feeling and moving. While consulting with your handler(s) can come into play, only you know how it truly felt. If you had a great meet prep cycle and your opener and second attempts are smoke shows, be honest and figure out what you can truly hit on your third attempt. Getting every pound you can going into deadlifts will help you make smarter jumps at the end when it matters. Only getting one attempt in on a lift can really put you in a bad position and make it a struggle to hit a PR total at the end of the day. If you can get two solid attempts in, you have wiggle room on your third.
I'd also like to bring momentum in to this. Nothing feels better than going 3/3 on squats and going into the bench press with positive momentum. You feel good, you've probably hit a PR, or very close, and you've set yourself up mentally to keep the ball rolling. The longer you can keep this going the better. It sucks to be in the dumps because you're barely in the meet. You're thinking what you're going to have to do to get a PR total now between the other six attempts, and will probably have to be a bit more aggressive. Hit good solid attempts that are there for that day. Even if it's not your day, if you lift smart and take the right weights you can still walk away with a PR total in most cases. It's very much like a basketball player with field goals. When they are building momentum they get hot and keep the streak going, but if they take too many three's and keep missing their confidence drops and they end up having a 2/11 game with seven points. Open light, and finish heavy.
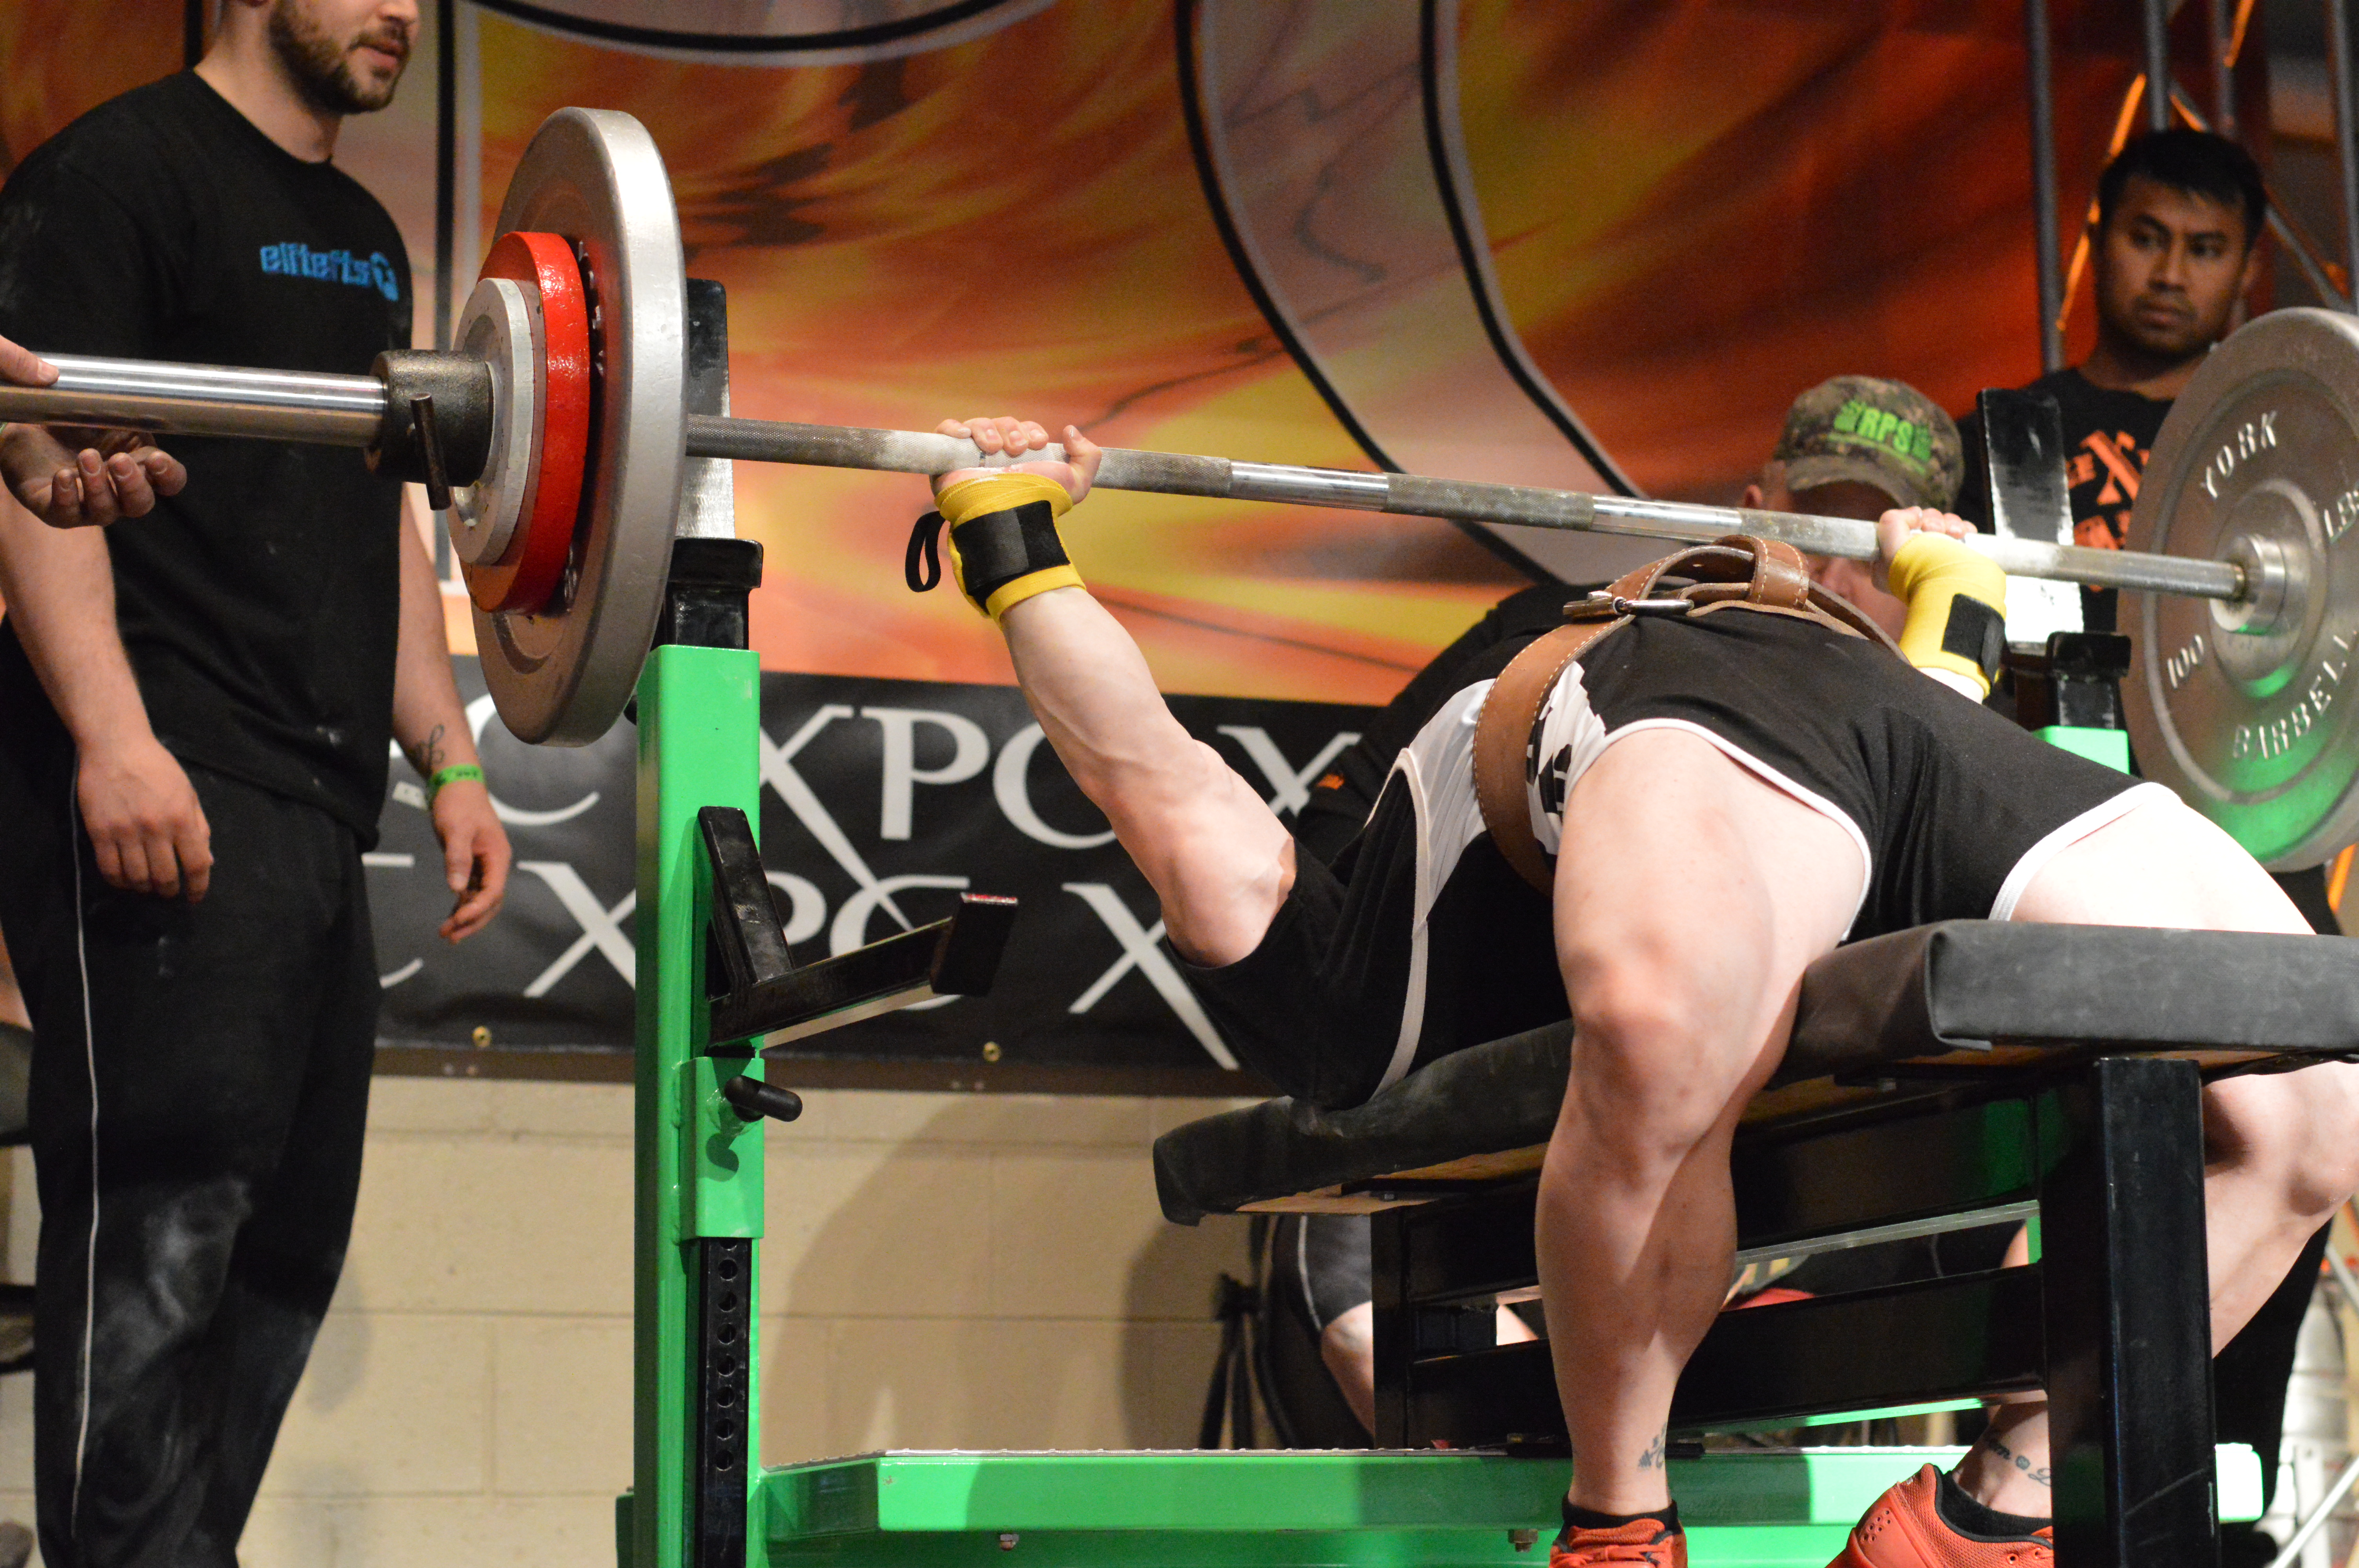
5. Know Your Surroundings
Many meets are going to be out of town for you, and it's paramount that you are as comfortable as possible. Do your homework early and find good eating places, where you're going stay, where the nearest sauna is, and even check out the meet venue before meet day. Get to know what is around you and what your options are. Even knowing how far away the warm up room is and the bathrooms will make your stress that much less. Try to find a location that you are going to set up camp at in the warm up room that you feel is going to be best for you and get there early so you can snag it. I like to pick the warm up area closest to the platform and make sure I have a few chairs that are "mine" for me and my handlers. I want to be able to sit down during my warm ups and watch the others, so I can jump in when I need to and not need to stand around. Try to also find the flight list and get that figured out to see when you will need to warm up to have ample time and not be rushed. Then relay all this to your handler(s) so you are all on the same page.
6. Programming/Training
I intentionally saved this one for towards the end, as I think many still think this is the key to having a PR day on the platform. While your meet training cycle is incredibly important, the style of programming you go with really isn't all THAT important. No matter what program you choose (or if you get a program from a coach), what matters most is that you give each session it's full undivided attention. Take each session day by day, and don't look forward any more than you need to. When you have an off/rest day, focus on being off and rested. I can't say this enough. Getting yourself pumped up for a heavy squat day a week away is a waste of time. You have no idea how you are going to feel, what life stressors may be thrown at you, or even if you can make that particular session the day you are planning on. Focus on the present, and the future will be a success.
I would also like to add that you need to set your openers, and possibly even your second attempts well in advance. Why? Your openers need to be almost automatic on meet day. I tell all my clients and lifters, this should be your "free space." Take it, crush it, and get the hell off the platform. NOW, the meet starts. How many people do you see missing openers and having to retake it? Get in the meet and then start going after weights. Setting your openers early will let you know if they are good or not. I typically can hit an opener about any time of the year, with no meet prep. On meet day, it's going to feel easy after a deload, peak, and a ton of fuel after weigh-ins.

7. Remember Why
My last tid bit to help you succeed on meet day is to ask yourself, "Why am I here?"
This answer is totally individual, but only you should know the true answer and it needs to be your motivation for prep and the meet, whether it is to hit a PR lift, win your weight class, win the meet, or even just finish the meet..
Remember why you wanted to get on the platform and see what you've got. Use this as your theme when you are waiting in the hole and getting mentally ready. This is your five minutes to cut out all the other bullshit in your life, and do what you enjoy. Dave likes to call it "The Void," but whatever you want to call it, you need to harness that (see #1). If you approach each attempt like this, you'll be locked in and little things won't matter for that brief point in time.
Closing Thoughts
While preparing for a meet is no easy task, there is a reason why you elect to compete and chose that specific meet. Every meet cycle has its own individual ups and downs, but with enough preparation and time you can make each meet its own success. It takes true dedication to put together an amazing meet, but with these seven steps, you are on a much better path to making that happen.
Go make your next meet, one you'll always remember.
Brandon's Training Log

You’ve spent days, weeks, and months preparing for the meet. These tips will ensure your efforts were not in vain.
Since joining team elitefts™, a common question I continue to see on the Q&A section is how to improve lifts by bringing up weak points. We are in a time where knowledge is plentiful, and everyone has his or her own way of going about programming and increasing his or her lifts. However, I think one aspect that is overlooked is just doing more work. This doesn’t mean that you need to go crazy by doing sets upon sets of squats. I’m talking about intelligently improving your lifts by doing extra work with minimal additional time. Some of these tips are pretty common, but many I believe are overlooked or forgotten. Others, however, may be ideas that simply haven’t been brought to your attention.
Front Loading Volume
This is somewhat new to me, but after talking with much greater minds, I think this is a simple way to get in extra volume without getting torn down. I got this idea from Matt Wenning, Louie, and Nate Harvey, and I have liked it thus far.
For each of your training sessions, you perform one movement for 100 total reps as part of your warm-up. This is going to be a nice transition from your typical warm-up (foam rolling, activation exercises, mobility, etc.) into your actual training work for the day. If you check out Casey William’s log, he’s currently doing this for his bench press.

To implement this, you need to pick a movement that is directly going to help you for that training session. Here are some good examples:
Upper Body Days
- Light DB Bench Pressing
- Light Tricep Pressdowns
- Light Lat Pulldowns
- Band Pull Aparts
- Face Pulls
Lower Body Days
- Light Reverse Hypers
- Light Leg Curls/Band Leg Curls
- Band Good Mornings
- Back Extensions
- Glute Ham Raises
- Light Pull Throughs/Band Pull Throughs
I would not recommend jumping straight into 100 total reps from Day One, as this will probably hit you harder than you imagine. I would start with 50 reps on Week One, 75 reps on Week Two, and then go to 100 reps for Week Three and beyond. It will take some time, but let’s look at a simple equation for reverse hypers:
Reverse hypers: 50 pounds x 100 reps x 2 days per week x 4 weeks = 40,000 pounds of volume per month!
That’s a considerable amount of extra work for just one month. You don’t need to change anything else in your program, and you will only spend about an extra 5-10 minutes per training session. In turn, you will likely feel more warmed up than you ever have before. Your lifts may take a minor hit in the beginning, but as your body becomes accustomed to the work, your lifts will start showing the results.

Back Down Sets
Another option you have is implementing back down sets on your main movements. If you are someone who runs a conjugated system, then you are probably working up to heavy sets and then moving on to a supplemental movement. This is great and nothing is wrong with this method. However, if you are finding that just working up to a heavy set is not enough, then this is a great method for getting in extra volume and work for that specific movement. After all, if you are running a conjugated system correctly, this movement should be based on your weaknesses, meaning you need more work in this area.
Let’s take for example that you lose upper back tightness coming out of the hole on squats. You elect to make Safety Squat Yoke Bar Squats your main movement for the training session, and you’re going to work up to a heavy set of one to three reps. So, you continue to do so as you normally would, and you find that max single or triple for the day. After you have that weight, you drop the weight by roughly 20% and knock out two to three more sets. An example may look like this:
SSB Yoke Bar Squats: 400 pounds x 3 reps
Back down sets:320 x 2-3 sets x 5 reps
Look at that! You managed to get an extra 3,200 to 4,800 pounds of volume in on a movement that you suck at but with quality reps. The key here is to not take these back down sets to failure! Perform good technical reps but still work hard. The great thing about this is that when you come back to this movement (either the following week or a few weeks later), you will hopefully set a new record on this movement and will have a heavier training weight off which to base your 80%, and again more volume.
Drop Sets
This is nothing new when it comes to strength training. Bodybuilders have been employing this technique for decades in order to add more mass to their frames. I personally think powerlifters can get much more out of this method. The key, however, is to be smart about its implementation and be careful as to not abuse it. (As with about any training method).

I would recommend that this not be done with your competition movements or your main movements (if you follow a conjugated system). I have personally found that this works best with accessory movements like tricep pressdowns, lat pulldowns, leg curls, glute ham raises, reverse hypers, chest-supported rows, face pulls, and single leg work.
The key is to implement it during times in which you need the extra volume and know that you will be able to recover from such work. I like employing drops sets the week prior to a planned deload. I know that I will have the time to recover the following week and that volume will drastically drop during that time. Essentially, I use it as a way to make up for the volume that I won’t be getting and to push my body to adapt more during that time frame.
Another way to implement drop sets is to use them for weak areas. Let’s say that you need to bring up your triceps, but you need to maximize your training sessions. These are an easy way to get in more work with only adding an extra minute or two (at most) to your session. Not to mention that you begin to recruit more motor units when reaching failure: a win-win. Again, I would not do this for every training session or weak area that you have. Pick one and run with it for a week or two. Then, switch to a different body part. If you opt to rotate what you perform drop sets on, here would be a sample way to do so:
Weeks 1 and 2: Tricep Pressdowns
Weeks 3 and 4: Reverse Hypers
Weeks 5 and 6: Face Pulls
Weeks 7 and 8: Back Extensions

Front Loading Warm-ups
This is a combination of Front Loading Volume and Back Down Sets. What you will do is stick with a higher number of reps during your warm-ups on your main movement. This gets you added volume with your main movement, but with weights and reps you will not have technical errors on. This is a scheme that John Meadows and Dave Tate use quite frequently on many of their big movements. An example would look like this:
Goal: Box Squats for Max Set of five Reps
Bar x 5
135 x 5
185 x 5
225 x 5
275 x 5
315 x 5
365 x 5
405 x 5
425 x 5
455 x 5
Again, like the Front Loading Volume, this can cause a hit to your main movements for the first few weeks, but as your body becomes accustomed to it, your lifts will begin to take off. Compare this to typical warmup, and you’ll find that the volume is considerably higher and it won’t take up much more training time.
Closing Thoughts
While high volume trends seem to be coming and going, I think there are intelligent ways to go about it - without destroying your body in the process. When it comes to increasing volume, we generally want this volume to come from performing accessory work. This is when we are trying to actually train the muscle, not the movement. This is because when fatigue sets in on main movements or the competition movements, we start to ingrain bad technique and motor patterns. Thus, using some of the methods I’ve listed above can let you achieve the best of both worlds. You can have your volume and lift heavy too.
Use these special techniques to boost your volume without crushing your recovery.
On Saturday, October 25th, 2014 I competed in the RPS Lexen Xtreme Fall Classic in Columbus, Ohio. I opted to compete in this meet for a host of different reasons. I knew after my performance at Raw Unity VII, that I had the potential of obtaining my first ever raw ten times bodyweight coefficient total at 132 pounds. I missed this total on my last deadlift at Raw Unity and only due to my grip giving out on a 518-pound deadlift. After that meet, I pondered what I would need to do to reach this lofty goal, something I had dreamed about ever since discovering powerlifting, and the steps that it would require for me to bring my best performance. While doing my own needs analysis, I put my grip work and bench press training on the top of the priority list. Behind that was switching to a sumo deadlift stance, followed by more upper back work.
My off-season training went the best it has in a long time, and all my lifts made vast improvements. When eying meets, I saw the Lexen meet and it aligned nicely with my schedule and location proximity. I set my programming up to align with this meet and when prep got rolling I committed early and was ready to conquer this tough feat.
I started “dieting” (I use that term loosely because I didn’t count a single macro) around 10 weeks out to help make my cut easier. I didn’t do this for Raw Unity and I could tell that it made my cut way harder than it needed to be. Taking this one little step a bit more seriously dropped pounds from my frame, but my lifts never took a hit. And honestly, my recovery and prep went even better because of this.
Meet Week
Early in meet week I started my typical cutting methods, by still having my carbs low (something I did after my last heavy weekend, two weeks out) and gradually increasing water. My weight was already so low that I talked with Chris Duffin to get some ideas since I hadn’t made this small of a cut in some time. Plus, the man just squatted a world record after cutting. I used some methods from him, along with some of my own, and my weight was falling off come Thursday.

Another thing I implemented this week was mental training. I know some people think this is absolutely absurd, but from all my sports psychology classes I had already built a strong base and used many techniques during training and meets. But I wanted to take it one step further and have my mind just as strong as my body on the platform. The idea of going for a ten times bodyweight total was just as mental to me as physical. I read the book Sport Hypnosis by Dr. Donald R. Liggett. Every night I was going through not only my lifts, but how they felt, my reactions, the smell of ammonia, and every other tangible aspect of a meet. I had envisioned my meet performance probably over one hundred times during this course of the week.
Thursday I began the travel to Columbus to stay at a friend’s place for the evening. I showed up only two pounds over, so I knew I was golden once awaking early Friday morning.
Friday
After a lackluster night of sleep, I woke up right on weight and drove to the meet site 90 minutes early to just relax in the lobby and get to know some of the other lifters that were waiting to weigh-in as well. After making weight, I took the time to drink my recomp hydration formula and just let that sit for about 60 minutes. I then met up with Savannah Steamer to eat breakfast at Marshall’s for eggs, sausage, toast, and three of the biggest pancakes I’ve ever seen.
When we were done stuffing our faces we made our way over to The Spot Athletics to catch up with J.L. Holdsworth and his staff. It was great to see everyone again and finally check out his awesome gym and what he is doing. He’s got an amazing thing going over there, and it was great to get some training and business ideas from him. It was also a good way for my food to settle and just get my mind off competing and continue to build some of the awesome relationships I’ve made.
Once noon rolled around, I made my way over to elitefts to catch up with the staff and then go eat lunch with Steve Colescott and Matt Goodwin. I love heading over to see all the guys and girls in the office. We had some good laughs and talked about some pretty cool content stuff that is coming in the near future.
Once I was done there, I finally made it back to the meet hotel and checked in. The first thing I did was take a nice Epsom salt bath and just relax. I had some time to kill until some of my handlers and friends got in town, so I got in some more food and fluid and then took a solid three hour nap. When I woke up I drove over to Texas Roadhouse and met up with Matt Wenning, Sheena Leedham, Joe Schillero, Mario D’Amico, Alycia Israel, and some Purdue Barbell folks. By this time I was feeling really good and after getting things squared away for Saturday I went back to the hotel to crash with some family that finally made it in town.
Saturday
I woke up early in the morning and went to the Waffle House to have a small breakfast. I don’t like having a huge breakfast before I compete, but I do like having some solid food to give me a good boost going into squats. I showed up early and got my rack heights and area set up for when all my help arrived. My handlers for the day were Joe Schillero, Ted Toalston, Molly Edwards, Mario D’Amico, and Michael Tanner.

Squats
Warm-ups for squats were feeling really well. I was in a huge flight, and was near the very end, so it was crucial that I didn’t get going too early. Things went like this:
Bar x 2x10
150x5
240x3
290x2
330x1 – add belt
380x1
405x1
435x1 – add Kraits
Opener – 470, good
This was nice and easy. It wasn’t the smoothest squat and I lost a tad bit of tightness in the hole, but it came up really strong. I talked with Ted and Joe and made some minor adjustments for the next attempt.
Second – 505, good
This was a 4-lb. PR. It came up with good speed and I did a much better job of staying tight in the hole. This was a big lift for me, as I knew this was going to set my day up on a really good note. After talking with Joe and Ted, we opted to be a bit conservative and only take a moderate jump.
Third – 525, good
This was a 24-pound PR and, man, were things a bit crazy on this attempt. Something happened on my unrack and I started to fall backwards. I was forced to take a few steps back to catch myself. I had already received the squat command, and I knew if I racked the bar my attempt was forfeited. I had to think really fast and try to suck in a bit more air. I was off center, and had to rotate my body about five degrees to the left to feel like I was normal. I took the decent down strong and aggressive and drove my head up into the bar with everything I had. It came up way faster than I had expected after the mishap. I was in a really good driver's seat going into bench.

Bench
After squats I got in some more food and fluids and watched Chuck V squat. It was great to see him back on the platform, let alone be able to share the same platform as him. After I saw his second attempt, I started getting loose for some benching. Warm-ups went as follows:
Bar x2x10
95x5
135x5
185x3
205x2
225x1
245x1
265x1
Opener – 285, good
Really good solid lift, just like I had planned it to be. I wanted to get on the board and see how the press commands were going to be. They were just like I had expected: very fair and reasonable.
Second – 305, good
This was a two-pound PR, and very big for me. It had been over 18 months since I had hit a PR on bench, and it moved with some good speed despite a minor misgroove. I talked it over with Joe and Ted and I needed to keep letting the bar sink and keep my lats locked in. We did some minor calculations (based on my 1320 total goal) and figured it’d be smarter to make a small jump here and increase my opener on deadlift if I got my third bench attempt.
Third – 315, good
For a 12-pound PR, it felt great to get! It was the right call, no question. It was a bit slow and I had to grind through about three inches off the chest, but it went up and was a good clean lift. While I had wanted 320 here, I don’t think it would have been in the cards for the day. Being 6/6, I was stoked and ready to get some rest and get ready for some deadlifting.

Deadlift
When I was finished benching I decided to travel to the nearby Subway to just get out of the meet venue, rest my mind, and get some grub with everyone. It was good to get a good meal in with ample time for it to digest and not upset my stomach before pulling. When we got back, I took some time to just listen to my music and get my mind right. Talking with Joe, we increased my deadlift opener by five pounds to give me plenty of attempts to get my 1320 total. Here were warm-ups:
135x5
225x3
315x2
365x1 – add belt
405x1
445x1
Opener – 480, good
This moved really fast and when I locked it out I felt like I had all the pressure in the world off my back. I had finally totaled my first raw ten times bodyweight! When I sat the bar down, I jumped over it and leaped in the air to give Joe a monstrous hug. I think many people were perplexed, but my emotions took over. I told Joe that it was time to have some fun and see what I’ve really got for the day.
Second – 505, miss
This broke the floor really fast, but when I got to lockout my right hand gave out. I was pretty frustrated considering I spent months working on my grip. I looked at the videos from friends and family and my quad pried my hand open. This was a PR attempt, but I had pulled this and more a handful of times in the off season and prep. I decided to take it once more and really squeeze the shit out of the bar.
Third – 505, miss
Basically the same thing happened again. I realized my hands were somewhat bloated and that somewhere my setup was off. While I was a little pissed off I had 505 past my knees twice and dropped it, I reflected and realized I showed up and accomplished what I had intended. I had no reason to be disheartened. I just threw the whole idea away, and went to thank everyone that had helped be part of such a great day.

Wrap Up
We stuck around and watched the big guys pull, helped clean up, and waited for awards. Danny did an excellent job running the meet and there were no hiccups all day long. At the end of the day, I showed up and lifted smart with everything I had. I managed to PR on squat and bench, for a 14-pound PR total. I accomplished my mission of a raw ten times bodyweight coefficient and took home best overall raw male lifter. To be mentioned in the same sentence with Chuck V (best overall equipped male lifter) blew me away. While I left some pounds on the platform, I couldn’t ask for a better day overall and walked away with more things I can work on to continue to improve.
I would like thank Dave and Traci Tate for their support and belief in me as a lifter and individual. You two have helped shape me as a person and lifter more than you can ever imagine, so thank you!
I would also like to thank my handlers; Joe, Ted, Molly, Mario, and Michael as without you I would not have been set up for such success all day long. More thanks goes to Renea, Alycia, Lilly, and Savannah for videos, pictures, and words of encouragement all day long. Continued thanks to Mark Glazier from NutraBio for the support and supplement regimes to help me to continue to train hard and recover and be the best I can be on the platform; and my training partners Kyle and Kirk for all their help during my months of training and preparation for this goal. A huge thank you as well to all of Team elitefts for their support and help.
And lastly I can’t forget my loving friends and family: Jim, Debi, Brittany, Joani, Nathan, and many more. You all support and believe in me every day and give me the drive to keep pushing my own boundaries on and off the platform.
At the RPS Lexen Extreme Fall Classic, Smitley cements his legacy with an impressive day of lifting.
I often get messages from undergraduate students asking me what to expect when going into exercise science (or a related field). They come to me looking for advice and wisdom so that they don't make the mistakes I made in undergraduate and graduate school. Teammate Joe Schillero wrote an excellent article that I think all students in the field really need to read. I won't focus on what Joe discussed. Instead, I'll discuss the aftermath of going through a program and some of the things you might encounter.
A few years ago, I finished up my bachelor’s degree from Purdue University in health and fitness. I performed internships and clinicals, took extra classes, worked as a personal trainer at the recreational center, and competed in bodybuilding competitions. I thought I was well rounded after graduating in December 2011 and thought, “Sweet! Let’s go get a job, make some money, and love what I do!”
Man, was I flipping wrong! I went all spring semester without finding a job. I was still working at the rec center and just finding ways to finish off my lease. Without much to do, I took an internship down in North Carolina for the summer of 2012. I won't say that this was the best internship, but I learned how to work with minimal equipment, put in long hours, network, and develop my training philosophy. I was still looking for jobs but couldn’t get any bites.

After my internship, I headed back home to live with my parents where I started working part-time at a gym. The money was hardly worth it, but I enjoyed the few kids and clients I worked with and I helped change lives. I was still bumming off mom and dad and submitting applications and resumes on a daily basis. I finally got sick of searching and told myself that I needed to be more desirable, so I applied for my master’s at Indiana State University. The university was close to where I lived with my parents, had a good physical education program, and I could still work. I applied that fall and started classes in the spring. While on campus and talking with my adviser, I met with the head strength coach, David McMannus. I asked if he had any room for volunteer interns for 15–20 hours per week. He openly accepted me to be in the room all spring. With school and interning, I dropped my part-time job with a few months to go.
In the meantime, I searched for summer internships nearby or those that required only a two-hour round-trip commute. I reached out to Wil Fleming, an outstanding weightlifter, strength coach, and business owner. I interviewed for an internship with him and his staff and was offered a position. While interning for Wil, I worked full-time at Lowe’s to pay for the gas I was using to drive 100 miles a day. I was still bumming off my parents for a roof and some grub. Reaching out to Wil was one of the best things that I ever did. It really helped my growth as a coach and grabbed my interest to open my own facility some day.
After interning for Wil that summer, I went back to finish my graduate work while taking a graduate assistant position. This was the only time when I didn’t do any work that was fitness related. However, my graduate assistant work gave me good managerial experience. Finally, in May 2014, I finished my coursework with the exception of an independent study due by August.
So here I am now…in the same position that I was in two years prior. I’m still pushing resumes and job applications while training a few clients from my parents’ garage, attending seminars, and working with a few online clients and Purdue Barbell. That is my journey in “exercise science.”
I’m here to tell you that this field, while growing, still has many flaws in its infrastructure. Strength and conditioning jobs are a revolving door and oversaturated with young professionals trying to break in. Personal training jobs tend to be part-time and with lousy pay while companies use your revenue to pay the bills. People are just flat out lazy and don’t want to exercise or already think they know everything about training. Personal training only requires a simple certification and $500 (making you fairly replaceable). If you get lucky, you might find a private facility and become an independent contractor, but this is hard and usually requires knowing people. You're also left to bring in clients.

I’m not trying to be harsh—just merely lay down the simple facts of the field. This field is hard and, if anyone tells you otherwise, he's full of shit. It isn't like nursing, engineering, or teaching. All your experience has to come on your own from internships (99 percent of which don’t pay). If you aren’t self-educating and training, you'll have a long road. It’s almost required to have a graduate degree and certifications to make it through the first cut of resumes. If you do have these, many see you as “overqualified” because they don’t want to bring in someone who may know more than they do. This is a very ego-driven profession, and people don’t want to share their so-called secrets or have someone knock them down a few pegs and teach them something.
If I were to go back and do it all over again, I would get a minor in business, marketing, administration, or writing/communication. Why? If you understand the business side, you'll likely stand a better chance at getting your name out and building more clients. If you go with the communication side, you can easily write and do speaking engagements or social media (and be qualified).
You have to be incredibly dedicated and truly want and love this profession if you want to make it. If you think an interest in "working out" and getting a degree while partying are enough, you’ll never make it in this field. It’s ruthless, it’s hard, and it’s all about networking and marketing.
While I’m not having the easiest time finding a job, I do love what I do as well as those I’ve had the pleasure of working with. It’s all a matter of patience and consistency and doing the intangibles that others can’t see to build character and value. When I do find a job, I sure as hell will have experiences to share in an interview that most can’t.
For those of you who are undergraduates in the field, I wish you the best of luck. Please don’t hesitate to reach out to me on the Q&A for any guidance. I’ll do whatever I can so that you aren’t stuck in my shoes at the end of the day.
I’m still not training LeBron James.
The emergence of raw powerlifting and CrossFit has popularized the front squat. Its popularity has surged by lifters posting YouTube videos of impressive lifts that, in turn, cause novices to realize the benefits of the front squat.
The front squat should not be taken lightly or seen as only a variation of the squat. It is very technical and comes with many issues that must be addressed prior to execution of the lift. In this three part series, I will discuss setup, grip and hand placements, execution, and other considerations for the front squat.
This final video, part three, shows other aspects of the front squat to consider. I discuss front squatting for raw vs. geared lifters, footwear options, and how to program the front squat into your training.
- (0:25) How to use the front squat as a max effort exercise
- (1:26) Raw vs. Gear
- (2:10) Olympic Lifting Shoes vs. Flat-Sole Shoes
I’ve also included a 10-week program below that you can use to increase your front squat or to build your competition squat.
Ramp Up Your Front Squat Program
*Note: the percent is of the weight you completed (it is not of your projected 1RM). Example: 200x3 so 86% = 170x3x3
Week 1
Front Squat – Work up to a three rep max; 86%x3x3
Front Squat, paused – 3x8
Reverse Lunges – 3x12 each leg
Leg Extensions – 2x20
Abs
Week 2
Olympic Squat – 5x5 (ramp up to one heavy set)
Pause Squat – 3x8
Close Stance Leg Press – 3x15
Abs
Week 3
Front Squat – Work up to a three rep max (attempt to beat week 1); 92%x2x3
Front Squat, paused – 3x6
Reverse Lunges – 3x10 each leg
Leg Extensions – 3x15
Abs
Week 4
Olympic Squat – 4x4 (ramp up to one heavy set)
Pause Squat – 3x6
Close Stance Leg Press – 3x20
Abs
Week 5 (Deload)
Front Squat – 3x5; technique work, keep very light
Leg Press – 3x20
Band Leg Curls – 3x20
Abs
Week 6
Speed Squat, paused vs. bands – 45%x8x2
Close Stance Squat – 3x8
GHR – 3 sets
Incline DB Shrugs – 3x15
Abs
Week 7
Front Squat – Work up to a heavy set of 5; 86%x2x6
Front Foot Elevated Reverse Lunge – 3x12 each leg
Leg Extensions – 3x15
Abs
Week 8
Speed Squat, paused vs. bands – 50%x5x2
Front Squat – 3x12
Chest Supported Rows – 4x12
Leg Curls – 3x15
Abs
Week 9 (Deload)
Goblet Squat – 3x15
KB Swing – 3x20
Band Leg Curls – 3x20
Abs
Week 10
Test new front squat 1RM
How should you incorporate front squats into your training? Try this 10-week program.
The emergence of raw powerlifting and CrossFit has popularized the front squat. Its popularity has surged by lifters posting YouTube videos of impressive lifts that, in turn, cause novices to realize the benefits of the front squat. The front squat should not be taken lightly or seen as only a variation of the squat. It is very technical and comes with many issues that must be addressed prior to execution of the lift.
In this three part series, I will discuss setup, grip and hand placements, execution, and other considerations for the front squat. In this video, part two, I have Joani execute the front squat while I give commentary on form and technical issues. I cover:
- (0:34) Back view of front squat execution
- (1:00) Breakdown of proper technique
- (2:00) Body position in the hole
- (2:18) Front view of front squat execution
- (2:43) Using elbow position to create tension in upper back
- (3:30) Coaching cues to remember
In our second of three on this series, we focus on the executing of the front squat, particularly form and technique.
The emergence of raw powerlifting and CrossFit has popularized the front squat. Its popularity has surged by lifters posting YouTube videos of impressive lifts that, in turn, cause novices to realize the benefits of the front squat. The front squat should not be taken lightly or seen as only a variation of the squat. It is very technical and comes with many issues that must be addressed prior to execution of the lift. In this three part series, I will discuss setup, grip and hand placements, execution, and other considerations for the front squat.
Here in part one, I show several grip and hand placements options. Your build and preferences will determine which option is the best to use. In this video I explain:
- (1:09) Clean Grip
- (2:00) Cross Grip
- (3:10) Strap Grip
- (4:00) How to setup for a strong unrack
As an athlete or Olympic lifter, the most popular squat variant would be the front squat. Learn the proper execution here.
I recently had an email conversation with a young man that wants to become a strength and conditioning coach. He still needs figure out the exact route he would like to take. I get social media messages all the time like this, and I’ve certainly taken an odd route to even to begin to attempt what I want to do. Here is the email conversation we had and hopefully you can take a little something away from it.
Note that some of the info has been removed due to confidentiality.
Student:
I'll be starting school in January so I'm interested in what you do. A little background about myself.. I'm 19 years old. I live in Illinois and I'm a powerlifter. I'm fortunate enough to train with _________ and I'm currently training for UPA Nationals February 16th. There I'll be aiming for ___/___/___ @ 198 raw with wraps. I'm very passionate about my lifting, along with helping others. I always have people coming to me for routines and such. As a favor, I always give them one. I truly enjoy watching others better themselves. I'm curious as to what you do, your schooling, and opinion on becoming a strength coach. Also, does a strength coach have a strength and conditioning certificate? Sorry to bother you. I just honestly have no one to push me in life' everything is self-motivated. So, learning more about a certain field will only give me confidence in finding what I'd like to do. Thank you for your kindness and time.
Me:
First, thanks for reaching out! Glad to hear and interact with a like-minded person. It looks like you're in good hands, and those will be some damn impressive lifts! So best of luck training for that!
Just to give you idea about me and what all I've done:
I attended Purdue University for my undergrad and earned my BS in Health and Fitness. I initially wanted to be a college strength coach, but after almost finishing undergrad I realized I wanted to open my own facility to work with mainly middle school, high school, and serious strength athletes. With that said, while at Purdue I got my CPT certification and began training clients at the student rec center for a job (for nearly two years!). This gave me great work experience and let me build my own philosophies and begin to apply what I had learned in undergrad. I self-educated through sites like elitefts.com and started competing in bodybuilding, and then powerlifting (I've done Olympic lifting as well, all at high levels rather successfully. I'm just better at powerlifting).
I have done multiple internships with hospitals, collegiate weight rooms, and private facilities. I know how all those are run and what they are like. After undergrad I enrolled to get my Masters at Indiana State University in Physical Education and Coaching (emphasis on strength and conditioning). I'll be finishing up my last semester in the spring. Over the summer I will do one more internship.
I am currently a GA at Rose Hulman, a small DIII school, and work in facilities and intramurals. I went this route to get managerial experience and facilities understanding so I know what I'll be up against when it comes to having my own facility. I also have my USAW certification to teach and coach Olympic lifts. I'm obviously sponsored by elitefts™ now, but also have a supplement sponsor, NutraBio. So I've got my hands in just about everything. I am currently registered to take my CSCS in the very near future (I'm awaiting my certification test date currently). So that's a bit about me.

As for becoming a strength coach, it really depends on what you want to do. If you want to be in the college sector you will need lots of collegiate intern experience, a CSCS certification after finishing undergrad, and need to enroll in a Masters program (and hopefully apply for a GA position). If you're wanting to get into the private sector, you're going to want to get internships in that area, but I still recommend an internship in a college setting at some point. You can still get great experience to help down the road. However, you will need to do some serious education on marketing and understanding client retention. Also try to get to know as many people as you can. They'll help you tons down the road.
If you're wanting to open your own place, this is going to be the most work. I'm currently starting my business plan/model and putting it on paper as soon as I'm done with finals this week. It's going to take me roughly three months to get a rough draft finished, then looked at by ________ and _______________ to work out the kinks. I've began buying equipment already and train out of my garage with that. So keep that in mind.
If you can get handed down stuff, you'll want to keep that. While doing the business plan stuff I will be attending more clinics and seminars, giving my own, and meeting with other people I know through elitefts™ to learn how I can start my facility. I'm currently focusing on how to get initial start-up costs (the hardest part). I do have a partner already in line (my girlfriend of nearly three years) and she has a similar background: same degree, lots of interning and work experience, powerlifter, etc. So, if you want a partner, find someone very similar to yourself. If you open your own place, a certification isn't needed, but will do wonders for you from a liability standpoint. It also gives you credibility.
I would suggest reading everything you can in the meantime and keep training. Your under the bar experience will hold a lot of weight (mine does, and that's why so many people reach out to me). All the above should result in a well-rounded experience to get you started. It really just depends on what you want to do. Either way, it's a ton of work for very little pay. If you're doing it for money, you're in the wrong field.
Student:
Thank you so much for taking the time to answer my question and give a genuine, lengthy response. Most of that was over my head, so I'll have to do some research on my half to understand it more.
I truly admire what you're doing. It's certainly something I'd love to do. Also, props on the sponsorships. It's a privilege to be sponsored, I'm sure you worked very hard for those. Hopefully I'll land one eventually. It's awesome to read through your credentials. You've done quite a bit and you're just getting started. I'll do my best to research in the near future and I'm sure I'll be hollering back your way with a few questions if you don't mind. I'm always looking to surround myself with positive and better individuals. It helps me become a better man and lifter. I'm sure you can relate.
I truly appreciate your time. Most are hesitant to help others, so thank you!
Me:
No problem, bud, and thank you for the support. I would say until you start classes, just keep reading sites like elitefts.com and training hard. Once you get started in classes it will all start to mesh and become clear on some of the steps you can take. Plan for each semester independently. For example:
- Focus on school work first. Learn your basics from classes like anatomy, physiology, biomechanics, kinesiology, etc. This will save you tons of time when it comes to studying for certifications and is the base for all other classes that will come later.
- Keep training, and think about how what you're learning in classes during that semester can apply to your training.
- Begin to look into personal training certifications and/or personal training jobs at the school rec by the end of the year. This will give you a chance for some money, easy work experience, and free clientele. Eait until the semester is coming to a close so you can use the classes you've taken thus far to nail the interview process.
- Keep up to date with strength and conditioning sites on the "what's new" and "who's who."
All that should keep you rather engaged and well ahead of your classmates!
Keep in touch, and feel free to shoot me any questions via email or on the elitefts™ Q&A! Best of luck!
The under-the-bar and academic experiences needed to become a successful strength coach.
I had originally decided not to write this article, but I thought it would be good to write off some frustrations and thoughts...and then go back and see how it would actually turn out. Clearly, since you are reading it, I decided to go through with it.
For the most part, many of us are connected with our families, and we know that they hold a special place in our hearts. I, for one, am no exception. My family has supported me and has helped me get to where I am today, and I honestly couldn't thank them enough. The one person who I couldn't live without, though, is my father, Jim (or Jimbo). We argue, fight, and have pointless debates, but I know that he only has my well-being in mind. He lost his father when he was 16 years old, and then he was drafted into the Vietnam War at 18, where he received a Purple Heart. I believe this is why he cares so much about me…even at 25 years old. He doesn't want me to go through what he had to. And I, in turn, commend him for being a terrific father (and soldier).
Recently, however, my father was diagnosed with spinal stenosis of the cervical spine. For those of you with minimal medical backgrounds, this is an abnormal narrowing of the spinal canal. My family began to notice issues with my dad’s walking and hand grip, especially on the right side of his body. At first we suspected the worst—a stroke, but thankfully this was cleared through the VA. However, this is when they asked to take a look at his spine. What they found were bone spurs, and these spurs were applying pressure to his spinal cord and causing numbness, tingling, and weakness.
The doctors at the VA in Indianapolis referred him to a specialist back home in order to get an MRI and greater detail on the situation. After the consultation, the specialist notified my dad that he needed surgery as soon as possible. My dad immediately freaked out and was in complete shock. Now, you must know that my dad is not a fan of medical professionals and surgery, so he was hoping for a quick fix in the form of medication. Still, the doctor booked my dad for surgery immediately because any traumatic movement to the cervical region, the doctor told us, could have potentially paralyzed him from the neck down—the fact that he had gone so long with no major issues was amazing.
Following his surgery, my dad was medicated...well, he was medicated out the ass. I remember him telling me to go outside and get him the paper...from the mailbox. He also said that it was time for me to go to class on a day that I didn't even have any classes. My dad is a funny guy, but this was priceless for the moment. The terrible part, however, was seeing how much pain he was really in once the meds began to wear off. There would be days when he would scream, yell, and cry while trying to do simple tasks. I commend my dad for his strength to persevere through the pain and be a strong guy, and I admire him even more for admitting that he needed inpatient therapy (so he could move better) after being home for only a few days.
Currently, he is out of inpatient physical therapy and is walking around with a cane. He attends physical therapy three times per week and is making tremendous progress with the right side of his body.

The reason behind this story is twofold:
Movement is a blessing
I didn't begin to realize how much I was taking my athletic capabilities and talents for granted until this occurred. Here was my dad—struggling to use the bathroom, while I was squatting 400-plus pounds on the regular. After seeing my dad fight to come back, I've personally made an oath to myself—an oath to never reach a state of inactivity and dependency upon others. I love pushing my body to its full potential; however, in my quest to get strong(er), I've lost sight of simple movement and how some could only dream of doing the basics again. In turn, I have been doing all that I can to help my dad become strong(er). For instance, I have been giving him some exercises that he can do at home with my bands in order to build up his hips, upper back, and his hand strength. And his progress has significantly increased!
Strength is not always measured in pounds or kilos
As strength athletes, we’re always measuring each other by how much weight was lifted, who has what world record, or who uses what gear. Yet, we often forget about those who are fighting to stay in this world, and we do not see the struggle they endure. Some of the most inspirational people in my life are not those who are popping up on my Facebook newsfeed with world records or phenomenal lifts. Instead, they’re the people who are working their asses off despite going through a nasty divorce. They're those people who are battling cancer, coping with unforeseen tragic accidents, or pursuing their dreams despite being broke as shit. These people are putting in more work than either you or I can even dream, and they're doing it just to survive. To hell with lifting and doing what you love—they’re doing this shit to prevent drowning in this world.
From watching my father suffer and regain abilities to do simple tasks, I've become very thankful for my ability to go out and compete and challenge myself. I believe that’s what powerlifting is all about. Sure, hitting PRs and bettering yourself are great rewards from the sport, but deep down I've come to realize that the ability to do these tasks is a blessing, and I’m beginning to see my training from a completely different perspective. I am even thankful for the days when training isn't optimal and I have to back off. Why? Because somewhere there is someone who is just wanting to be able to perform tasks by themselves. I’m thankful for the realization that I am able to help others improve their lives through strength training. This is why I love training—helping others improve their bodies, their quality of life, and to re-establish empowerment.
So, before you go lift during your next training session, go out and do something for someone who is not as fortunate. You could make someone’s day, week, month, year, or even life. Re-evaluate yourself (as I have), and see where you truly fall in the grand scheme of things.

Each day…every training session…is a blessing.
I’ve been training out of a college recreational gym for nearly seven years and I’ve picked up a few things that have helped me become a better lifter. I’ve traveled to train with some of the best lifters in the country, but being a student, I don’t have the funds to do this consistently and have no private gyms in my area that cater to my style of training. No piece of equipment is the “holy grail” to a PR, but as a competitive lifter I know that my training is serious and I’ll do all the little things I can.
Throughout my time training in a college recreational gym I’ve compiled great items from elitefts™. Even though these items work well for a college meathead, these items should also be a regular staple to anyone looking to improve their performance in any setting. Below is a video of 11 of those items and how you as a lifter can use them to improve your training and become Strong(er).
Eleven items you need to become strong(er).
If you are like me and read elitefts™ daily, then you probably have seen numerous posts about Carb Back-Loading, along with some pretty nifty recipe substitutions for the low carb portion of the diet plan. I personally love Carb Back-Loading, and it’s done wonders for my physique and my training. However, if you’re trying to stay relatively close to a weight class, eating all those crazy sweets isn’t always an option. And let’s face it, you usually get cravings for sweets on your off day...which is a total pain in the ass. Well, with some experimenting of my own, I have managed to make a nice low carb treat that really packs a punch to help in recovery and keep those lifts climbing. Behold! The recipe for seriously the easiest dessert that's not only delicious, but will also make you want to keep coming back for more. The best part is that you can take it to work, school, meets...just about everywhere you go!
What You’ll Need:
The following ingredients make one serving, but trust me, go ahead and make two or three!
- 1 scoop of Chocolate Whey Isolate Protein Powder
- 2-3 Tbsp of Organic Creamy Peanut Butter
- 2 Tbsp of Natural, Unsweetened Cocoa Powder
- A few pinches of Stevia
- ¼ Cup of Water
- 3-5 grams of Leucine Powder (optional)

How to Make it:
- Place the protein powder, cocoa powder, stevia, and leucine in a soup-size bowl.
- Add in ¼ cup of water.
- Mix with a fork or whisk until it resembles a battery-like texture. It should be a nice dark brown.
- Add 2-3 Tbsp of peanut butter and continue to whisk until the substance becomes a bit tougher.
- Enjoy! I like to stick mine in the freezer for 5-10 minutes to let it harden a bit more.

Bonus:
I don’t know about you, but who doesn’t enjoy cake? I know that in one of his videos Clint Darden mentioned eating a whole cake every few days if you’re trying to pack on pounds and get stupid strong. Well, if you’re one of those lucky guys (or gals), use the “pudding” as syrup. Simply microwave it in the bowl for about 30-45 seconds, pour it on top of your cake, and enjoy the surplus of calories with some extra protein. Besides, who eats meat with their cake anyways?
Be sure to let me know what you think!
This dessert is all that is chocolatey goodness…without the sugar buzz and immediate crash. Plus, it packs a protein punch!